Customer Page Interface
Overview
The Customer Page Interface provides a comprehensive, customizable grid system to manage customer data efficiently.
This system ensures up-to-date customer information and facilitates quick actions like filtering, editing, and notifying customers in bulk.
Key Features/Benefits
-
Customizable Grid System:
- Modify layouts to suit your needs.
- Apply filters to refine searches (e.g., filter by credit balance).
- Group data for better organization.
- Perform grouping and pivoting of data (similar to Excel functionality).
- Automatic background updates to ensure real-time data accuracy.
-
Robust Data Management Tools:
- Real-time updates ensure that customer information is always up-to-date.
- Bulk management options allow you to manage multiple customer records simultaneously.
- Integrated communication tools facilitate quick actions such as filtering, editing, and notifying customers in bulk.
-
Customer Indicators:
-
Warning Signs: Hover over warnings to identify potential issues (e.g., missing authentication sets or routing issues).
-
Last Call Details: Track the last time a customer was active.
-
Key Metrics
- Credit & Currency: Displays available balance in the system.
- Active Channels: Shows live active call channels.
- ASR (Answer Seizure Ratio): Measures the percentage of connected calls vs. total calls.
- Calculation: (Connected Calls / Total Calls) * 100.
- ACD (Average Call Duration): Calculates the average length of customer calls.
- Calculation: Total Call Duration / Total Number of Calls.
- PDD (Post Dial Delay): Measures the time delay between dialing a number and hearing the ringtone. A high PDD (e.g., 10 seconds) can indicate carrier issues.
- CPS (Calls Per Second): Displays the number of calls processed per second.
-
-
Search & Filtering
-
Search Box: Instantly find customers by entering keywords.
-
Filters: Apply specific criteria to narrow down search results.
-
-
Customer Management Functions:

-
Adding a New Customer: On the Customers page, you can perform several management operations. By clicking on
+button we can add customer (see Create Customers below for details.) -
Refresh Data: Refreshing the page, helpful when making edits or looking at real-time changes. This page is built as a web app, so some information will update automatically.
-
SQL: The SQL Query option allows you to run a query.
-
Bulk Upload: Upload multiple customers at once by importing a spreadsheet file (.csv file). Users can dynamically map columns (e.g., customer name, channels, status).
- Steps of bulk uploading:
- Click
Bulk Upload, thenUpload, find your customer file, and then clickOpen. - Right-click on the second row and select Start Row to show the first line of data (the first row is typically column headers).
- Right-click on each column to Map Columns to appropriate fields.
- Once you have filled out all the required fields, click Upload to Server.
- Click
- Steps of bulk uploading:
Note
- Before uploading the .csv file, please ensure that it doesn't contain any exponential or scientific notations. The inclusion of the notations will result in errors.
- You must include the Customer name and Currency as necessary columns in the.csv file for bulk uploading.
-
Bulk Edit: Select multiple customers and modify attributes such as Channels, Status, Flow Speed (CPS), Portal Access, and Country in bulk.
Change multiple customers to inactive in one action
-
Delete Customers: Select customers and confirm deletion with a prompt before removal.
-
?: Link to the documentation of the current page.
-
Send (Communication Tools)
-
Email Notifications: Select customers and send bulk emails. Customers don't see other recipients Use cases: Service downtime alerts, marketing updates, new product announcements.
-
SMS Alerts: Send instant SMS messages to selected customers. Use cases: System updates, routing issues, urgent notifications.
-
Steps to use Communication Tools:
- Select several customers using the tick-box selector on the left side of each row. (Customers aren't visible to each other in the sent message.)
- Click on "Send" at the top right then choose email or SMS.
- Fill in the Subject line and body details and send.
- Emails sent FROM the email address gets populated in Setup Settings, and TO every email address listed in Contacts for each customer.
- Each contact receives an SMS to their Mobile number.
Custom Email Servers
Change the outbound Email Server and SMS origination number in Setup Settings.
-
-
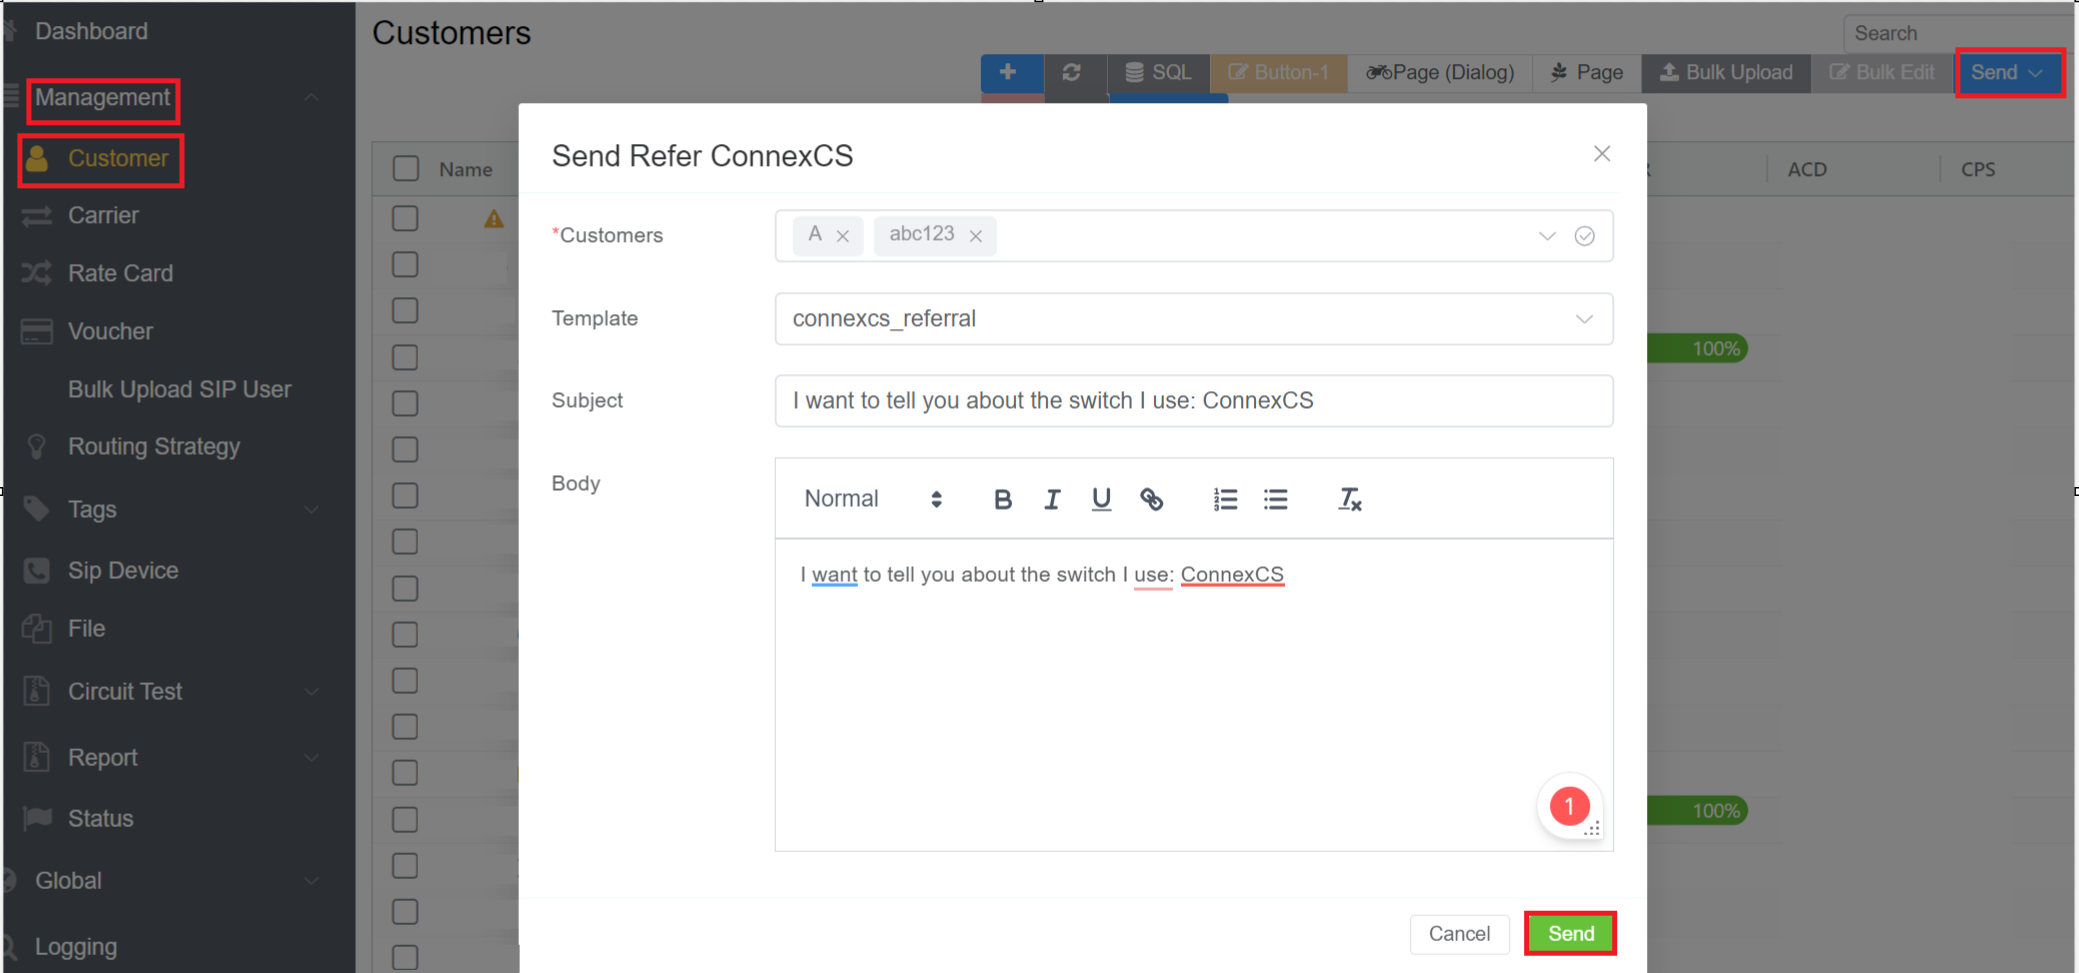
Refer ConnexCS: This feature allows you to send simple ConnexCS Referrals to you customers.
- You can send referrals to multiple Customers.
- You can select the Template from the drop-down list.
- Enter the Subject.
- Write the Body of the referral.
- Click on
Send.
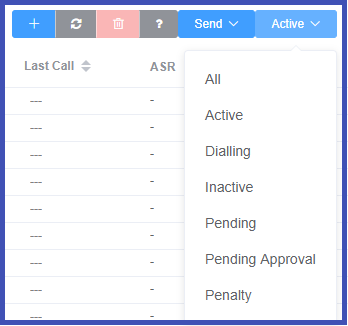
- Customer Status: View and update the status of a customer:
- All
- Active
- Dialing
- Inactive
- Pending
- Pending Approval
- Penalty
-