File
Document Metadata
Category: Customer / Information → Files / Documents
Audience: Administrators, Support Team, Customer Account Managers
Difficulty: Beginner to Intermediate
Time Required: 5–10 minutes
Prerequisites: Access to the ConnexCS control panel under a customer account; appropriate permissions to upload or manage customer files
Related Topics: Document Guide — overview of document types, Customer Portal Documents — how customers view files.
Next Steps: Use the Files section to upload required documents (e.g., contracts, proof-of-identity, invoices), then manage or request additional customer documents via the customer account interface.
Management File
Overview
The File module provides a centralized location for managing media and other files used throughout the platform.
You can organize files into folders, upload new content, and access resources required by various services such as recordings, voicemail, provider cards, and public assets.
The File section can store a variety of files, including (but not limited to) audio files for PBX (Private Branch Exchange), rate cards, or a logo for your portal.
Directory Overview
The following folders are available by default:
| Folder | Description |
|---|---|
recording |
Stores call recordings generated by the platform |
public |
Contains publicly accessible files that can be referenced by applications or services |
archived-cards |
Stores archived card files for historical reference |
audio |
Contains uploaded audio files such as prompts, announcements, or IVR recordings |
provider-cards |
Stores provider card files used by the routing platform |
voicemail |
Stores voicemail recordings left by callers |
!!! Note |The available folders may vary depending on your deployment and enabled features"
Add new file(s)
- Navigate to Management File Public then click
Uploadat the top of the page and add the logo. - Navigate to the desired directory, select one or more files, then click
Open. - The file should appear as the next item on the list if the upload is successful. (You made need to refresh the list.)
File Menu
The File menu provides options for uploading and previewing files within the Files module.
| Option | Description |
|---|---|
| Upload | Upload one or more files to the currently selected directory |
| Preview | Opens a preview of the selected file. This option is only available when the selected file type supports previewing |
| Preview As | Opens the selected file using a specific preview format or viewer, when supported. This option is disabled if no compatible preview is available |
Edit Menu
The Edit menu provides actions for selecting files, copying file information, and managing selected items.
| Option | Description |
|---|---|
| Select All | Selects all files and folders in the current directory |
| Deselect All | Clears the current selection. This option is enabled only when one or more items are selected |
| Copy Path | Copies the full path of the selected file or folder to the clipboard |
| Copy Download URL | Copies the direct download link for the selected file. This option is available only for downloadable files |
| Delete | Permanently deletes the selected file or folder after confirmation. This option is enabled only when an item is selected |
View Menu
The View menu allows you to customize how files and folders are displayed within the Files module. It also provides options for refreshing the current view and adjusting display preferences.
| Option | Description |
|---|---|
| Refresh | Reloads the current directory and updates the displayed files and folders |
| Grid View | Displays files and folders as icons in a grid layout |
| List View | Displays files and folders in a detailed list format |
| Tree View | Displays the folder hierarchy in a navigation tree for easier browsing |
| Show Thumbnails | Displays thumbnail previews for supported file types |
| Show Hidden Files | Displays hidden files and folders within the current directory |
| Full Screen | Expands the file manager to occupy the entire browser window |
| Persist Path | Remembers the last accessed directory and automatically reopens it the next time the Files module is accessed |
| Metric Units | Displays file sizes using metric (decimal) units (KB, MB, GB) instead of binary units |
Go Menu
The Go menu provides navigation options for moving between directories and quickly accessing specific locations within the Files module.
| Option | Description |
|---|---|
| Forward | Moves to the next directory in the navigation history. This option is enabled only after navigating back |
| Back | Returns to the previously visited directory |
| Open Containing Folder | Opens the parent directory of the currently selected file or folder. This option is available only when applicable |
| default | Navigates directly to the default (root) directory configured for the current user |
| Go to Folder | Opens a dialog that allows you to navigate directly to a specified folder path |
Help Menu
The Help menu provides access to file manager preferences, keyboard shortcuts, and application information.
| Option | Description |
|---|---|
| Settings | Opens the file manager settings, allowing you to customize its theme and defualt settings |
| Shortcuts | Displays a list of supported keyboard shortcuts for quicker navigation and file management |
| About | Displays information about the file manager, including the application version and other details |
Sorting & Display Options
The Sorting & Display Options panel allows you to control how files and folders are sorted and filtered within the Files module. These settings help you quickly locate specific files or customize the directory view.
You can sort by Name, Date, or Size in ascending or descending order.
Display Filters: Choose which items should be displayed in the current directory.
| Option | Description |
|---|---|
| All Items | Displays both files and folders |
| Files Only | Displays only files, hiding all folders |
| Folders Only | Displays only folders, hiding all files |
Enable Show Hidden Files to display files and folders marked as hidden.
Click Reset to restore the default sorting and display settings. This clears any custom sorting or filtering applied to the current view.
Integration of logo
- Navigate to Setup Integrations Portal.
- Click on the name of the Domain you want to integrate the logo.
- A dialog box will appear, click on Advanced option.
- Then click on Upload logo and
Saveit.
Recommended dimensions of the logo: height: 75 px and width: 300 px.
Upload Errors
If an error occurs, check your browser settings and operating system for things like firewalls or pop-up blockers which may prevent uploads of a certain type.
Specific file type functions
- Text to Speech: Under Audio files, select
 . Enter the text, select the voice, and define the file name. To preview the audio, select
 Play Voice. When the audio is ready, clickSave. In addition, we also support SSML for our TTS. - Download: Use
Downloadto download a file you've selected.
Remove files
Select a file from the list and then click the trashcan button.
Auto Archival
We support the automatic archival of rate cards.
These can be downloaded in .csv format for convenient access and record-keeping.
SFTP Access
Overview
SFTP (Secure File Transfer Protocol) allows users to securely access and manage files stored within the ConnexCS File System.
Using an SFTP client, users can connect directly to their ConnexCS storage and perform file operations such as:
- Downloading call recordings
- Accessing voicemail files
- Managing uploaded audio files
- Retrieving files from the File System
- Uploading, modifying, or deleting files (subject to permissions)
- Performing bulk file transfers
- Automating backups and integrations
SFTP access provides an alternative to the web-based File Manager and is particularly useful for bulk file operations, automated workflows, and third-party integrations.
Prerequisites
Before connecting via SFTP:
- SFTP access must be enabled for your account.
- You must have a valid ConnexCS account.
- An SFTP client must be installed.
Supported clients include:
- WinSCP
- MobaXterm
- FileZilla
- Cyberduck
- OpenSSH Command Line
How to enable SFTP access?
- Login to your account.
- Navigate to
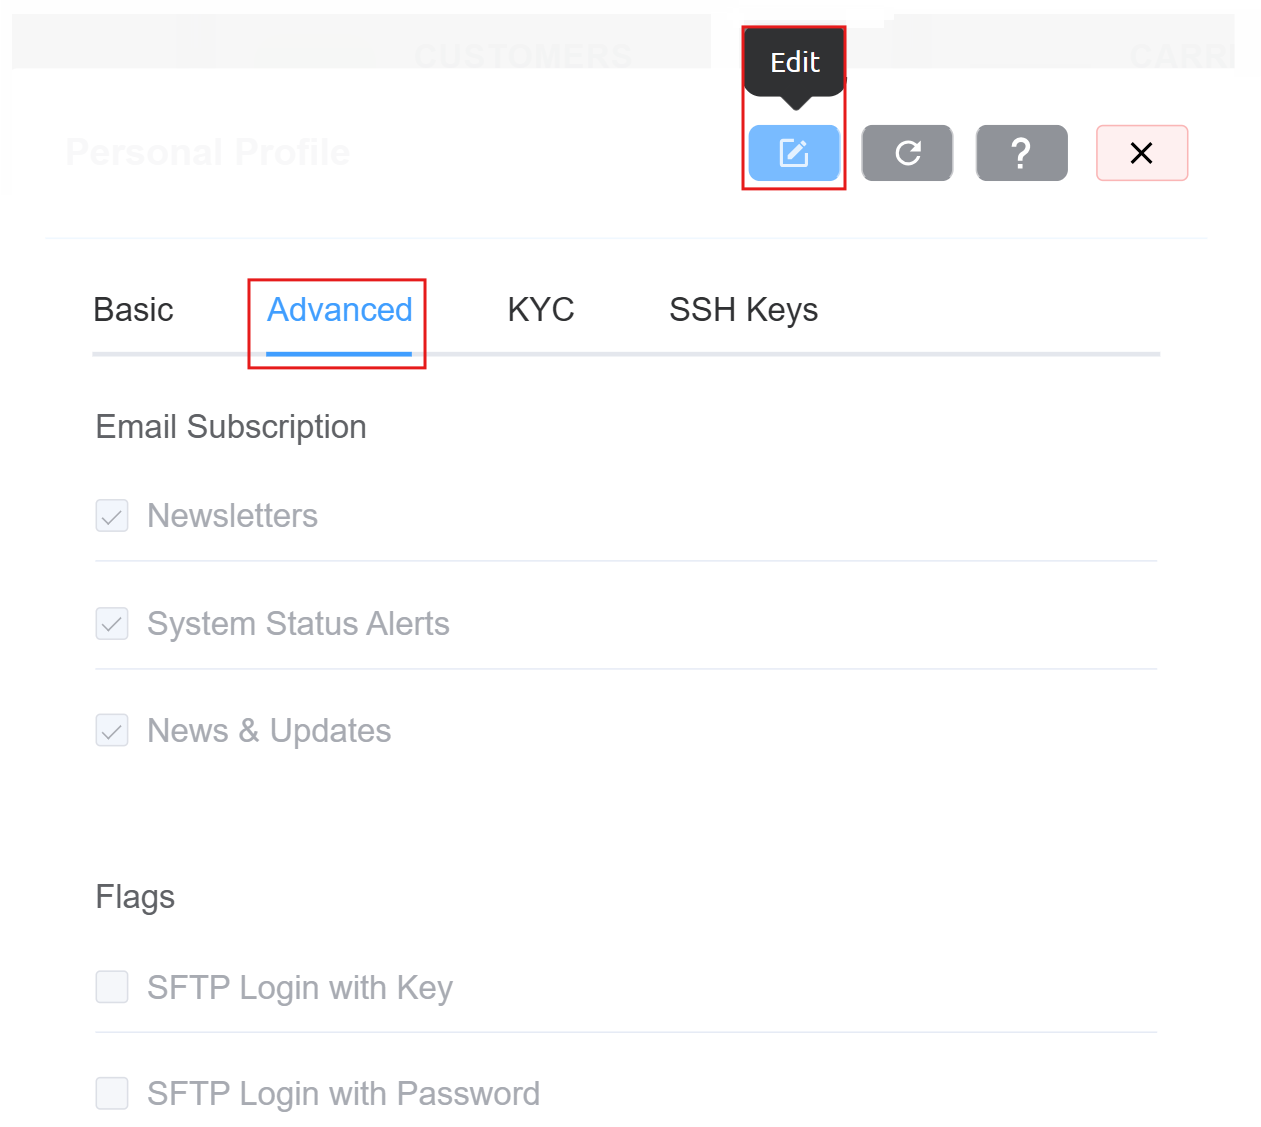
Profile :material-menu-right: Advanced. Click onEdit.
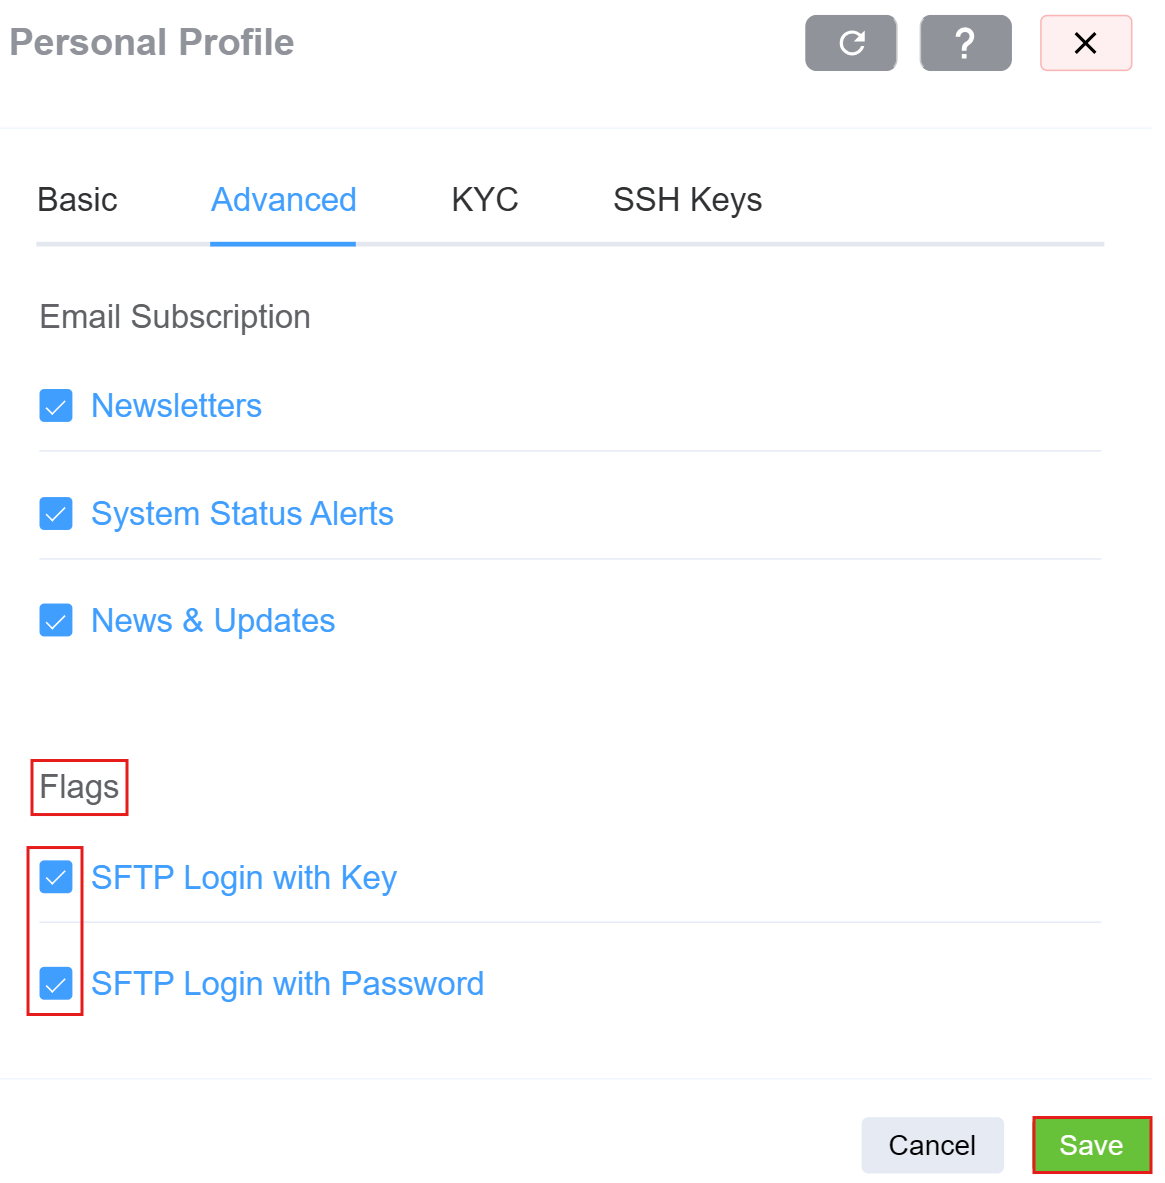
- Enable the
Flags. ClickSave.
Authentication Methods
ConnexCS supports the following authentication methods:
Username and Password
Users can authenticate using the same credentials used to log in to their ConnexCS account.
SSH Key Authentication
Users can optionally authenticate using SSH public/private key pairs.
SSH key authentication provides enhanced security and eliminates the need to enter passwords.
Configuring SSH Keys
To authorize an SSH key:
- Login to your account.
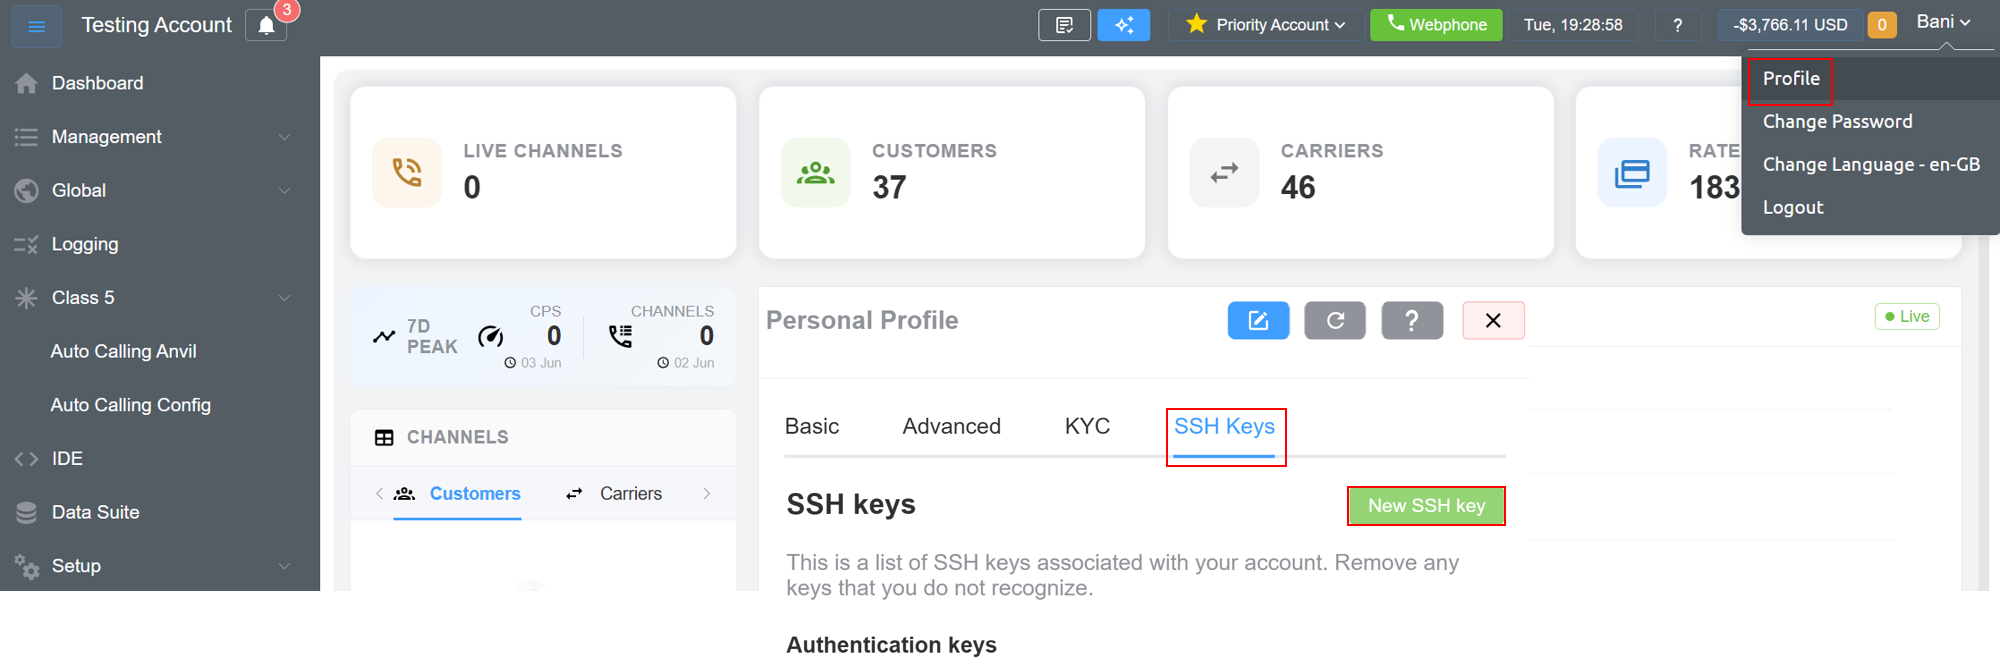
- Navigate to
Profile :material-menu-right: SSH Keys. - Create a
New SSH Key.
-
Enter
KeyDetails:- Key Name (Identifier)
- SSH Public Key
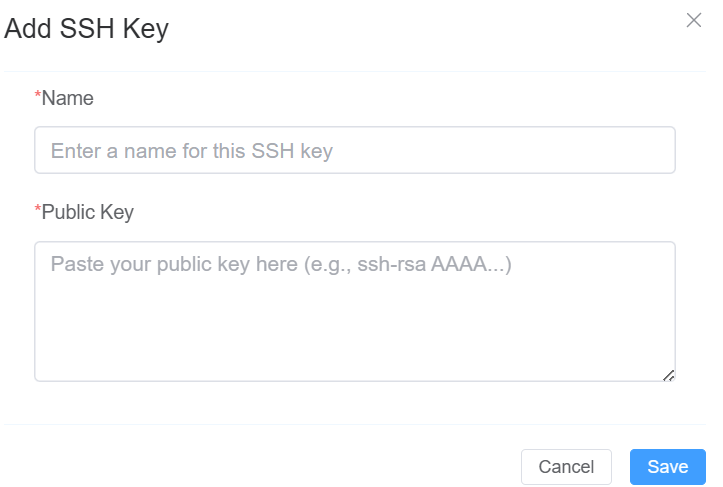
Only the Public Key should be uploaded. Never upload your Private Key.
-
Click on
Save. After saving, the SSH key becomes available for SFTP authentication.
SFTP Connection Details
Use the following connection settings:
| Parameter | Value |
|---|---|
| Protocol | SFTP |
| Host | sftp.connexcs.com |
| Port | 22 |
| Username | Enter the username (ConnexCS email) you use to sign in to the ConnexCS Control Panel |
| Authentication | Password or SSH Key |
Connecting Using Username and Password
- Open your preferred SFTP client.
-
Configure the connection:
Setting Value Host sftp.connexcs.com Port 22 Username Your ConnexCS Username (email) Password Your ConnexCS Password -
Click Connect. The system will authenticate using your standard ConnexCS login credentials.
Connecting Using SSH Keys
- Upload your Public SSH Key to ConnexCS.
- Open your preferred SFTP client.
-
Configure:
Setting Value Host sftp.connexcs.com Port 22 Username Your ConnexCS Username (email) Authentication SSH Key -
Select the corresponding Private Key from your local machine.
- Click Connect.