Main
Document Metadata
Category: Customer Account Management
Audience: Administrators, Engineers, Support Team
Difficulty: Intermediate
Time Required: Approximately 30–60 minutes
Prerequisites: Active ConnexCS Control Panel account with permission to edit customer-account settings
Related Topics: Customer – Create & Configure, Documents (KYC & File Upload)
Next Steps: Contacts — Add & Manage Customer Contacts, Internal Number Block — Setting Extension Ranges
Management Customer [Customer Name]
The first tab in a Customer account is Main.
As the name suggests it allows you to manage the critical customer functions.
It offers a comprehensive set of tools to manage customer accounts, including the addition of customer contacts, invoice generation, summary reporting, and internal number allocation.
Why and When do we need the Main section?
- User-Friendly & Flexible System:
- Offers customizable options such as number blocks and verification.
- Improved Organization & Accountability:
- It helps in managing customer's contacts.
- Allows multiple logins with unique credentials for each contact.
- Provides authentication and password management options to secure customer access.

By clicking the dropdown next to the customer's name, you will be redirected to the selected customer's portal. For more information, see Access Customer Portal.
Contacts
The Contacts section allows you to manage individuals associated with a customer account.
Each customer can have multiple contacts, providing better visibility and accountability within an organization.
Global Contacts
Contacts can also be modified in Global Contacts, which displays all Customer Contacts.
Add Contact
Click to the right of Contacts.
-
Name: The contact's real name.
-
Email: This is the contact's login and a means to contact them.
-
Phone or Mobile: To communicate with the contact.
-
Contact Type: This field is only used for informational and organizational purposes; there is no additional function for it.
-
Auto Generate Password: Select this to have a password generated online and sent via email. Deselect the box to enter a password manually.
Login and Access Controls
- Each contact can have their own login credentials.
- Actions taken by a contact are logged for accountability.
- Multiple logins help track system changes by different individuals.
-
Public Notes: Display on the Customer Portal and is visible to customers.
-
Private Notes: Display in the Control Panel and its internal-only for administrative purposes.
-
Mobile Verified and Email Verified: Manually set the status for each. Check in the Customer Details to confirm if the Mobile and Email are verified. Alternatively, the customer can do this in the Customer Portal.
-
IP Whitelist: Applies to Contacts accessing the Customer Portal.
- If IP whitelisting is configured:
- The contact may log in only from the whitelisted IP address(es).
- Login attempts from non-whitelisted IP addresses will be denied.
- If no IP restriction is configured: The contact may log in from any IP address.
- Purpose: This restriction secures customer-level access to the portal.
- If IP whitelisting is configured:
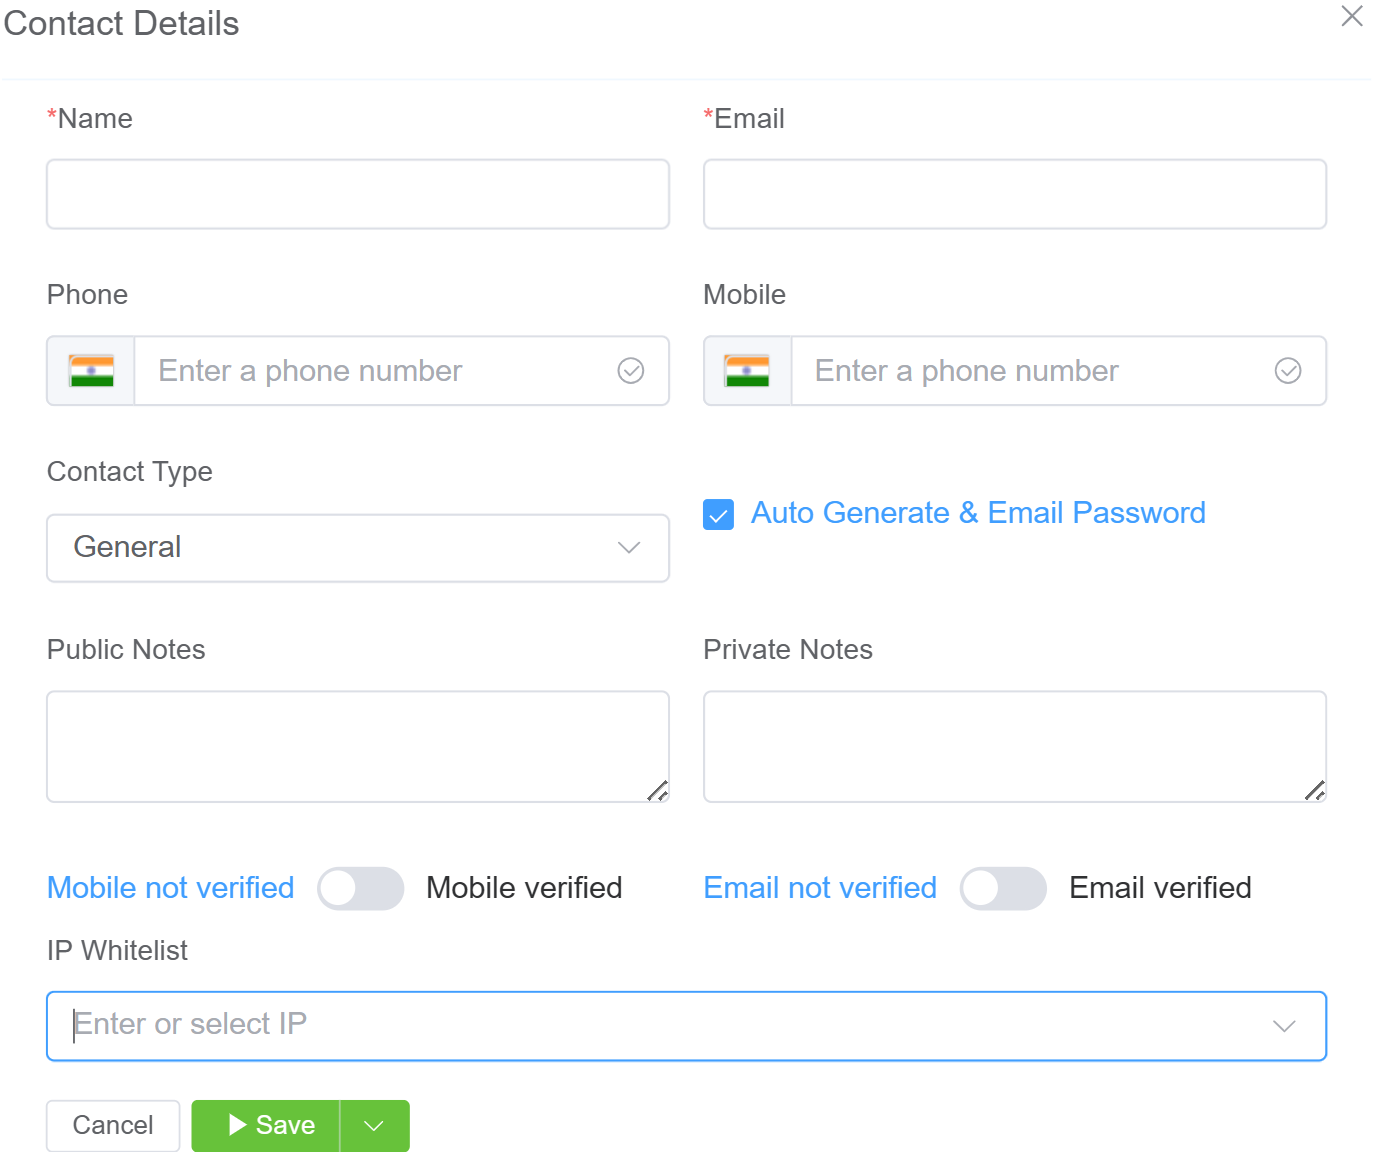
Click Save to add the Contact.
Save Options
- Save and Continue: Exit the Customer screen
- Save and Stay: Save the customer, but stay in the screen (helpful when adding multiple Customers at a time)
- Delay and Save: Select a time to elapse before saving the Customer, delaying the setup or change.
Warning
DO NOT save passwords in either of the Contact Details notes fields.
Reset Contact Password
Follow these steps to reset a Contact password:
- Click the blue
down arrowto the right of the Contact. - Select
Change Password. - Select
Auto Generate & Email Passwordto email the random password to the contact's email address, or deselect it and enter the password manually. If auto-generate is disabled, an administrator must manually set a password. Save.
Access the Customer Portal
It's necessary to view the Customer Portal for issues or questions they may have.
To access the Customer Portal:
-
Click the blue
down arrowto the right of the Contact. -
Choose
Portal Login.
This will load the Customer's Portal.
Internal Number Block
Assign an Internal Number Block to define the range of numbers a Customer can use for setting up SIP Extensions (see SIP Authentication for configuration details).
The Internal Number Block ensures number allocations are managed efficiently.
Key Features/Benefits
-
Namespace and Extension Management:
- Each customer operates within a unique namespace.
- Duplicate extensions across multiple customers are prevented.
-
Number Allocation:
- Without a Number Block: Any extension can be added without restrictions.
- With a Number Block: Extensions must be chosen from a predefined range.
- Administrators can assign number blocks to specific users.
Steps to implement Internal Number Block
- Click next to Internal Number Block
- The next available Number Block is assigned.
- Numbers from the assigned range is then available in Customer Auth for IP or SIP users, and in Class5 Conference.
Why Define Internal Number Blocks?
-
Within each Account are multiple Customers, each will likely have more than one Contact.
-
SIP Extensions are unique for the Account, not for individual Customers.
-
Without defined Internal Number Blocks, there is the risk of a Contact attempting to use an extension that's already in use by another Customer or Contact.
-
With Internal Number Blocks defined, each Customer will have a predetermined list of Usernames to select for SIP Authentication.
Number Range parameters
The Number Range Start and Block Size must be defined under Settings Options before an Internal Number Block can be assigned.
Summary
Displays the Summaries of calls in 24 hours, Daily, Weekly, and Monthly formats in 24-hour UTC. This data is updated hourly.
| Field | Description |
|---|---|
| Date | Represents the reporting period based on the selected view |
| ASR (Answer-Seizure Ratio) | Percentage of successfully connected calls out of total call attempts |
| ACD (Average Call Duration) | Average duration of connected calls |
| Profit | Net profit generated from calls |
| Profit % | Percentage margin expressed as a percentage |
| Customer Charge | Total amount billed to the customer |
| Attempts | Total number of call attempts made |
| Connected | Number of successfully connected calls |
| Duration | Total duration of all connected calls |
| Billed Duration | Total duration used for billing purposes (may differ due to rounding rules) |
| Action | Used to generate invoice |
You can perform the following functions with this data:
-
Sum and Average: Select multiple cells in a column to get sum and average values (not a true average, but an average of averages).
-
Export Data: Select data from multiple columns and rows, then right-click to
Copy,Copy with Headers,Copy with Group HeadersorExport. -
Generate Invoice: Select one or more checkboxes under Action, and then select
Generate Invoicein the upper right corner. This will create the invoice based on the Summary time frame (Daily, Weekly, Monthly) which can then be queried by a billing system. -
Auto Generate Invoice: Select this to generate an invoice based on the settings found in the Customer configuration (Edit Config Invoice Schedule) for any that are missing.
-
Download CDR Report: You now have the option to Download the CDR report in the .csv format. You can download the CDR report as a Daily, Weekly or Monthly time-frame. You just need to click on the download icon
 .
.
Data used for billing
The data found in the Customer Summary section is considered valid for billing purposes. The same data may be found in other parts of the system, but you shouldn't use it for billing.