App Store
Document Metadata
Category: Setup / Application Store & App Deployment
Audience: Administrators, Engineers, Product Team
Difficulty: Intermediate
Time Required: Approximately 30–60 minutes
Prerequisites: Active ConnexCS account with Setup privileges; basic understanding of the Apps platform and deployment process.
Related Topics: Apps Platform – Applications
Next Steps: Install the required app from
Setup → App Store, complete its basic configuration, and then verify it works correctly in your environment.Setup App Store
The ConnexCS App Store lets you discover, download, and install applications on your user account.
Apps created using the IDE are available for use in the App Store when published.
Apps can be created by other customers or developers and used by ConnexCS's customers.
Steps to install Apps
- Login to your account. Navigate to Setup App Store. Click on the App you wish to install.
- Click on Install.
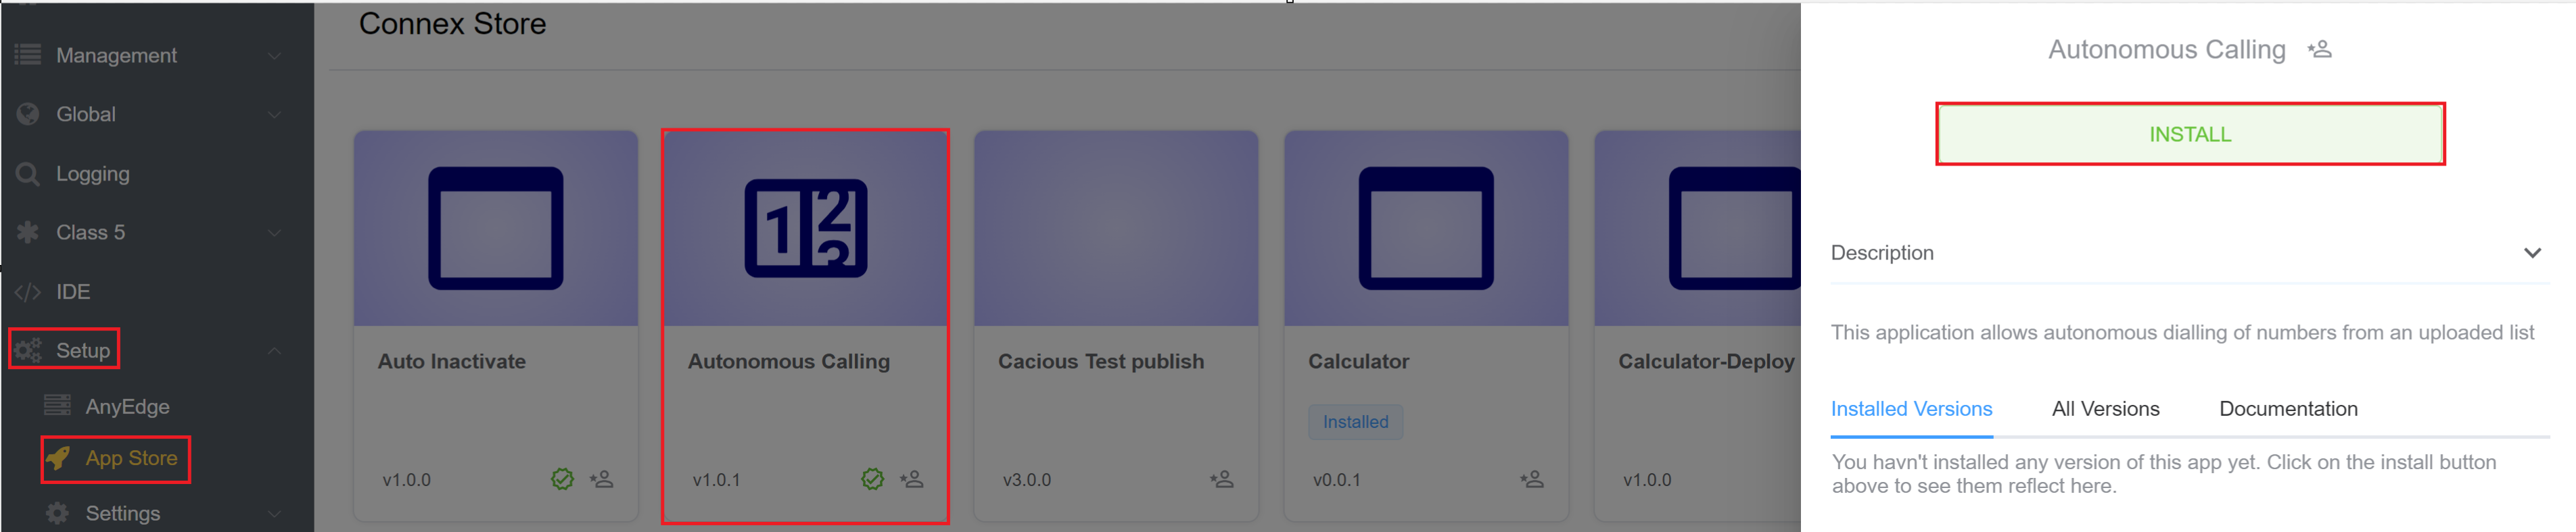
3.After hitting the 'Install' button, a window appears with two fields. The first field is 'App Name', where you can either change the name of the application or keep it the same. The second field allows you to select the Version of the application.
4.Click on Install and the App will be installed on your user account.

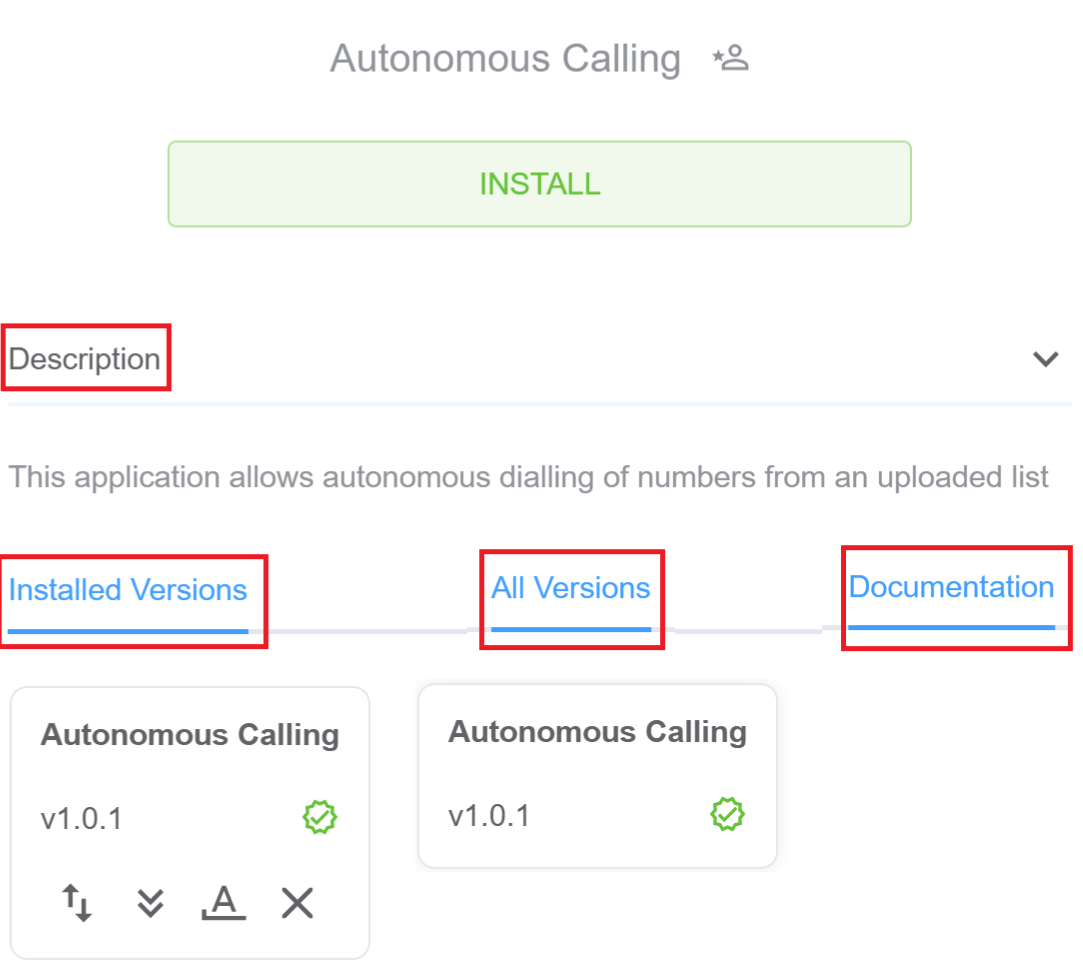
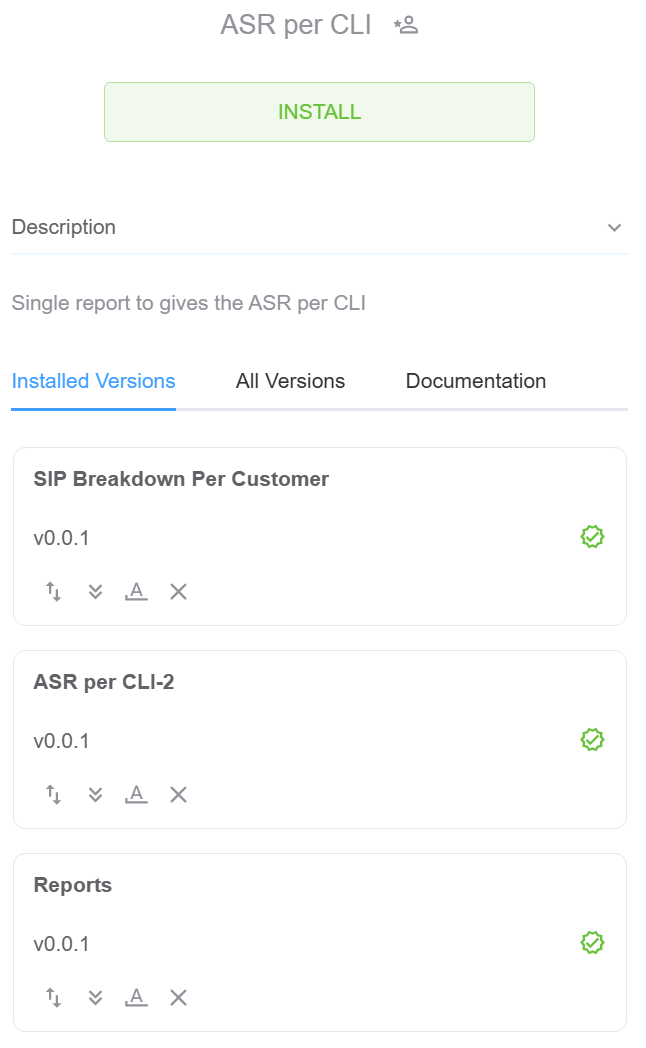
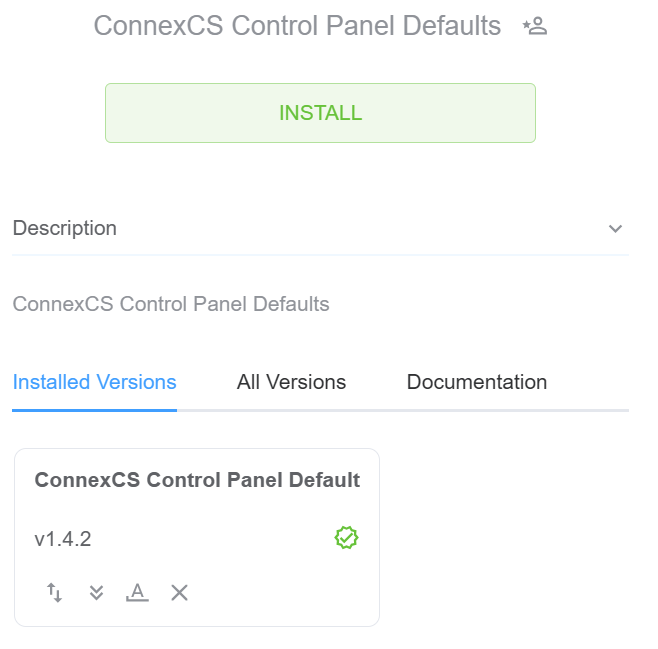
5.You can view the Description, Installed Versions, All Versions and any Documentation related to the Application.
Note
See this icon?  . It means you built this application and the ownership belongs to you.
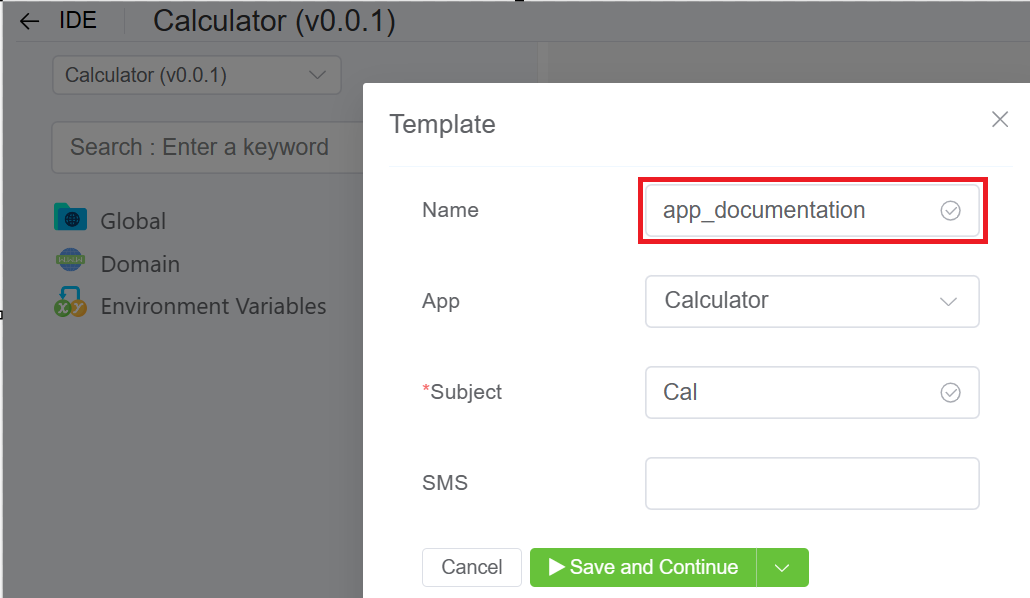
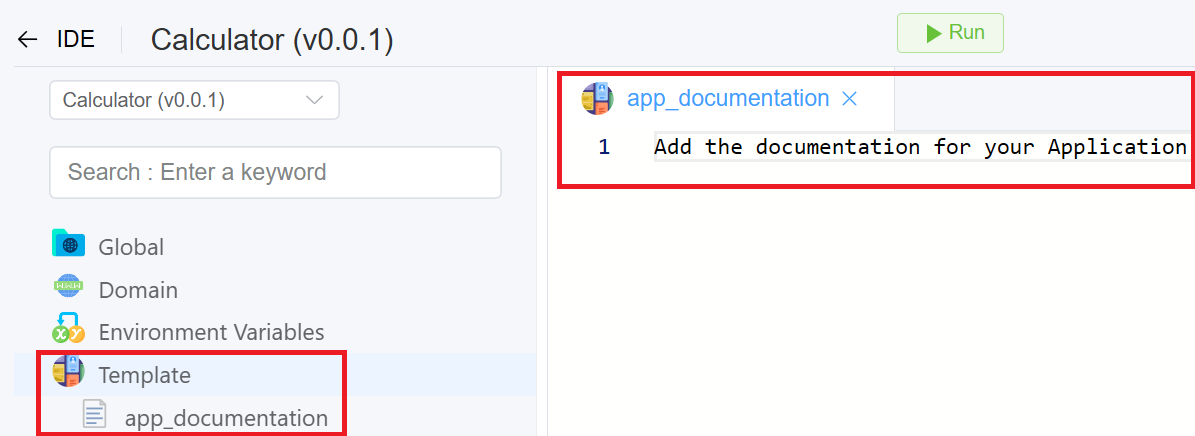
How to Display documentation for your Application
- You can add information about your specific application by using the Template component in the IDE section.
- Click here to follow the instructions on how to create a template and add documentation, however, note that template name should actually be app_documentation.
Useful Tools and Applications
DID Spam Score
Overview
This application helps you update the spam score of your DIDs and send a report to the provided email ID.
Please note that this service is chargeable. Check Pricing here.
Prerequisites
Before using the app, ensure that the Spam Score package is added to your account.
Steps to Use the App
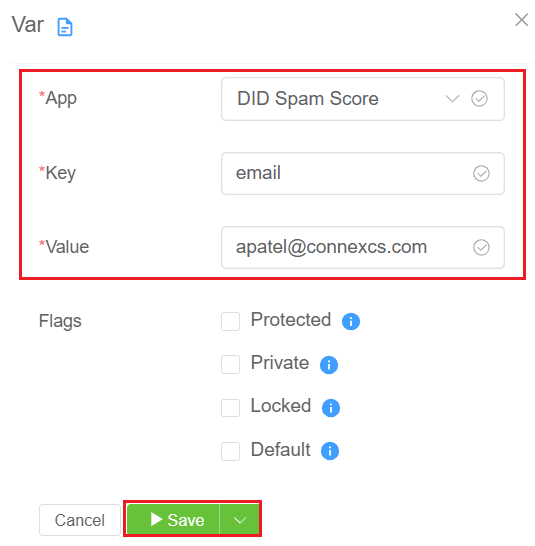
- Setup Email that will be used as API user.
- Navigate to IDE DID Spam Score App Environmental Variables.
- Locate the
cx_api_uservariable.
- Enter the email address you use to log in as the value.
- Select DIDs for Spam Score Check.
- Navigate to Global DID.
- Select the DIDs you want to check.
- Once selected, click on the
Spam Score buttonat the top of the page.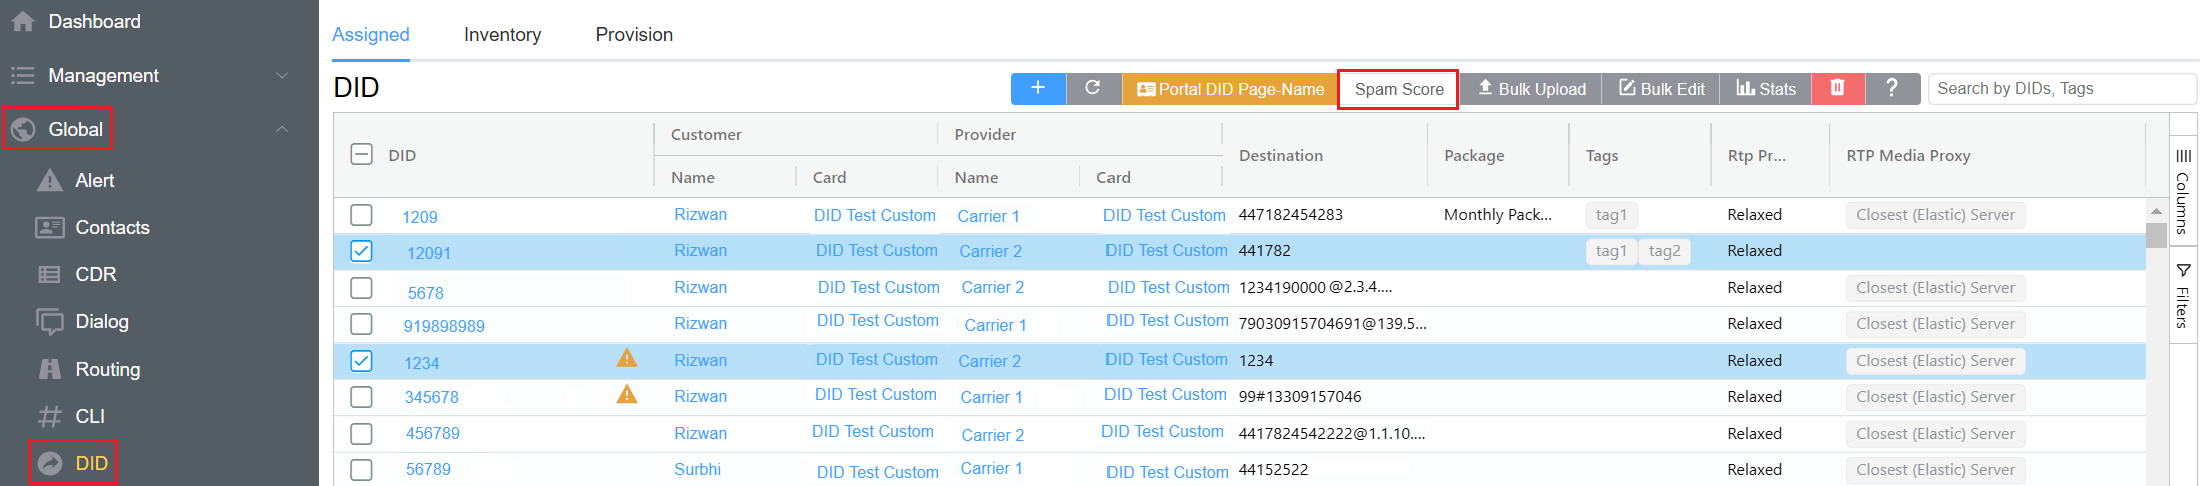
- Send the
Spam Score Report. - After clicking the Spam Score button, you will be prompted to enter the email address to which the DID spam report will be sent.
- Enter the desired email address and click
Spam Scout.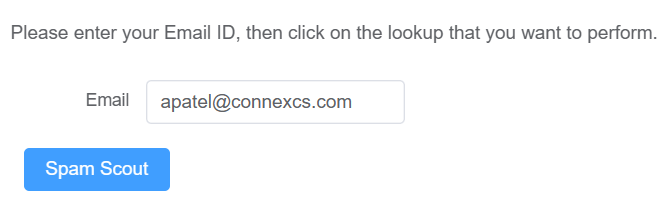
Autonomous Calling
Overview
This application allows autonomous dialling of numbers from an uploaded list.
Steps to Use the App
- Navigate to Setup App Store Autonomous Calling and click
Install.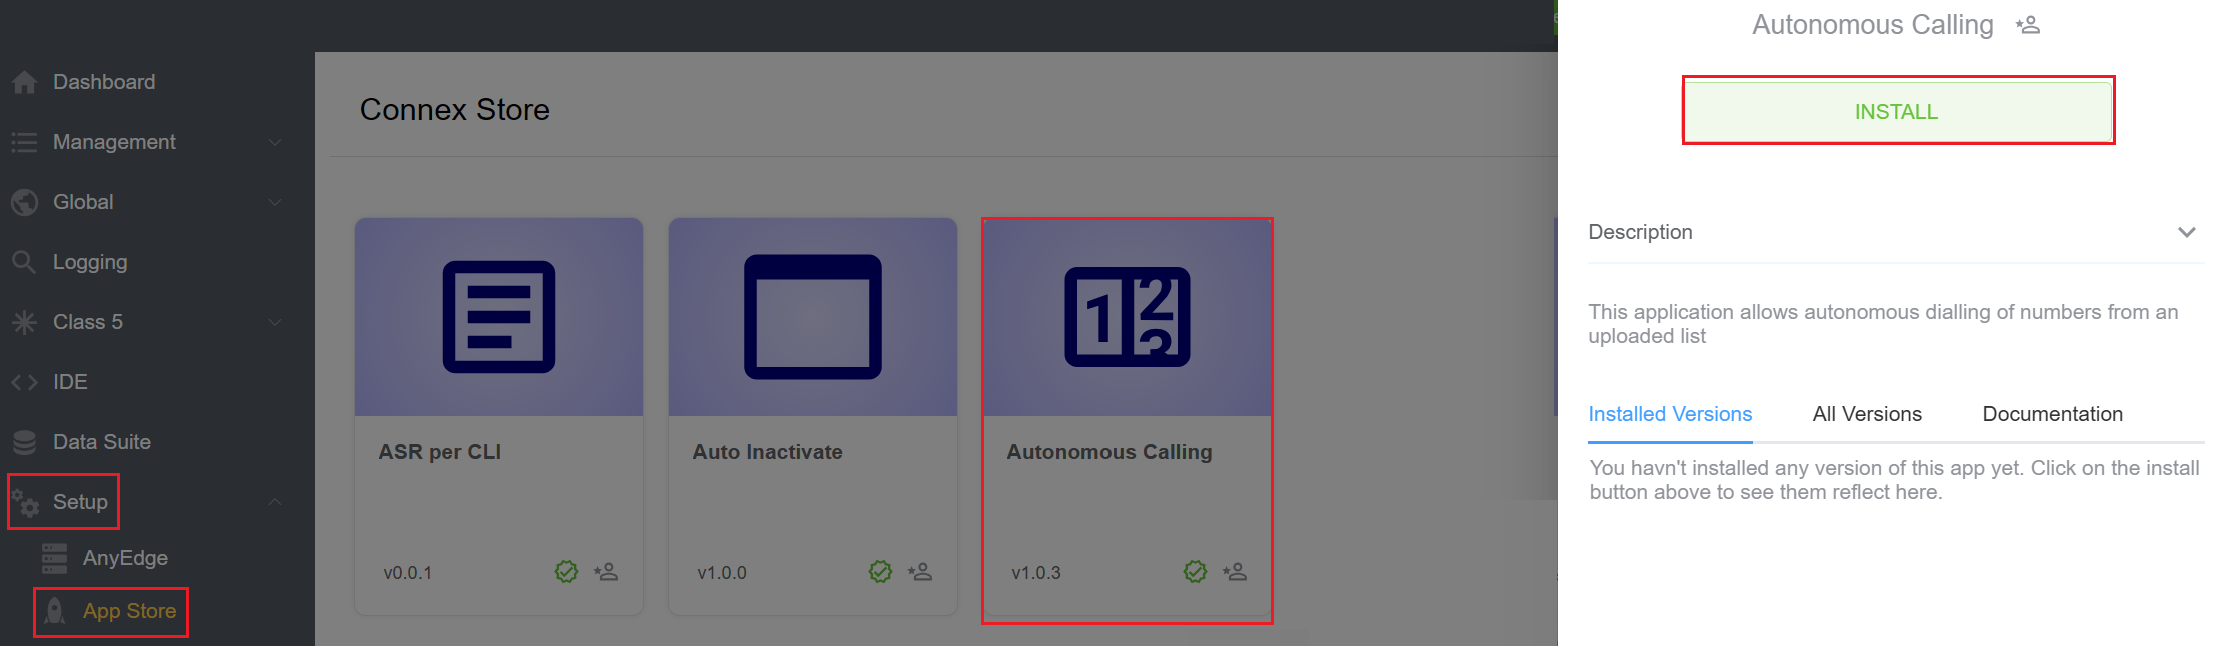
- A window will appear, select the version of the app and hit
Installagain.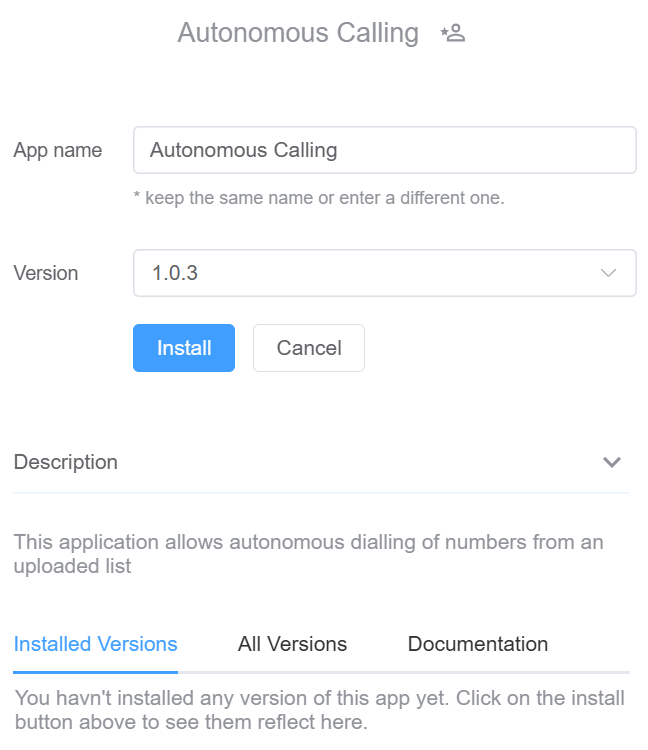
- After refreshing the Control Panel, the
Auto Dialbutton will appear on the side bar. - Click
Auto Dial, thenConfigto setup the calling process.- Select the
Customerfrom the drop-down. - Enter the
Outbound Serverin use. - Enter the extension in the
Endpointfield. - Enter the
CLIand clickConfirm.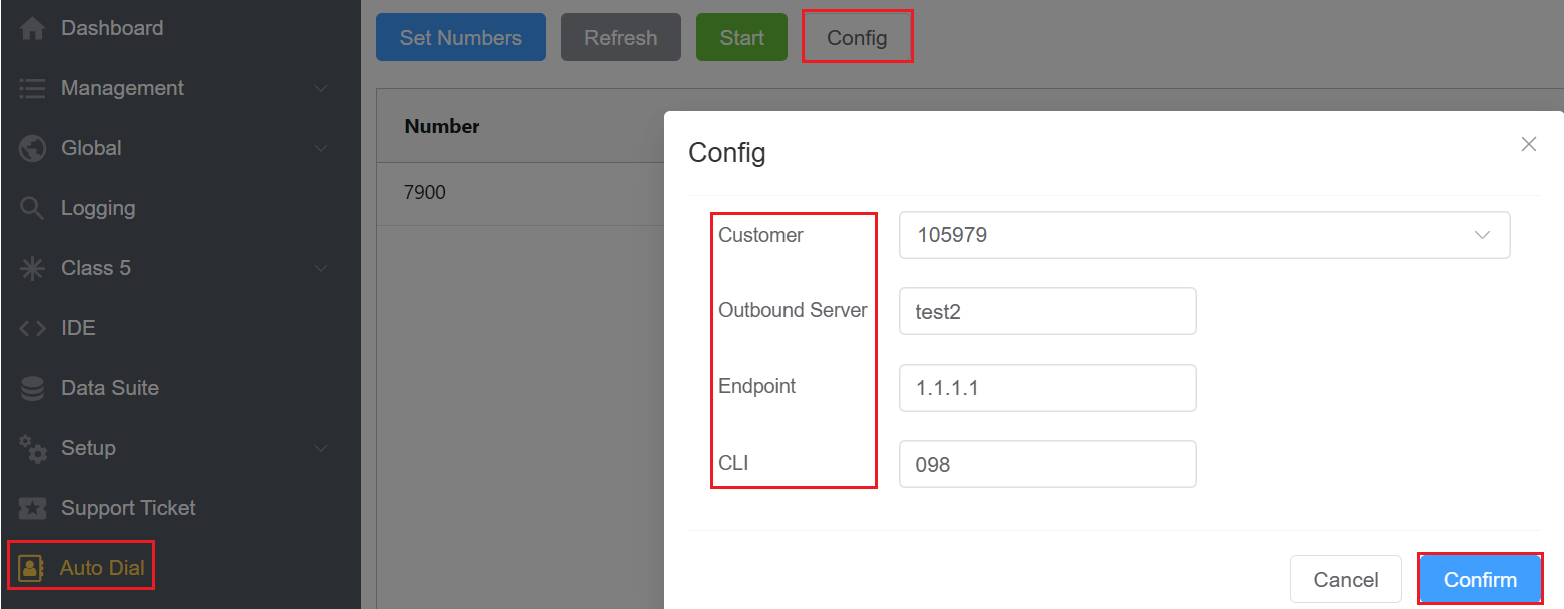
- Select the
- Click on
Set Numbersto add the number list for the autonomous dialing process. Click onSave Numbers.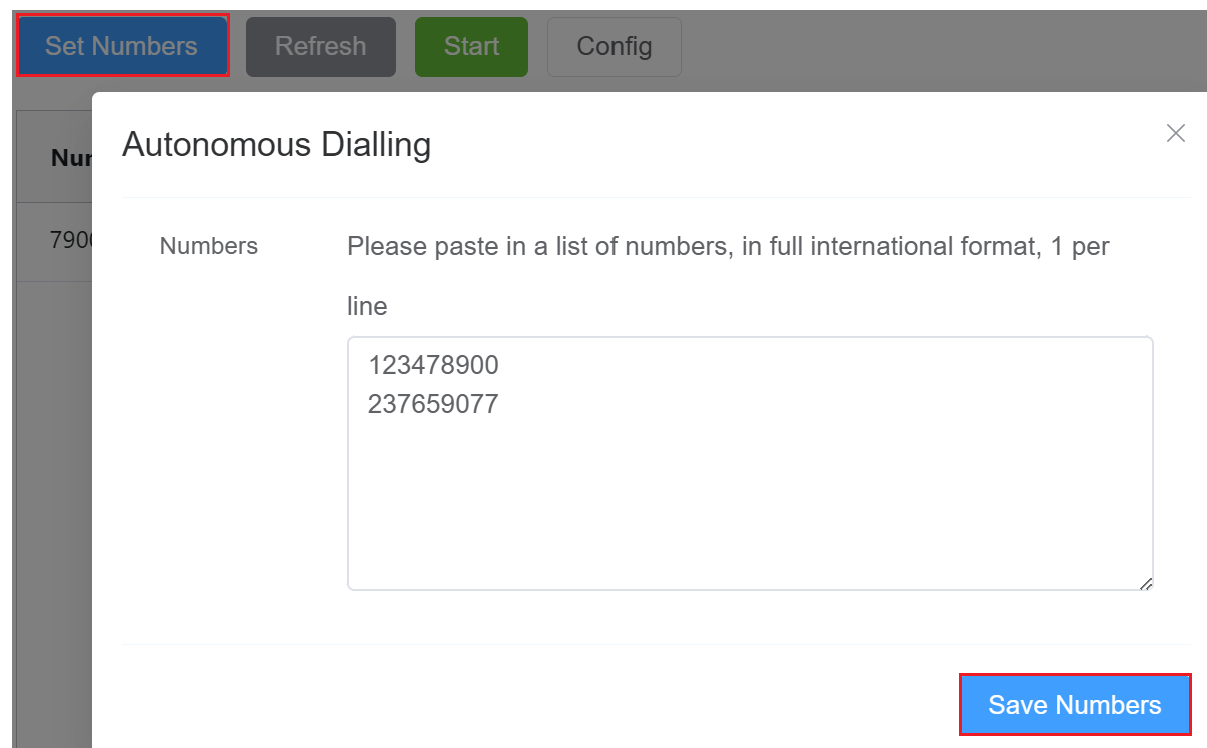
- Hit the
Startbutton to dial the numbers automatically. `.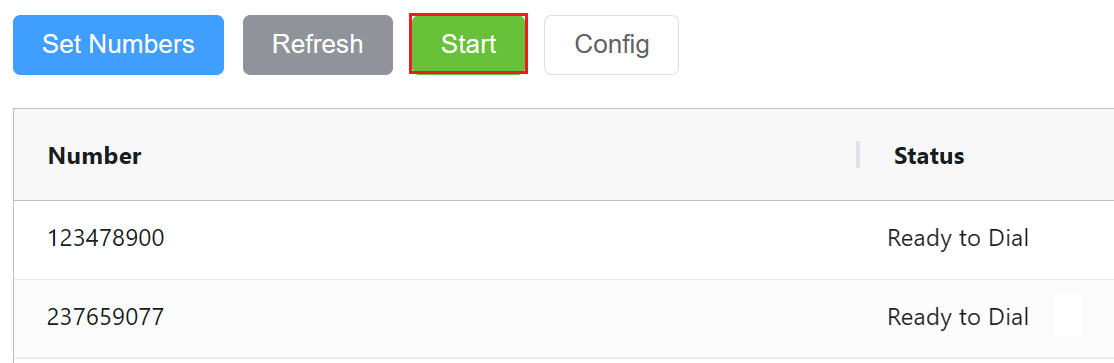
Important Note
- Ensure that all phone numbers are entered in the complete international format (e.g., +44 for the UK, +1 for the US).
- When entering multiple phone numbers, list each number on a new line.
Click-2-Dial (Programmatic API Calling)
Overview
Click-to-Dial API enables applications, websites, or software systems to initiate phone calls with a single click or programmatic command.
Instead of manually dialing a phone number, users or systems can trigger a call directly from an interface, making the process faster, more efficient, and less error-prone.
Call Flow (How it works?)
flowchart TD
    A[API Request Sent] --> B[Includes api_key & phone]
    B --> C[Validate Authentication]
    C -->|Valid| D[Initiate Two Outbound Calls]
    C -->|Invalid| X[Reject Request]

    D --> E[Call to Configured Extension]
    D --> F[Call to Destination Number]

    E --> G{Both Calls Answered?}
    F --> G

    G -->|Yes| H[Bridge Calls Together]
    G -->|No| I[Wait / Retry / Fail]
Steps to Use the App
-
Navigate to Setup App Store Click-2-Dial and click
Install.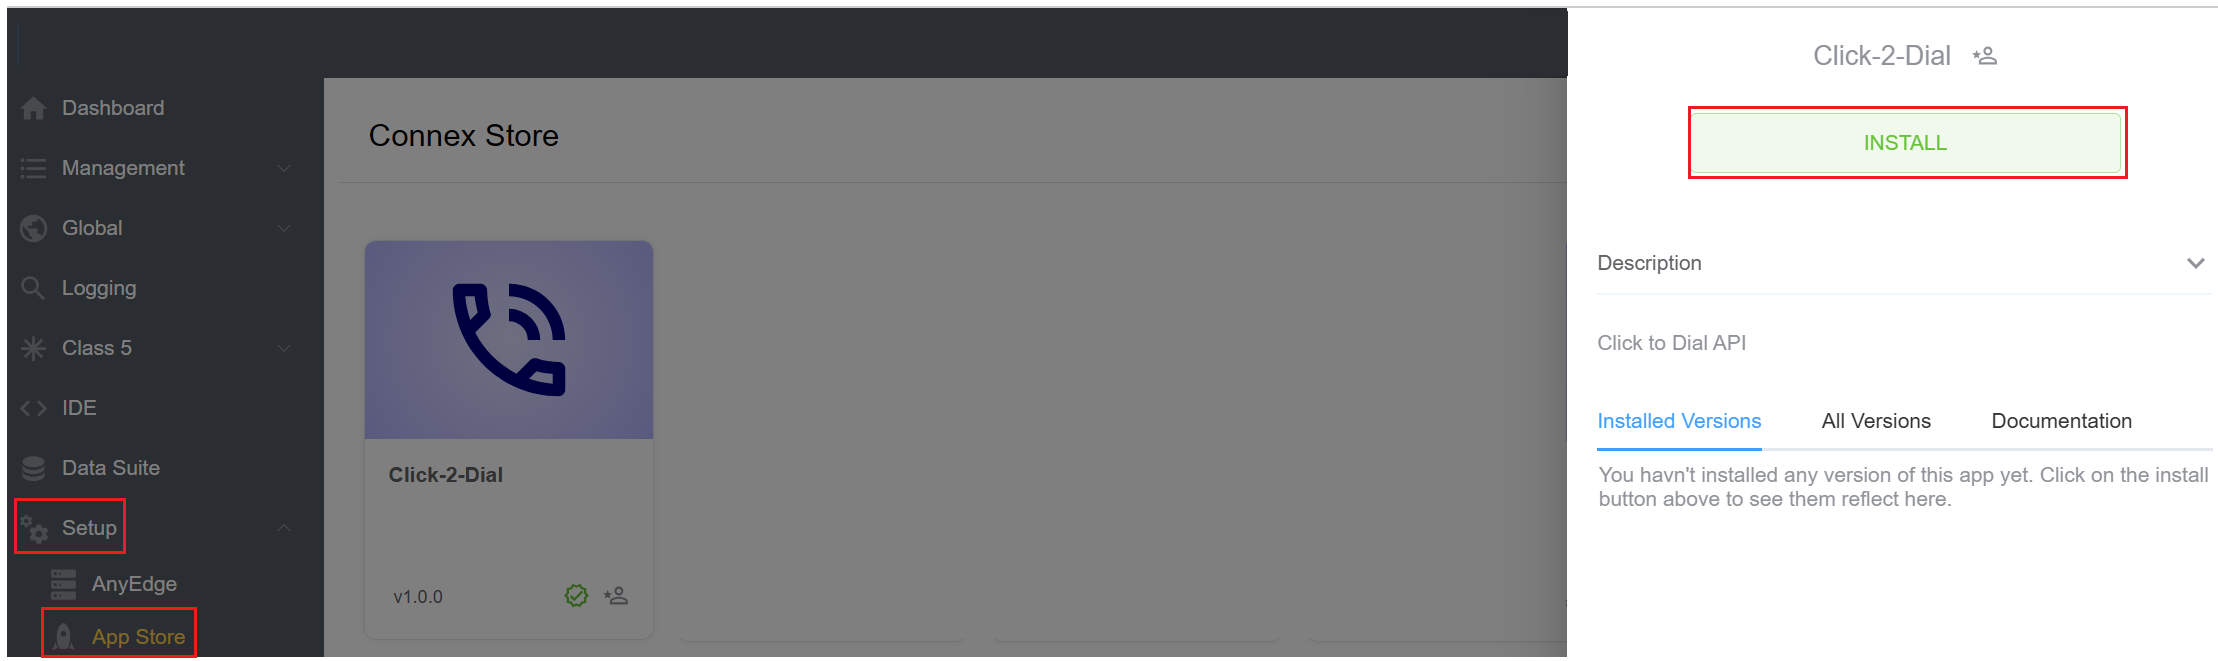
-
A window will appear, select the version of the app and hit
Installagain.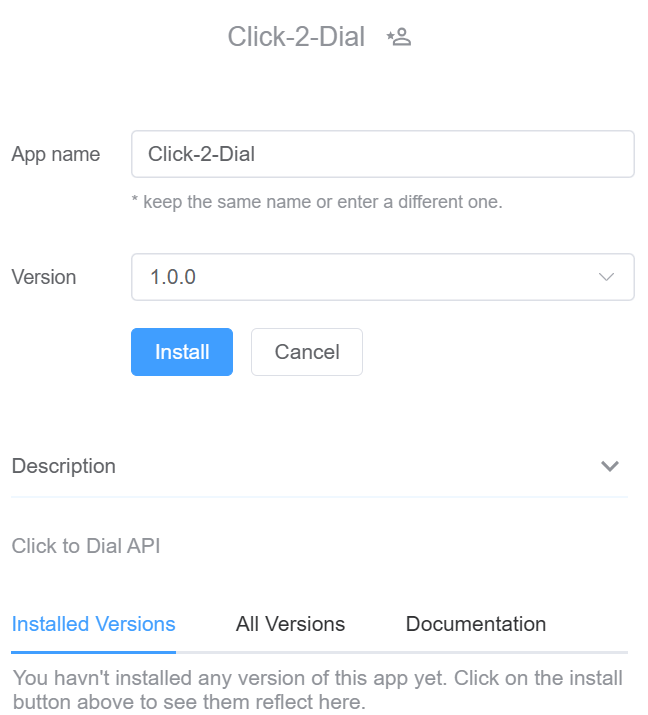
-
In the
Installed Versionstab clickConfig.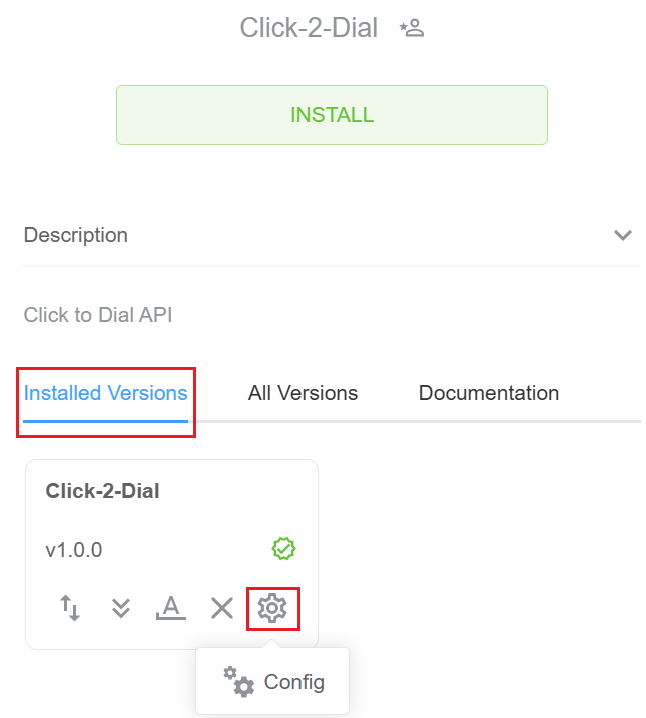
-
A window will open, prompting you to enter the following details:
- Select the
Customerfor the drop-down. The account from which the call will be initiated. - Enter the
API Key. It acts as a gatekeeper, maintaining the security, reliability, and integrity of API-based interactions. API Keys are generated randomly for each customer as soon as you press+Add. - Enter the
Extension. Number that will be called as one leg of the call.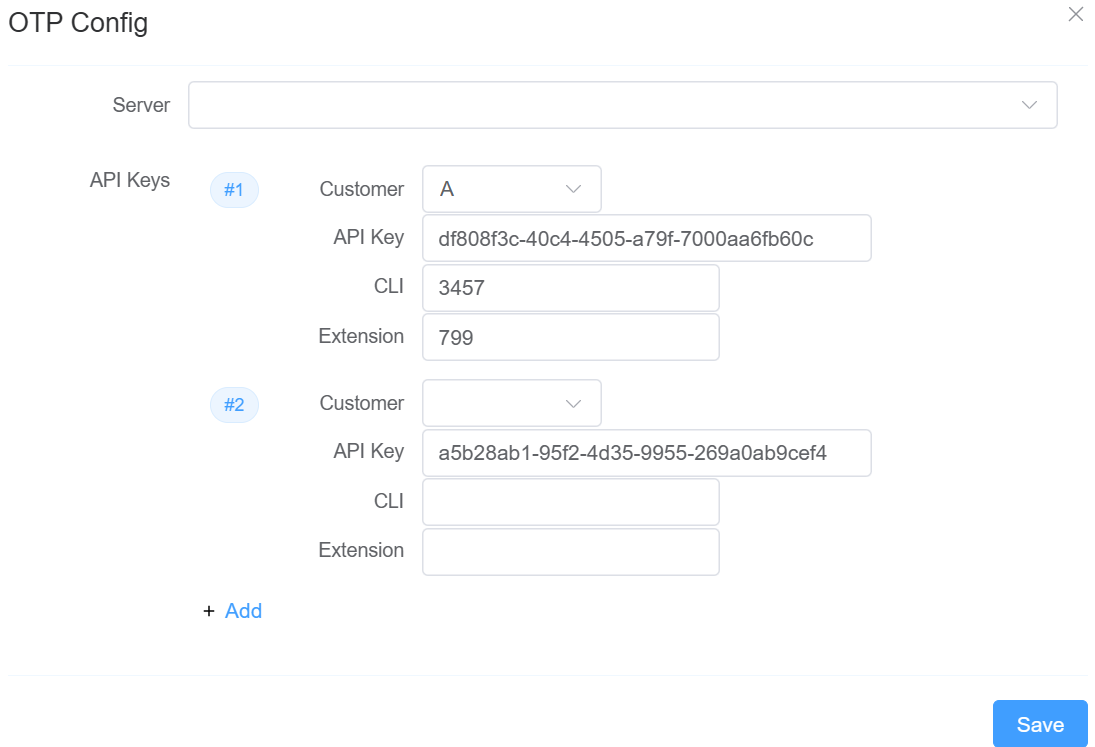
- Select the
-
Click
Save. -
Navigate to: IDE Click-2-Dial Application Script Forge (Click-2-Dial Originate) Settings Endpoint URLs. This section provides the API endpoint that allows external systems (or internal workflows) to trigger the ScriptForge function
sendvia an HTTP request.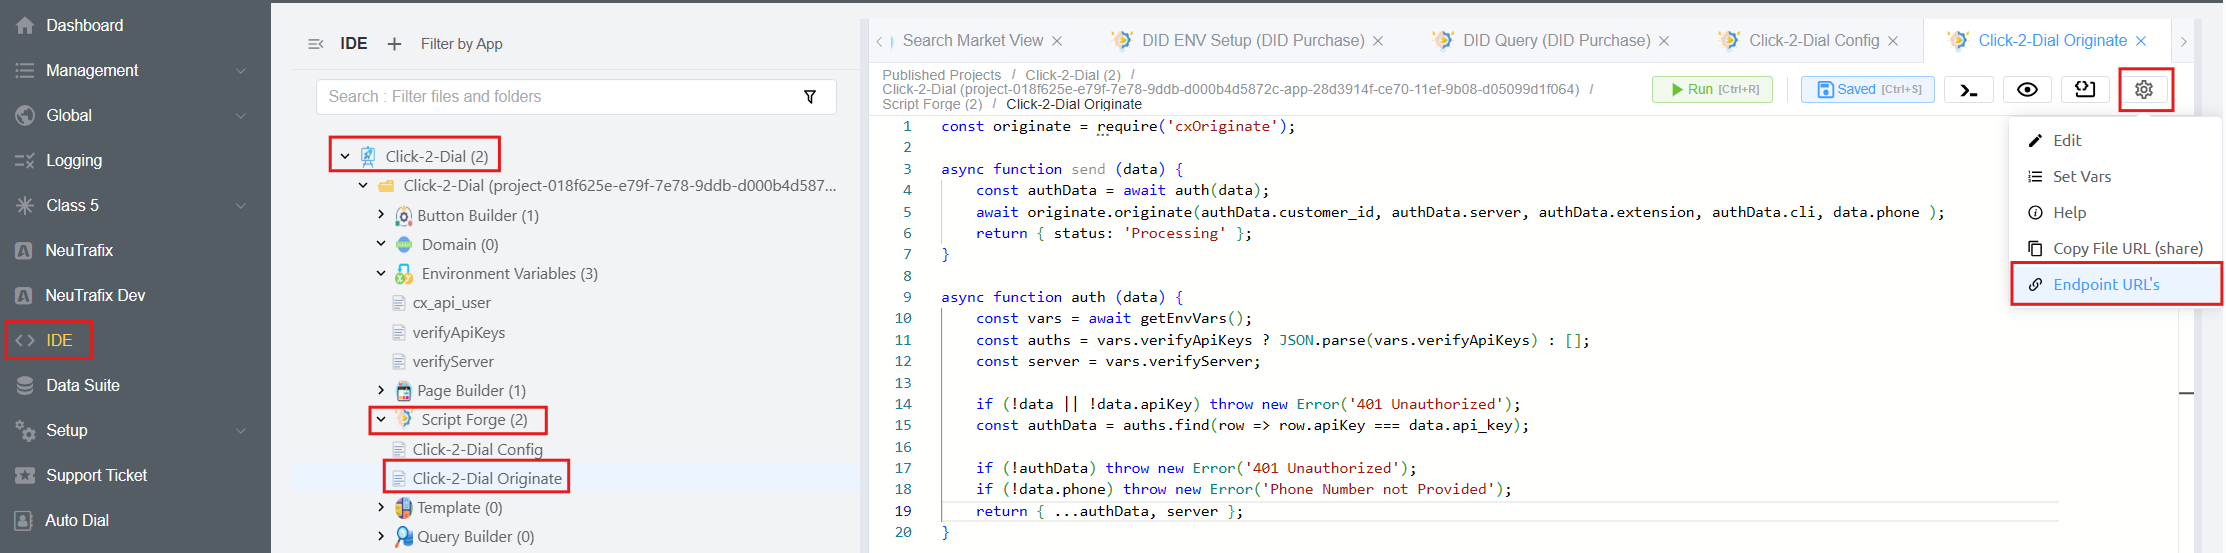 .
. -
Technical Explanation
- Domain → Specifies the base host where the API is exposed.
- Function Name (send) → Maps to the underlying ScriptForge function to be executed.
- Final URL → Fully qualified endpoint that accepts HTTP requests to trigger the function. Enter the
APIfrom theConfig.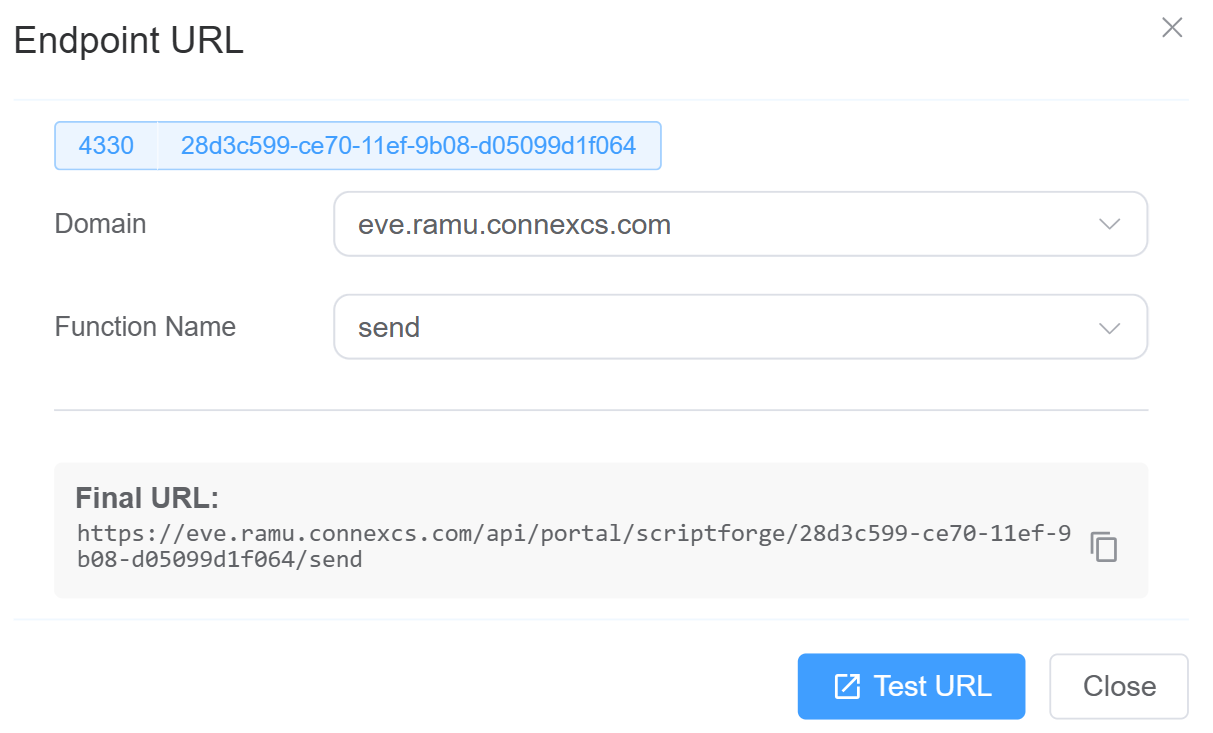 .
.
-
When this endpoint is called:
- The request is routed to the ScriptForge execution layer.
- The specified function (send) is invoked.
- Any defined logic, integrations, or side effects are executed.
This feature requires the Programmatic Call Originate package to be enabled; otherwise, it will not function.
Example
Example (cURL)
curl -X POST "https:///api//send"
-d "api_key=YOUR_API_KEY"
-d "phone=123456"
Yoco Payment
Overview
Yoco is a payment gateway and merchant services platform that enables businesses to accept, process, and manage digital payments securely through APIs and hosted payment flows.
Instead of handling payment processing, card security, and transaction compliance internally, applications and platforms can integrate with Yoco to initiate charges, collect customer payments, and track transactions programmatically, making payment collection faster, more reliable, and secure.
How it works?
To enable payment-related operations via Yoco, the system requires authentication using a Secret API Key.
This key determines which Yoco account the API requests are executed against and ensures secure access to subscribed services.
Where to Obtain the API Secret Key?
-
The customer logs in to the
Yoco App/Yoco Control Panel. -
Navigate to the API Developer Integration section.
-
Locate the
Secret Keyunder theaccount credentials. -
Copy the Secret Key for use in the integration.
The Secret Key is account-specific and must be kept confidential.
Steps to Use the App
-
Navigate to Setup App Store Yoco and click
Install.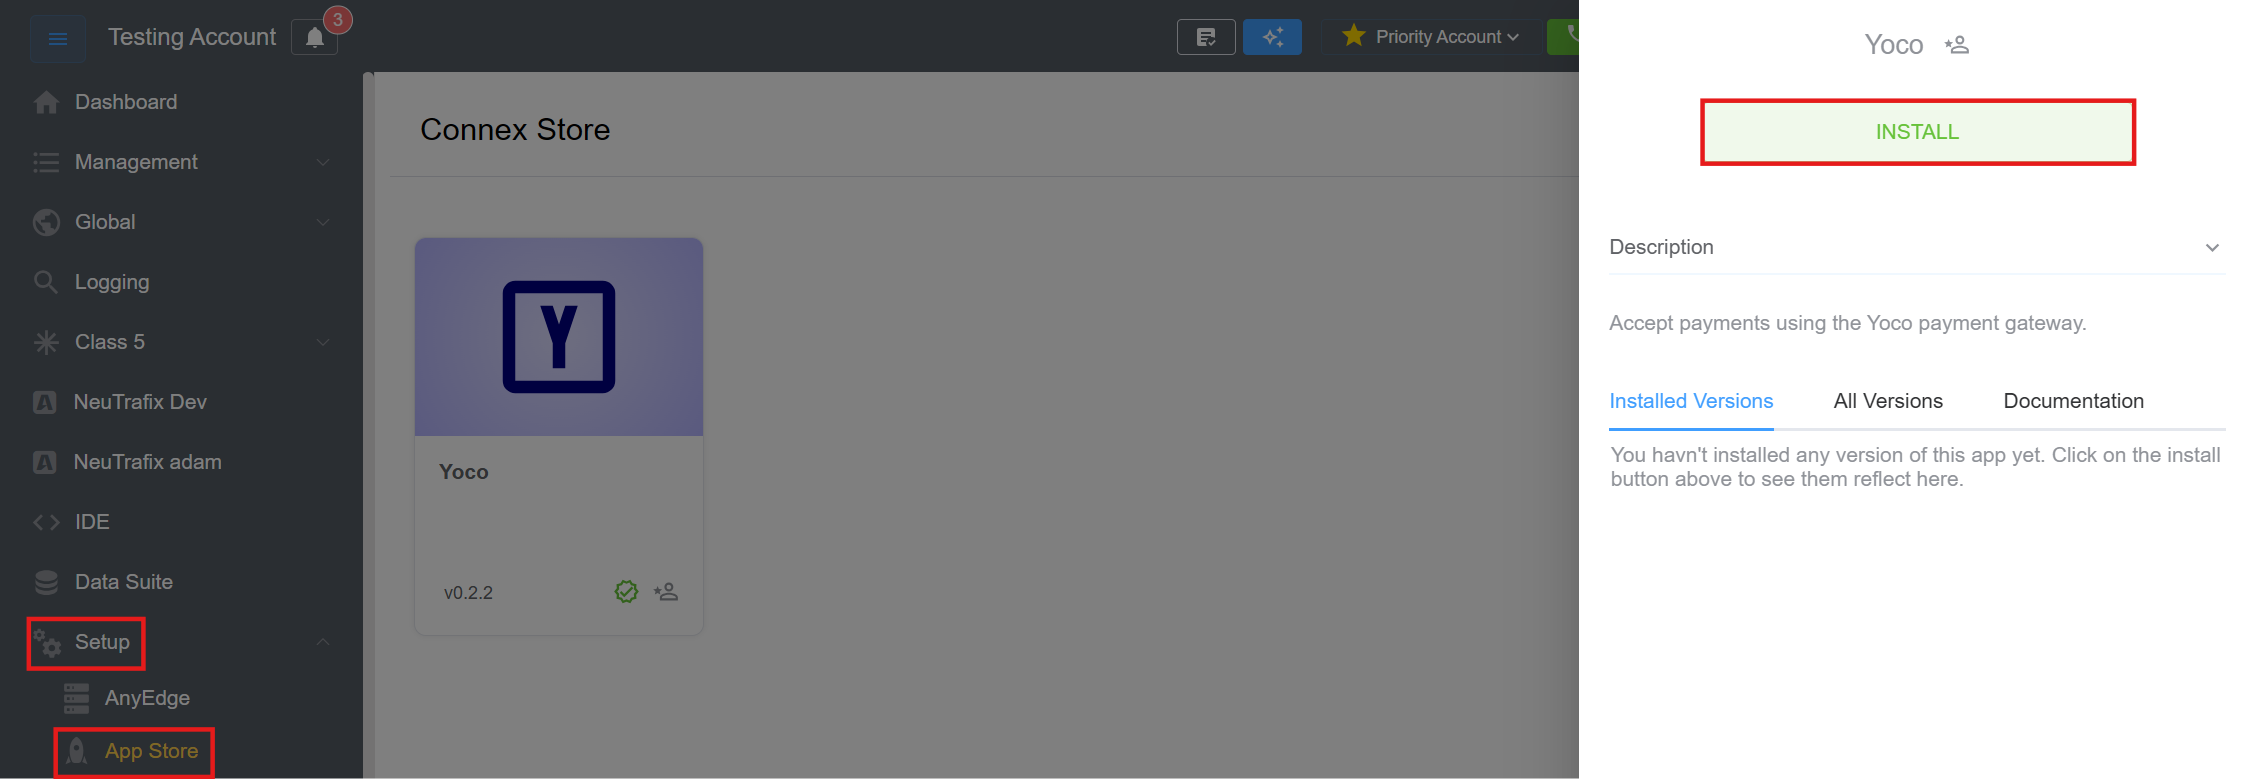
-
A window will appear, select the version of the app and hit
Installagain.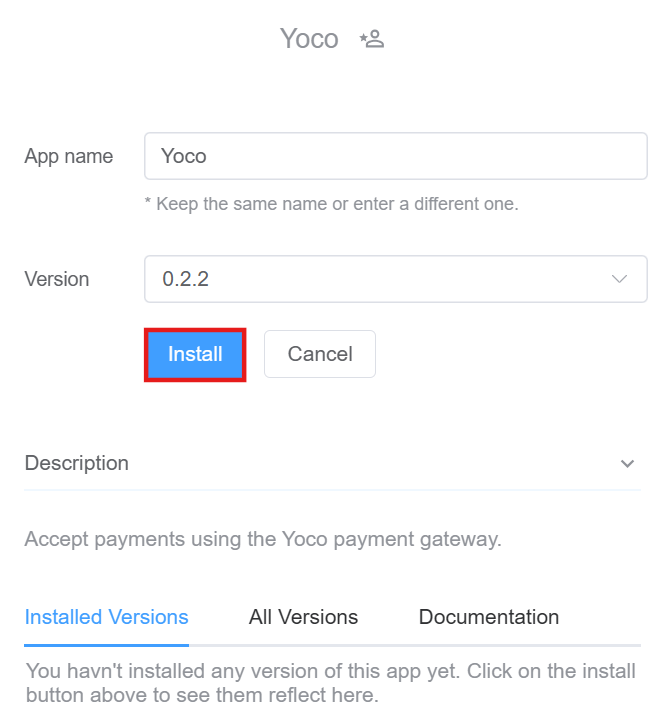
-
Go to the
Installed Versionstab, then hover onsettingsicon and click onConfig.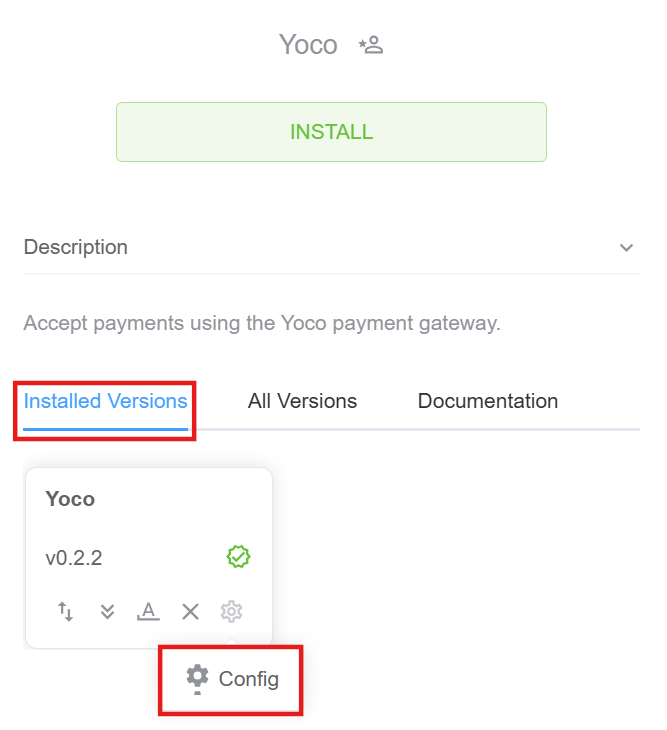
-
A window will open, prompting you to enter the following details:
API User: The selected API user represents the authenticated entity making API requests.- Enter the
Secret Key. This key is required for authentication. Follow the steps here to generate and retrieve the API key. ConnexCS uses this key to securely authenticate and authorise all payment-related API requests. Surcharge: Configure an additional charge to be applied to payments. You can choose one of the following options:- Amount (ZAR): Applies a fixed surcharge in South African Rand (ZAR).
- Percent: Applies a percentage-based surcharge on the transaction amount.
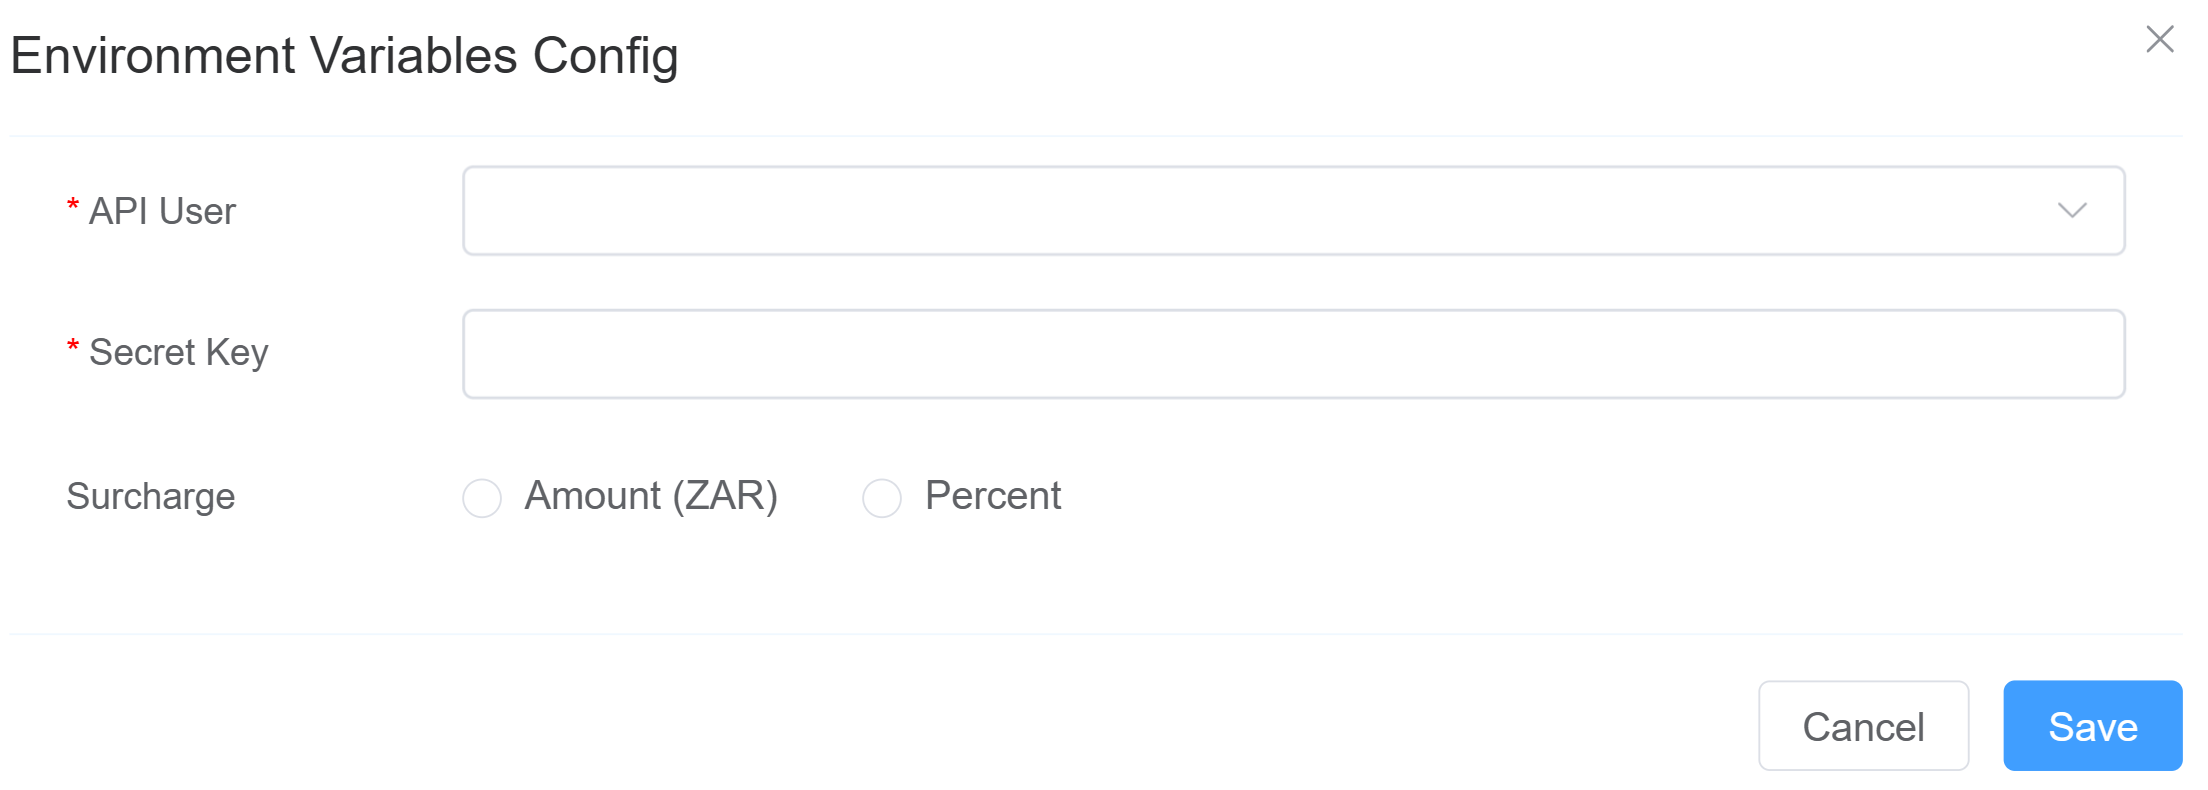
-
Click
Save.
Neutrafix
Overview
Neutrafix is a telecom routes marketplace integrated within the ConnexCS platform. It allows telecom companies to buy and sell voice routes through a structured, automated workflow.
Using Neutrafix, companies can:
- Browse and purchase telecom routes
- Manage prefixes and rate cards
Neutrafix connects directly with the ConnexCS Control Panel, enabling a seamless flow from company registration → authentication → route selection → billing execution.
System Purpose
The Neutrafix application provides:
- Route marketplace access
- Prefix-based routing configuration
- Seller-specific rate card assignment
- API and portal-based access control
User Onboarding Flow
1. Sign-Up Process
Users register through the Neutrafix application interface.
Steps
a. User clicks Sign Up.
b. One-click registration flow begins.
c. Company verification documents must be submitted.
d. After completing sign-up, a credentials dialog is displayed containing:
- Username
- Login Password
- API Password
⚠️ Important: Users must securely store these credentials, as they may not be shown again.
Note 1 — Account Creation & Verification
- The account is created immediately after sign-up, and credentials are generated and shared with the user.
- Submitted company documents are sent to the Neutrafix team for verification and review.
- Users cannot perform buying activities until the document review process is successfully completed by Neutrafix.
Note 2 — Existing Neutrafix Users
- Existing Neutrafix users can reuse their API Username and API Password.
- These credentials are available inside the Profile section of the platform.
- Standard login credentials should not be used for API authentication.
Steps to Use the App
- Navigate to Setup App Store NeuTrafix and click
Install.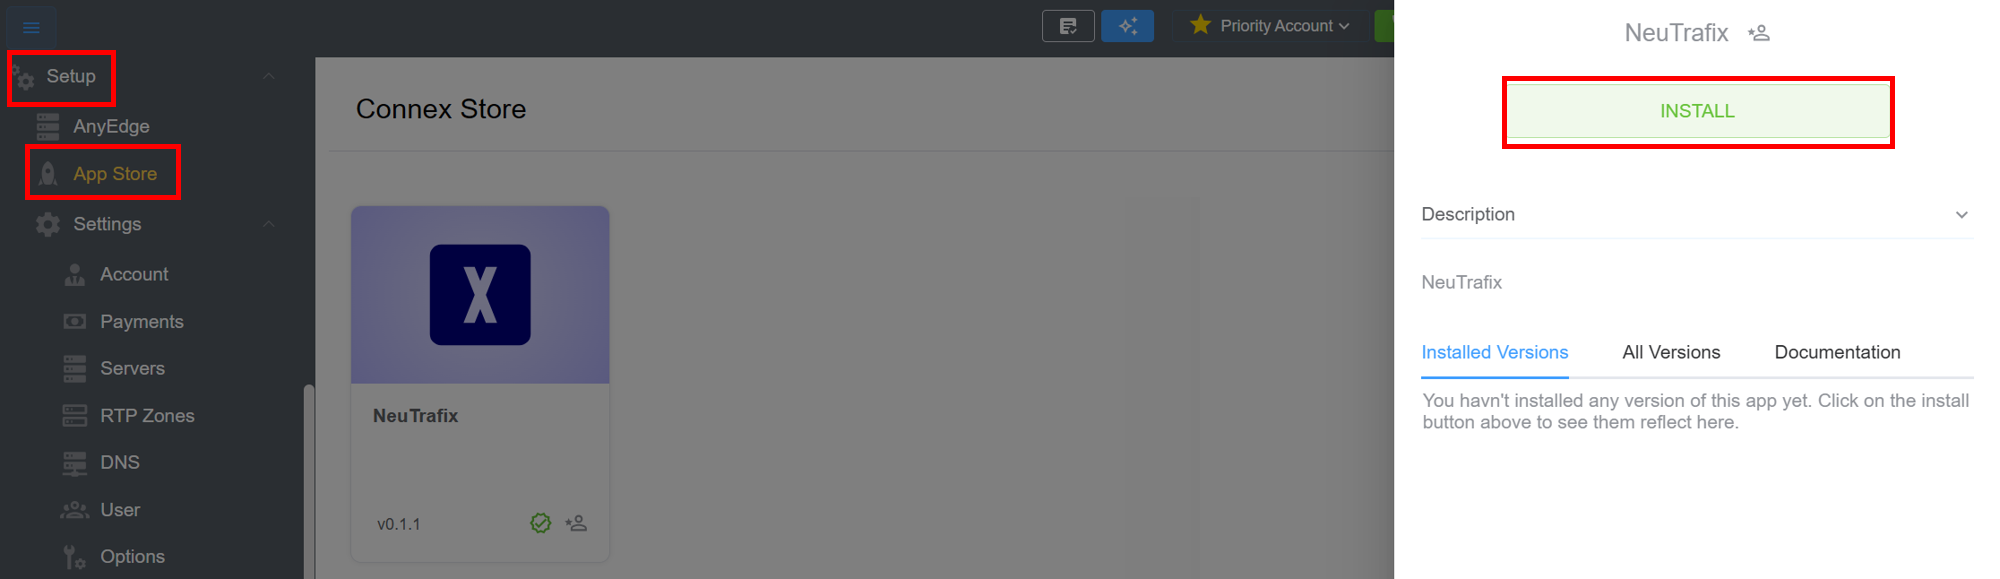
- A window will appear, select the version of the app and hit
Installagain.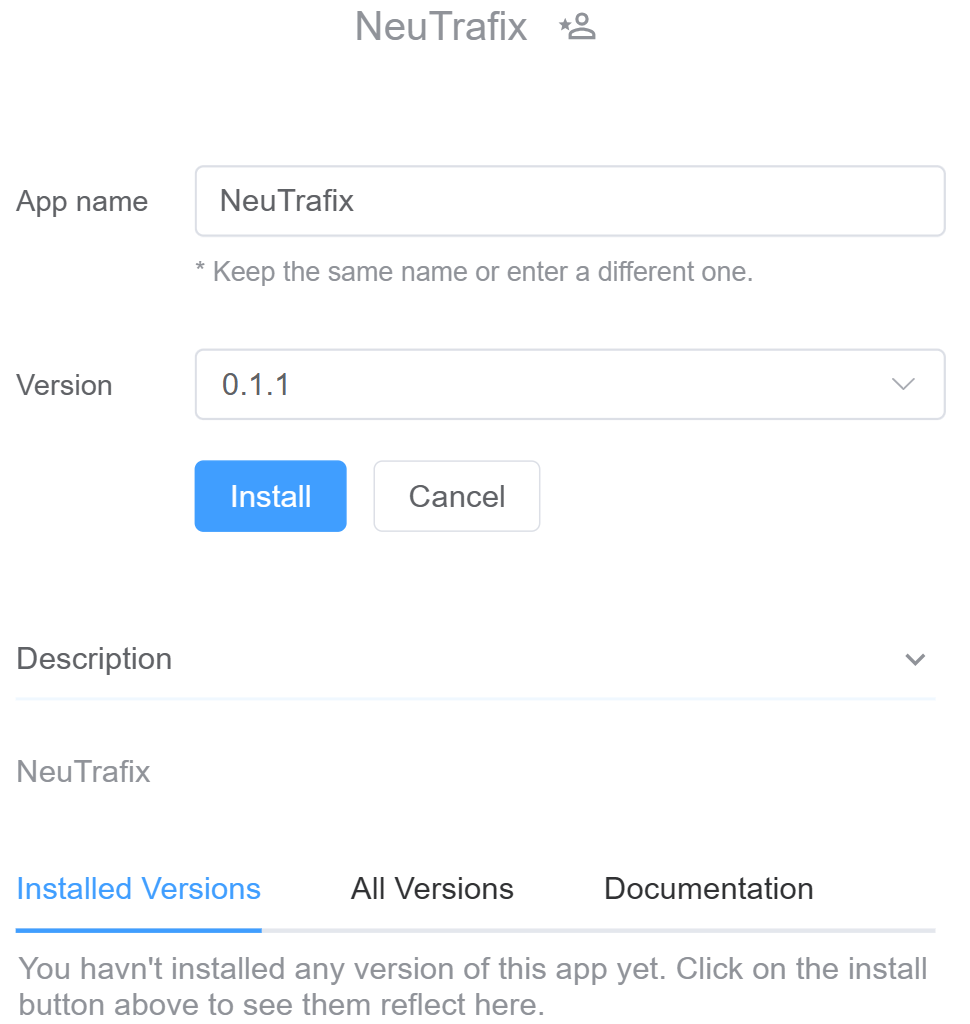
- Click on
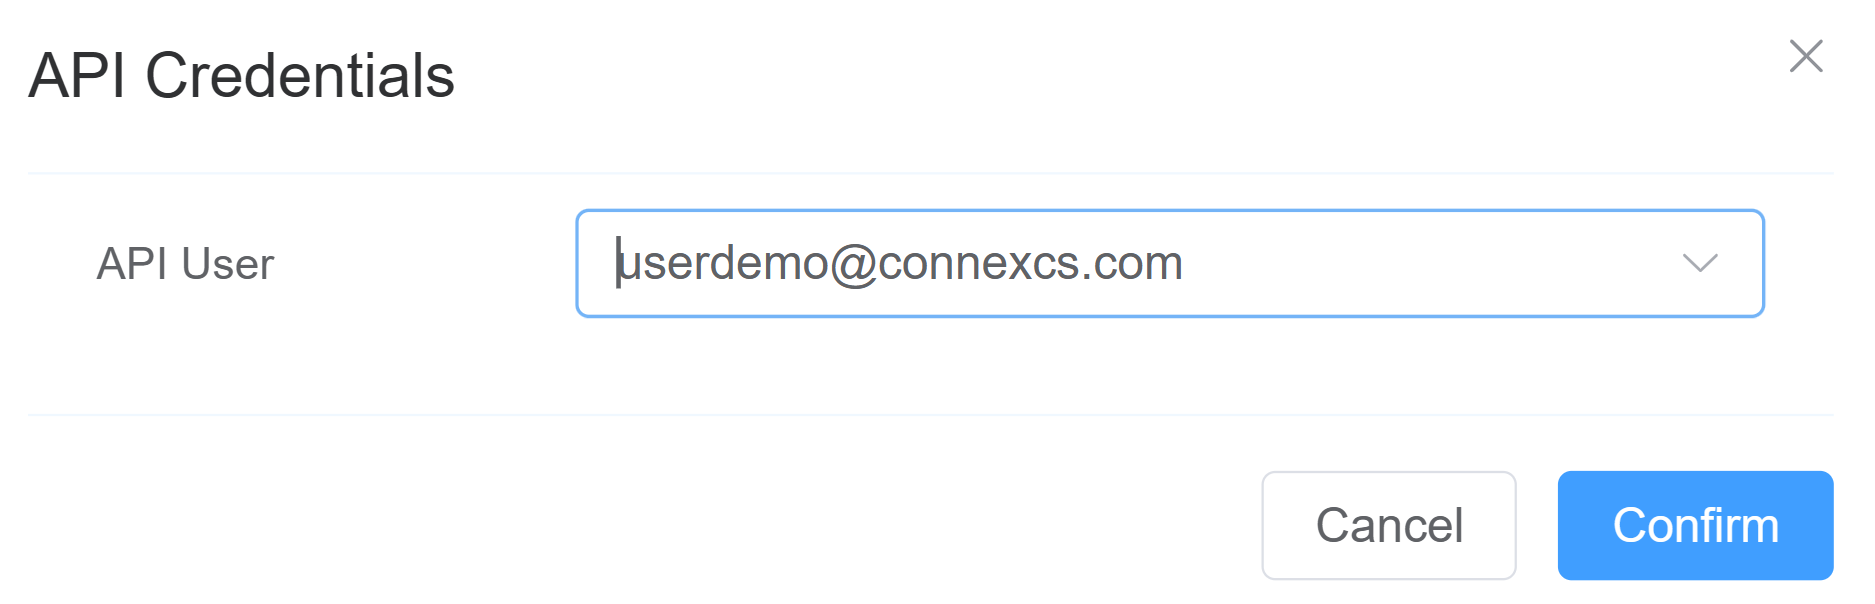
Config(settings button) to assign theAPI UserclickConfirm.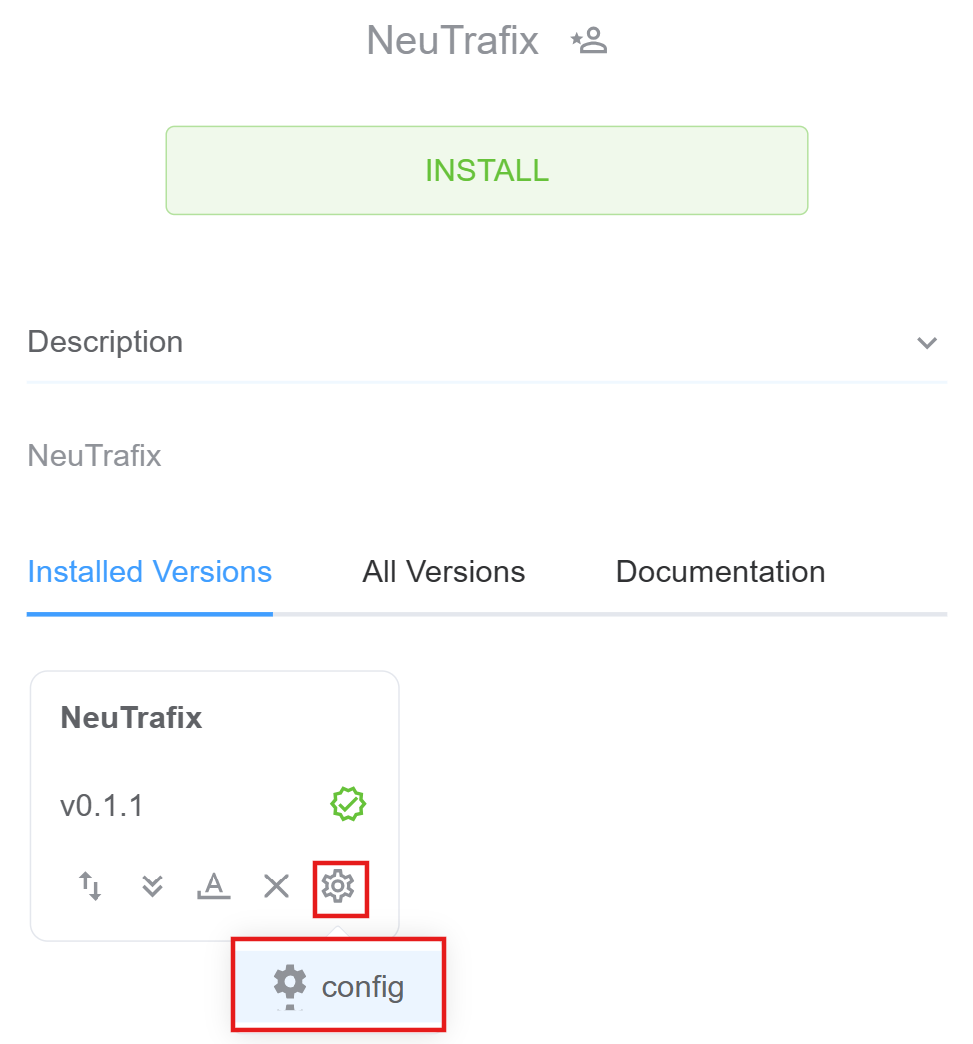
- Click on the
NeuTrafixapp on the sidebar. Complete theSignupprocess if you are a new customer.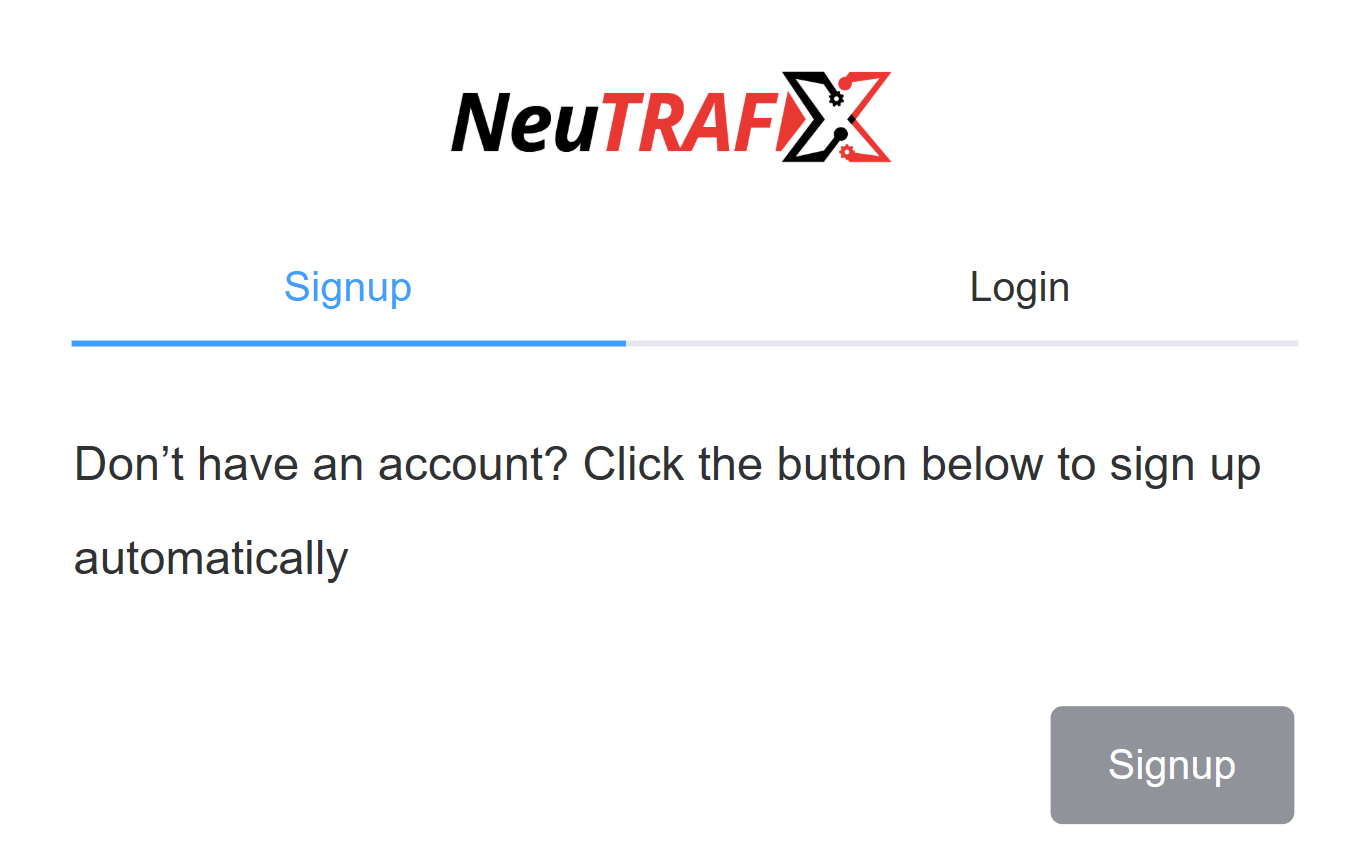
-
If you are already a customer, click on
Login. A window will prompt you to enter theAPI LoginandAPI Key. Click onLogin. You can get theAPI LoginandAPI Keyfrom the NeuTrafixDashboard.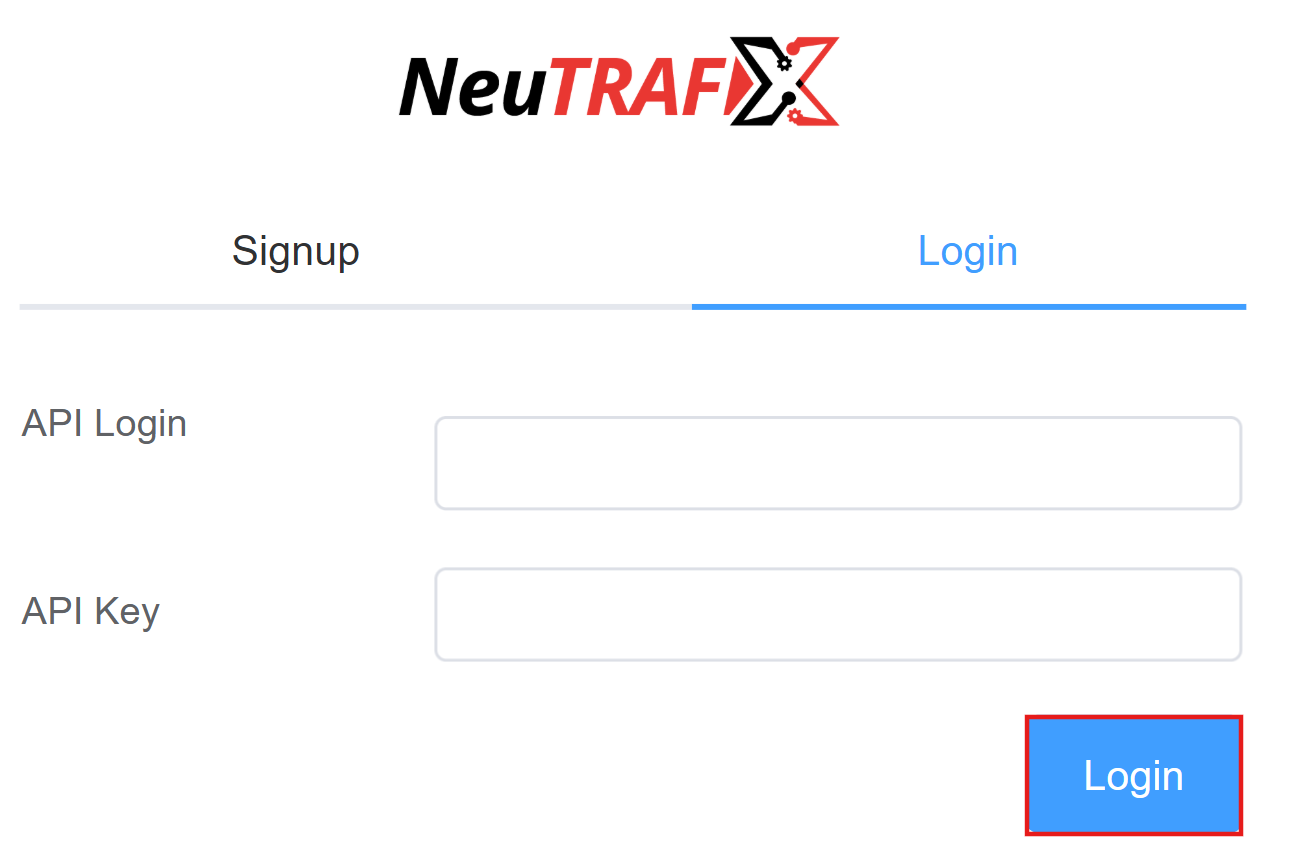
⚠️ Note: Use your API Username and API Password from the Profile section for authentication; standard login credentials are not supported. -
A window will appear with the following fields:
-
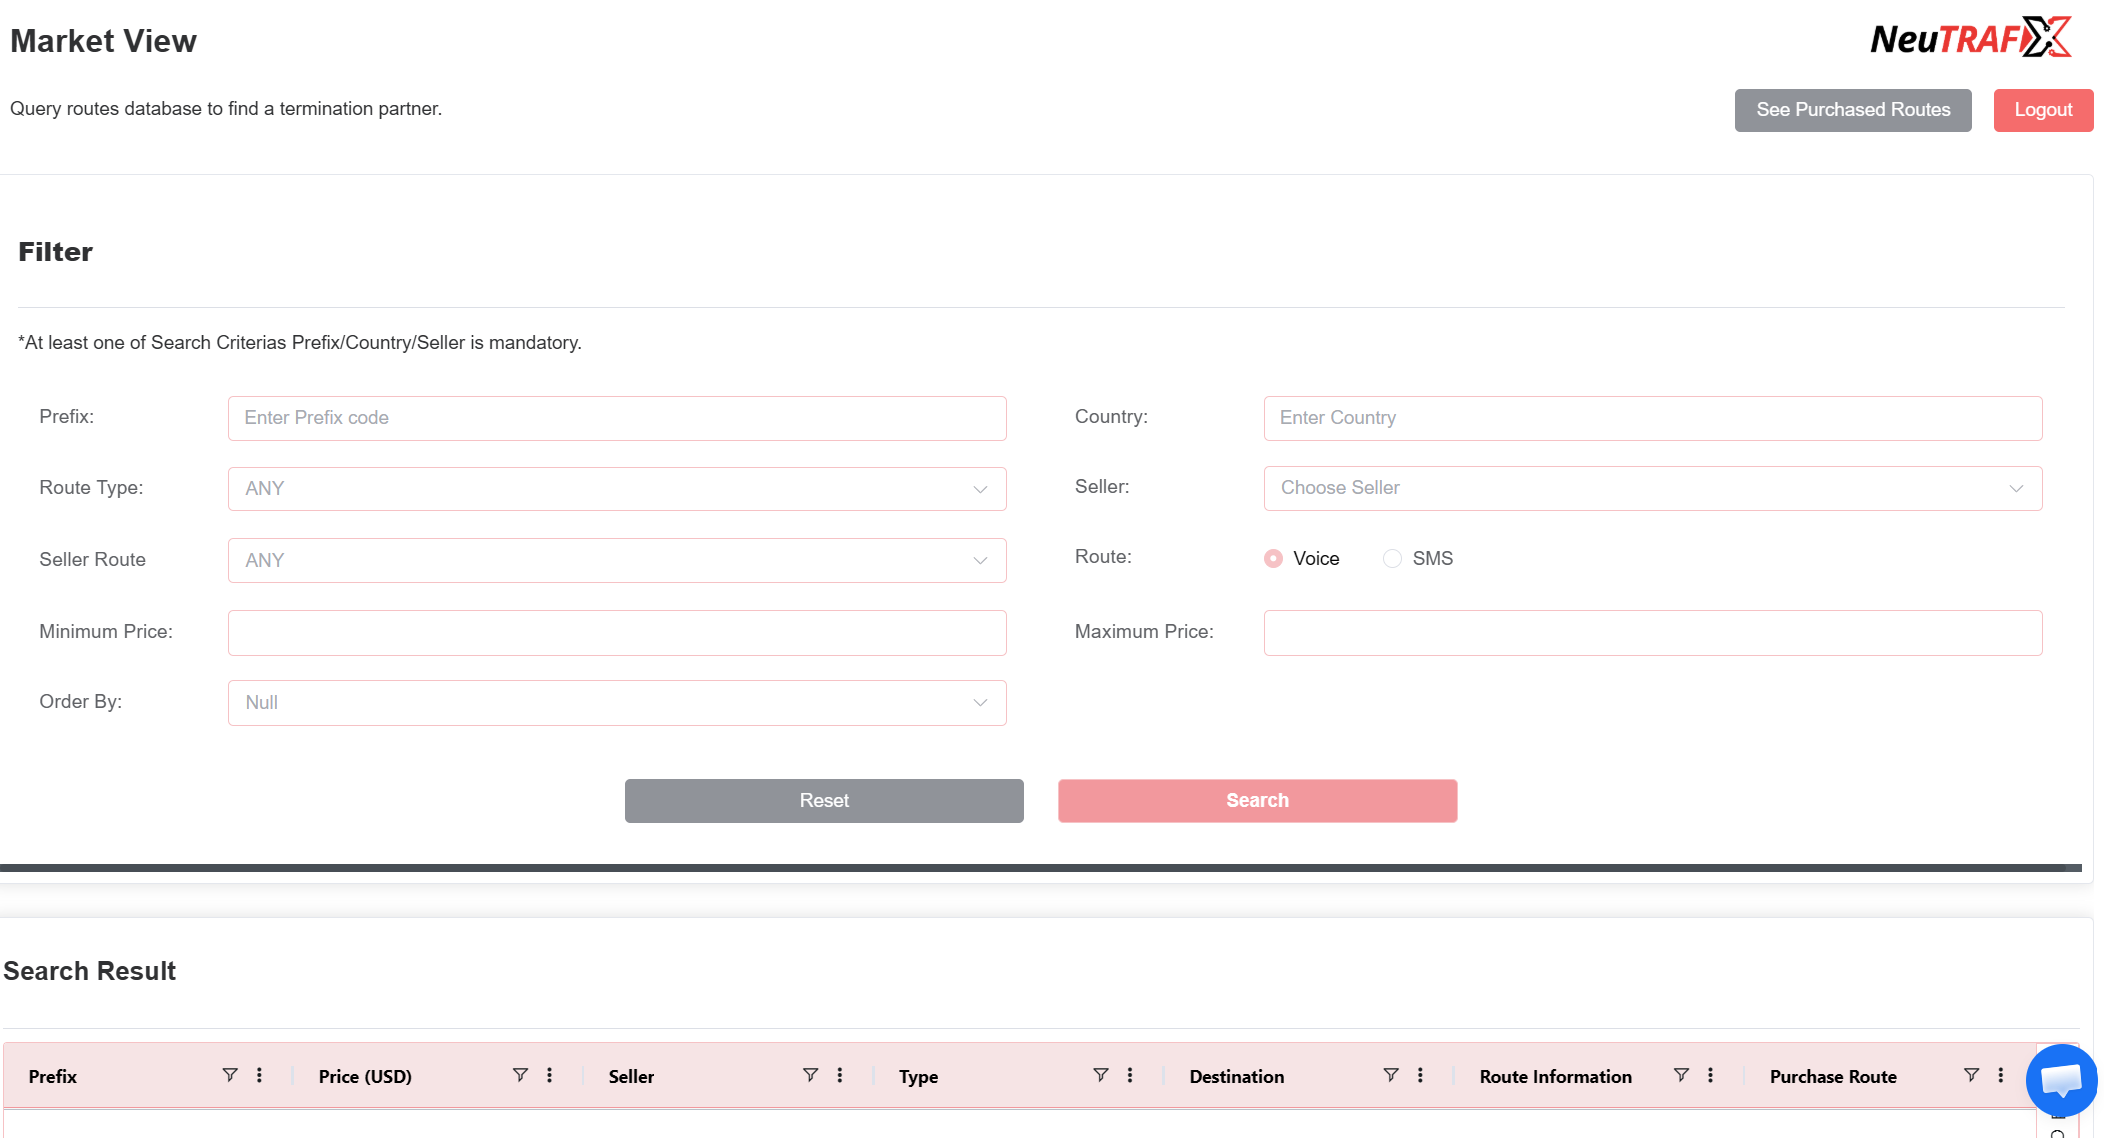
Market View allows users to
See Purchased Routes. Opens list of routes already purchased by the user. -
Filter Section:
Field Description Usage Prefix Destination dialing prefix Used to search routes for a specific number range (e.g., 91, 44, 1) Country Destination country Filters routes available for a country Route Type Route classification Filters route quality/type (e.g., CLI, Non-CLI, Premium, etc.) Seller Route provider/company Shows routes offered by a specific seller Seller Route Seller-specific route category Filters routes within seller inventory Route (Voice / SMS) Traffic type Select whether searching Voice routes or SMS routes Minimum Price Lower price limit Filters routes above specified price Maximum Price Upper price limit Filters routes below specified price Order By Sorting criteria Sort results (price, prefix, seller, etc.) -
Search Result Section: Displays routes matching the filter criteria.
-
Result Table Columns:
Column Description Technical Meaning Prefix Destination prefix Dialing code covered by the route Price (USD) Route rate Cost per minute/message offered by seller Seller When users click on a seller, they can view the seller’s profile details. Type Route type Traffic category (Voice/SMS or quality classification) Destination Destination name Country or operator served Route Information Route details Technical information about route quality/configuration Purchase Route Action column Button to buy/select the route View More Additional information Available to display additional information -
Purchase Route: When you wish to purchase a route, double-click on the
Purchasein thePurchase Routecolumn. A window will open where you need to select theAccountandCarrier. By default the carrier isNeutrafixbut you can also choose the carrier from the drop-down. Click onConfirm and Purchase Route.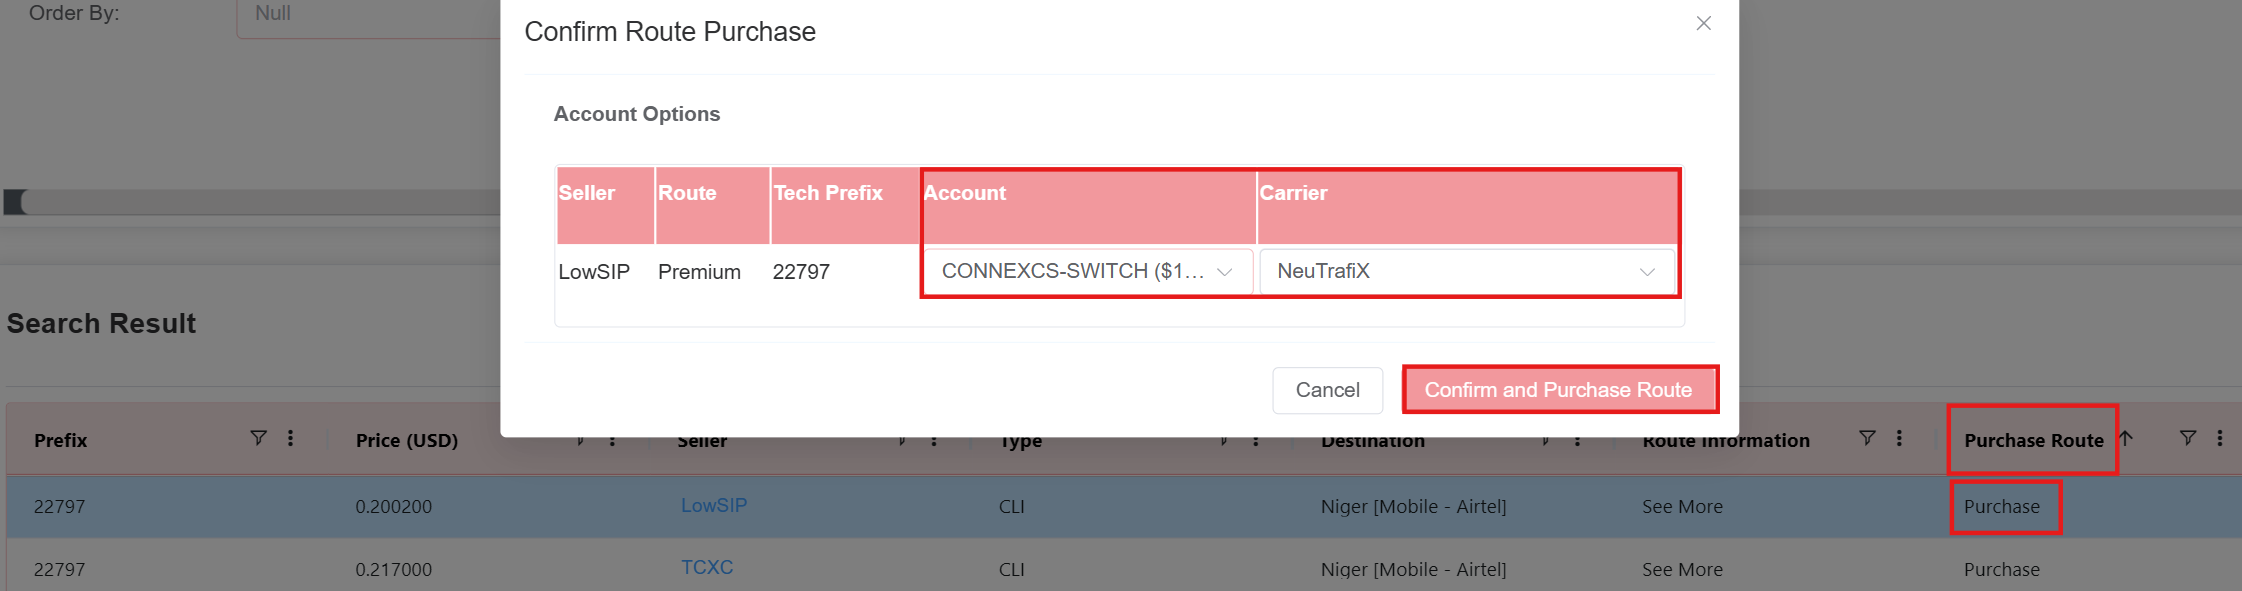
- Rate Card Assignment: Whenever a new seller is created, a rate card is automatically added.
-
Info
A NeuTrafix carrier is automatically created each time a user logs into the application. Within this carrier, multiple seller-specific rate cards are associated. Whenever a user purchases a route, all corresponding prefixes linked to that purchase are automatically added under the respective seller’s rate card, after which they function as a standard rate card within the system.
ASR per CLI
Overview
The ASR per CLI application provides a report that displays the Answer-Seizure Ratio (ASR) for each CLI (Caller Line Identification), helping users analyze call performance at a granular level.
Instead of manually compiling call metrics, users can view ASR data directly within the application, enabling faster insights, better monitoring, and more informed decision-making.
Steps to Use the App
-
Navigate to Setup App Store ASR per CLI and click
Install.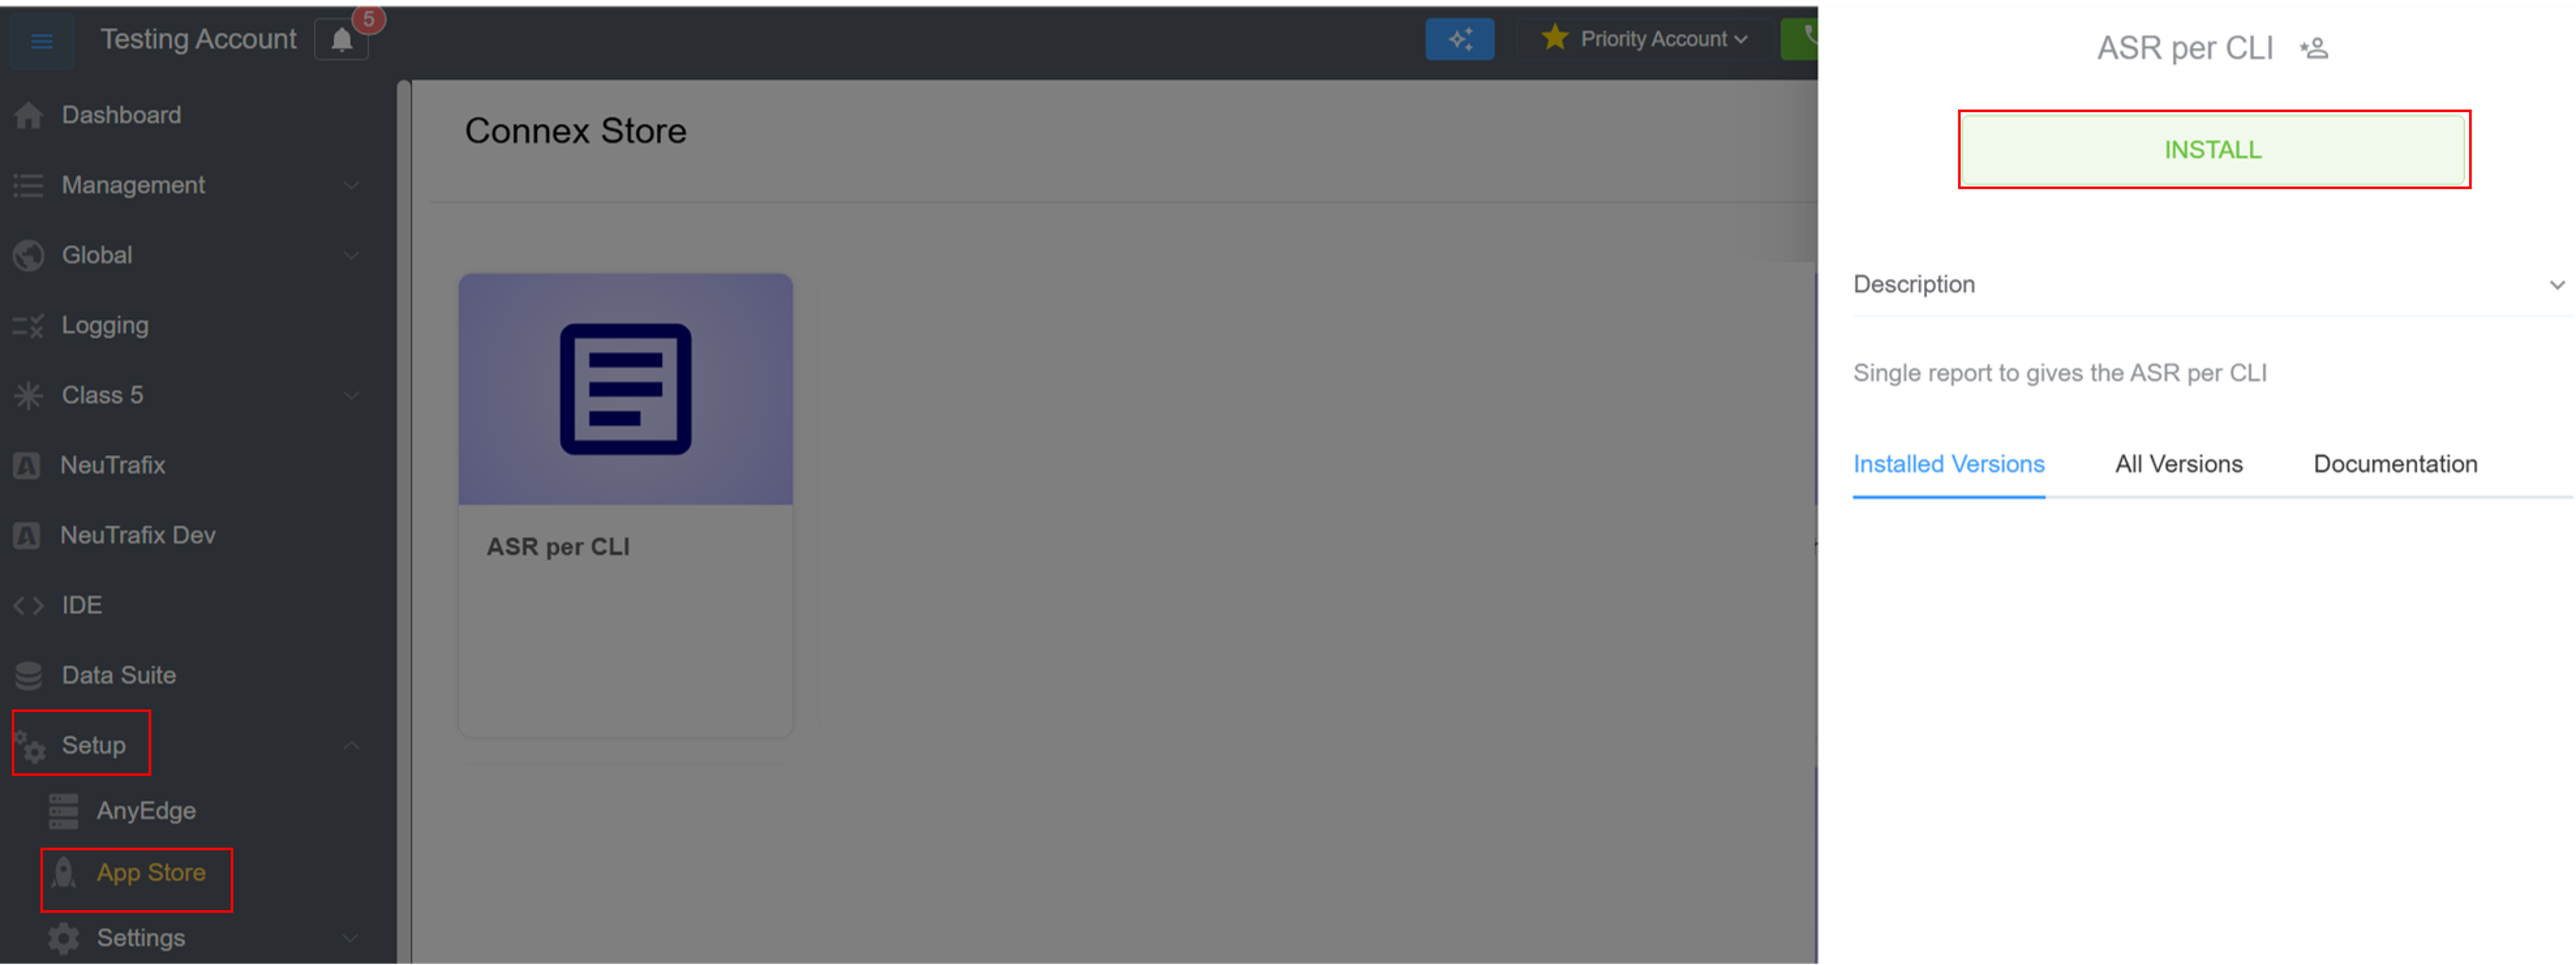
-
A window will appear, select the version of the app and hit
Installagain.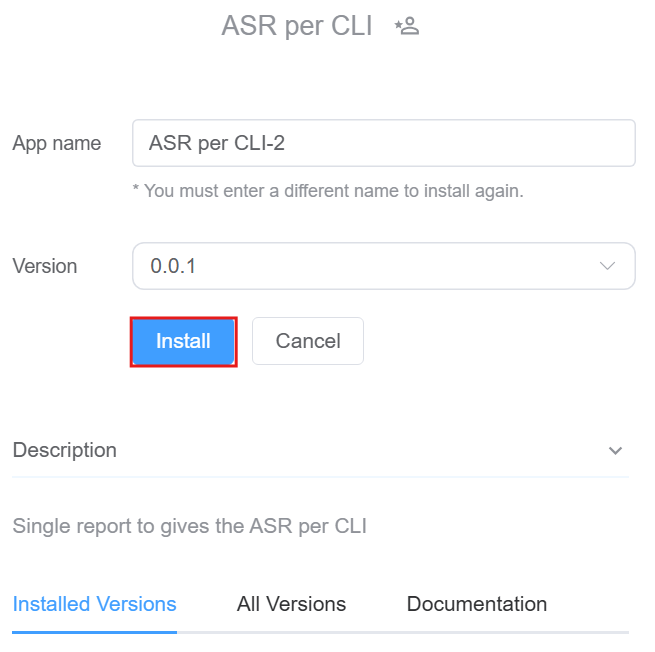
-
The installed versions are visible.
-
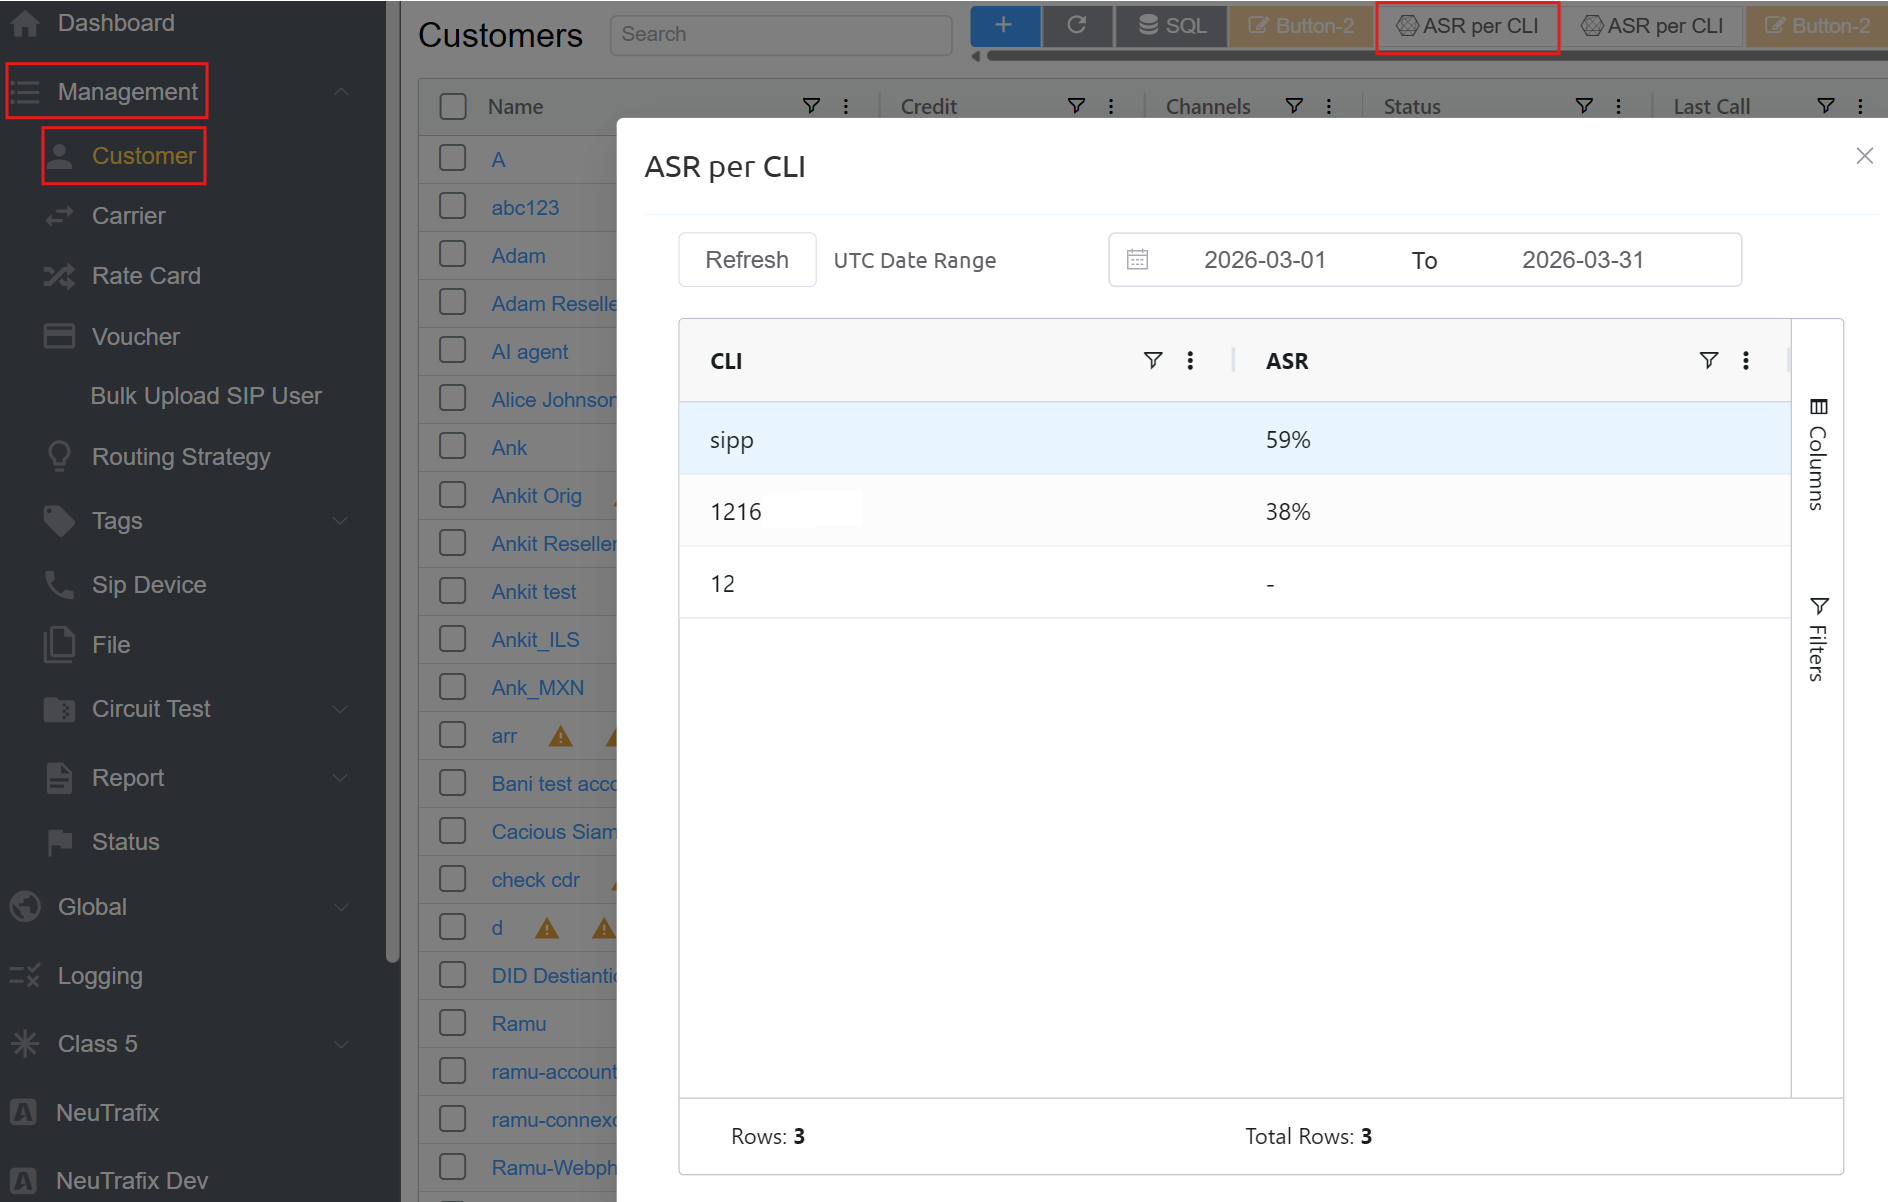
The installed app can be seen in Management Customer.
-
Click on the
ASR per CLIbutton on the top. - Select the
Date Rangeand click onrefreshto get the data.
ConnexCS Control Panel Defaults
Overview
The ConnexCS Control Panel Defaults application provides predefined configurations for commonly used modules, including:
- Carrier Win Rate
- Custom Reports
- DTMF
- Latency
- Route Stats
- Stats
- USA Calls
- USA Rate Center
These modules are already available in the system by default.
Purpose
This application allows users to install copies of the existing default modules.
The original modules remain unchanged.
The installed versions are independent copies.
Users can modify these copies as needed.
This ensures that customization can be performed without impacting the default configurations.
Steps to Use the App
-
Navigate to Setup App Store ConnexCS Control Panel Defaults and click
Install.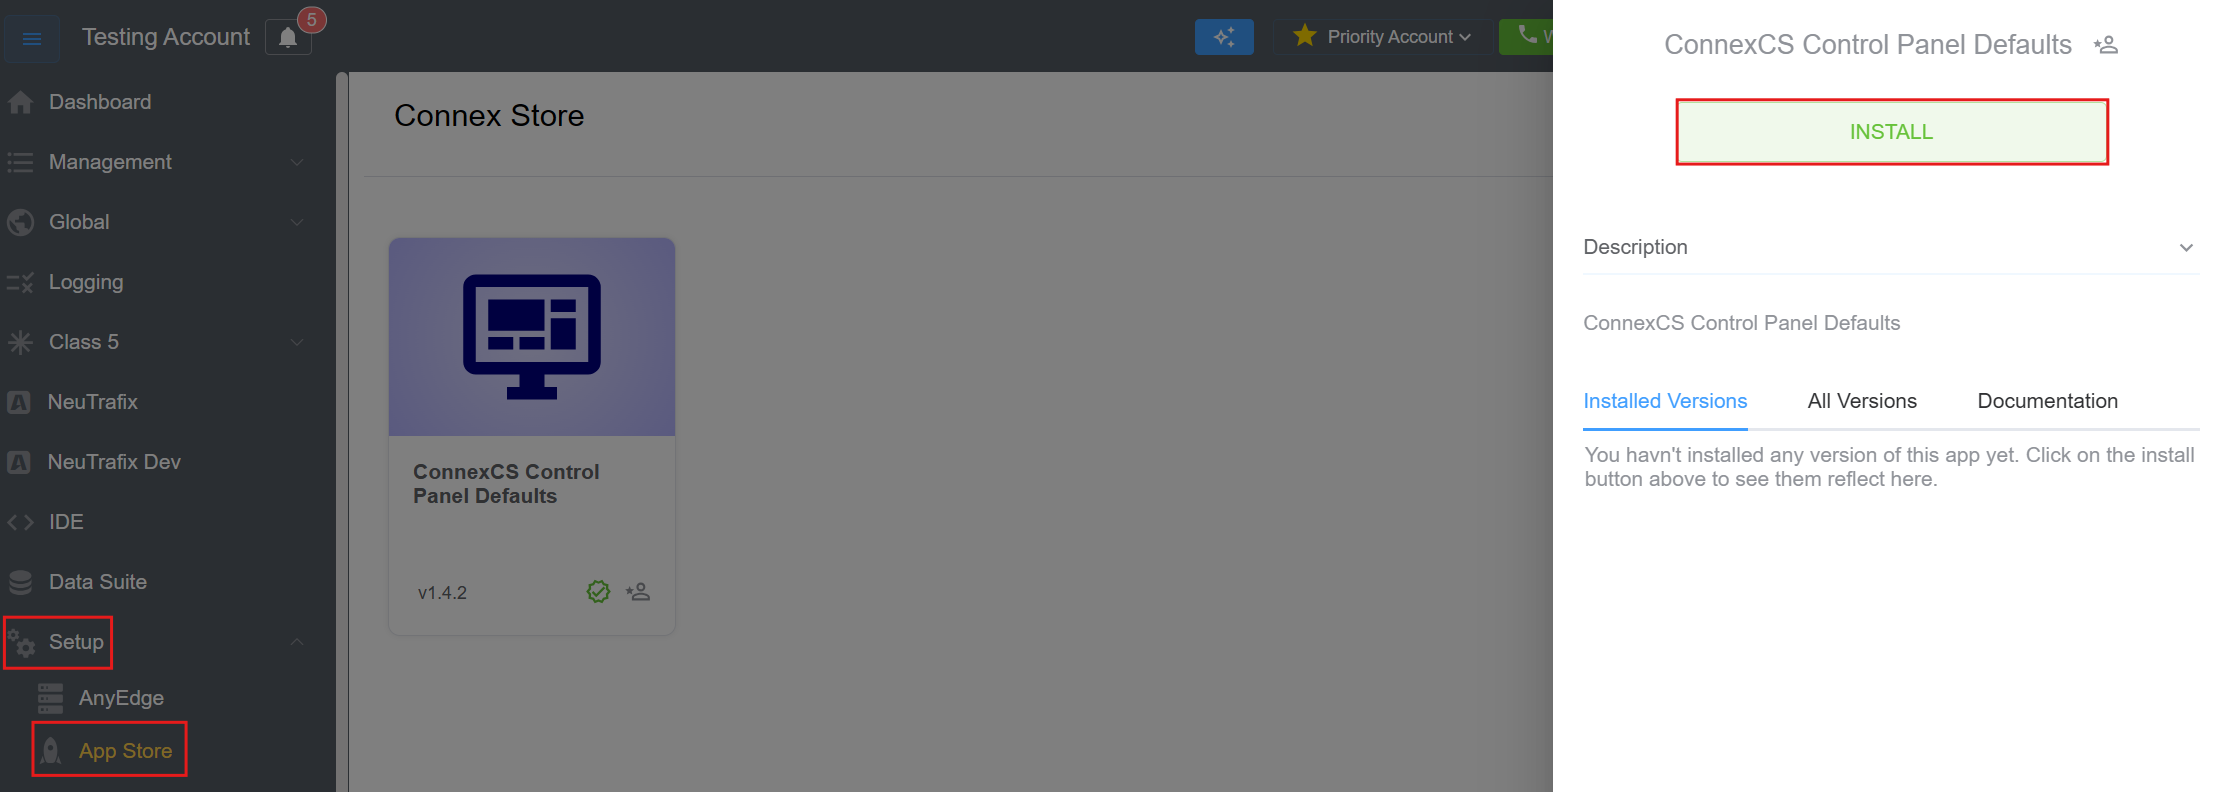
-
Fill in the
App Name,Versionand hitInstallagain. A window will appear, select the version of the app and hitInstallagain.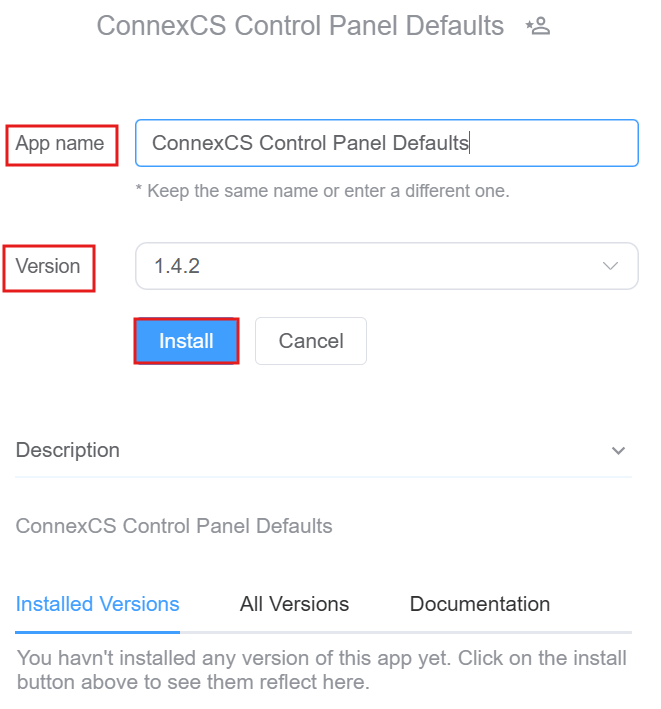
-
The installed versions are visible.
-
Navigate to Management Customer Customer[Name]. These duplicate features are automatically added when the application is installed. You can then customize them according to specific requirements from IDE section.

Contact Center
Click here for a comprehensive introduction and step-by-step setup guide for the Contact Center.
Sequential CLI
Overview
The Sequential CLI application enables users to automatically assign CLIs (Caller Line Identification) in a sequential order from a selected database.
Instead of manually selecting CLIs for each call, the system retrieves them sequentially from the database.
Steps to Use the App
-
Navigate to Setup App Store Sequential CLI and click
Install.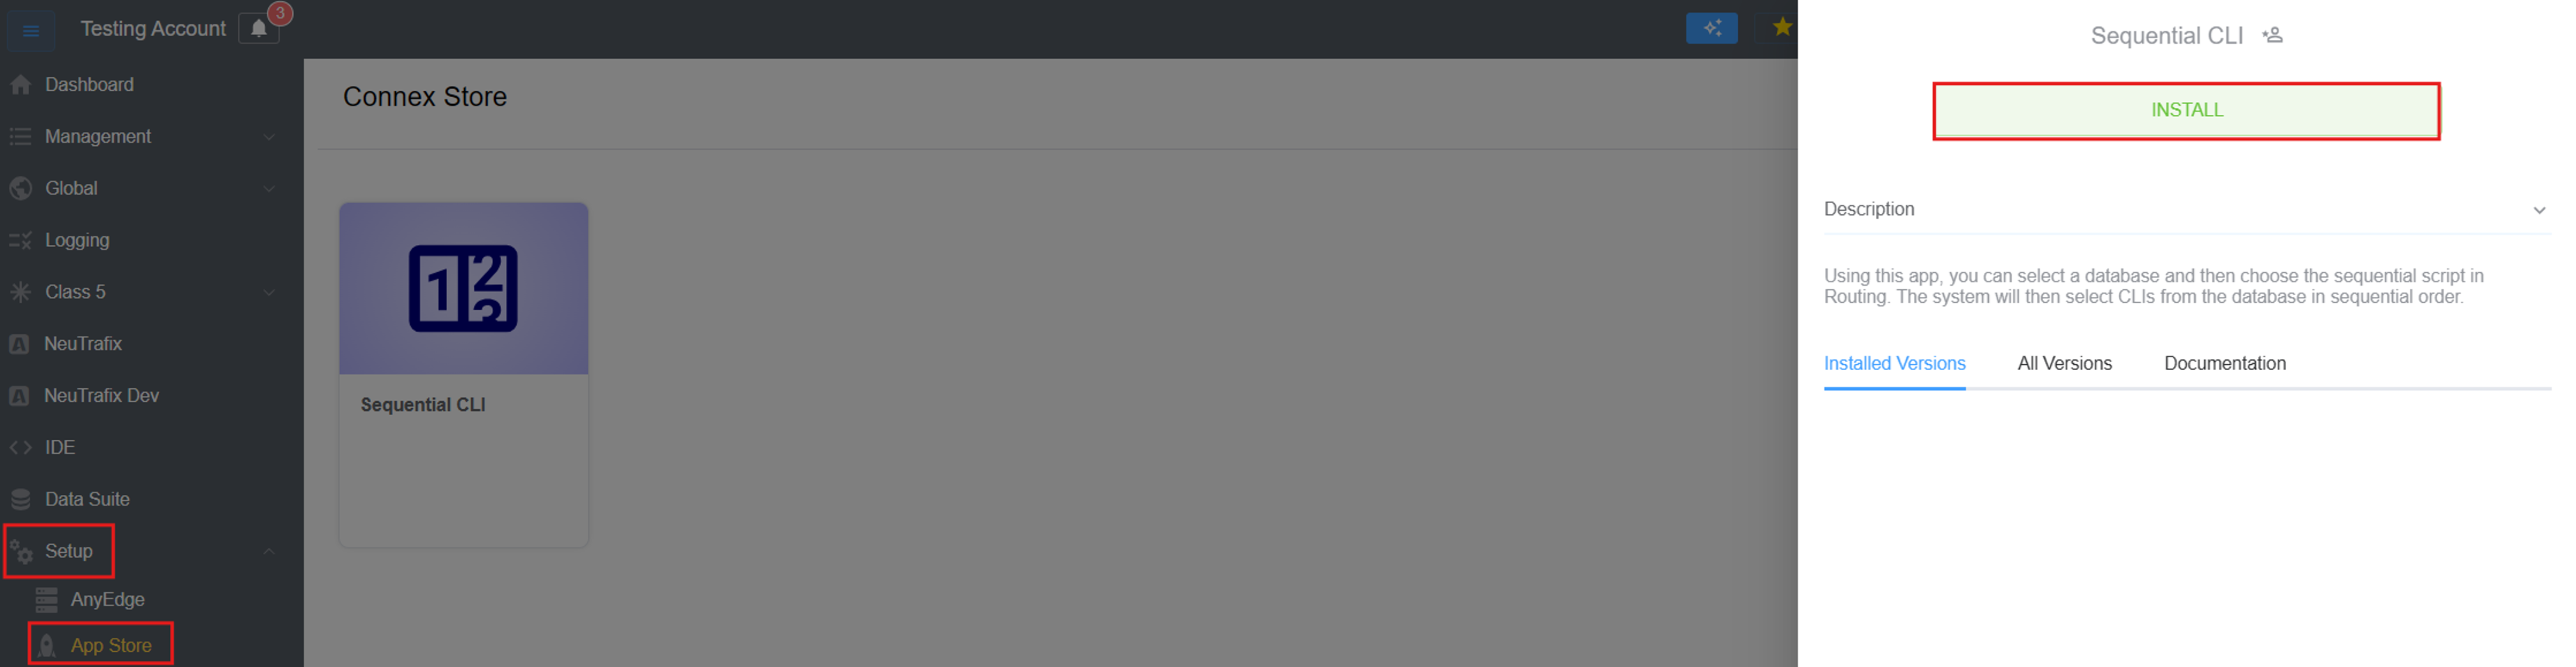
-
Fill in the
App Name,Versionand hitInstallagain.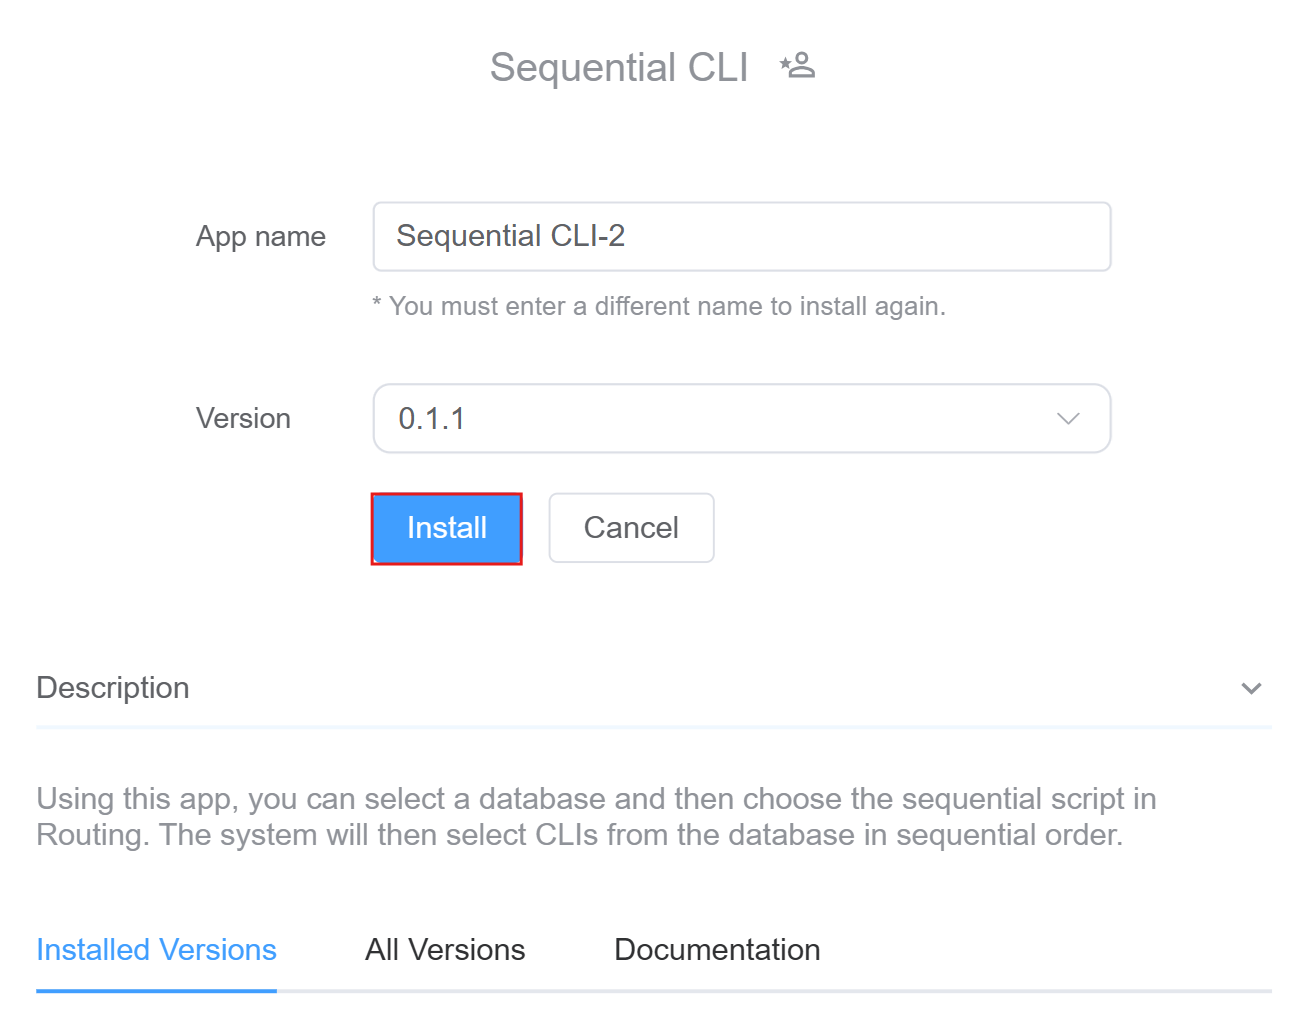
-
The installed versions are visible and click on
Config(settings button).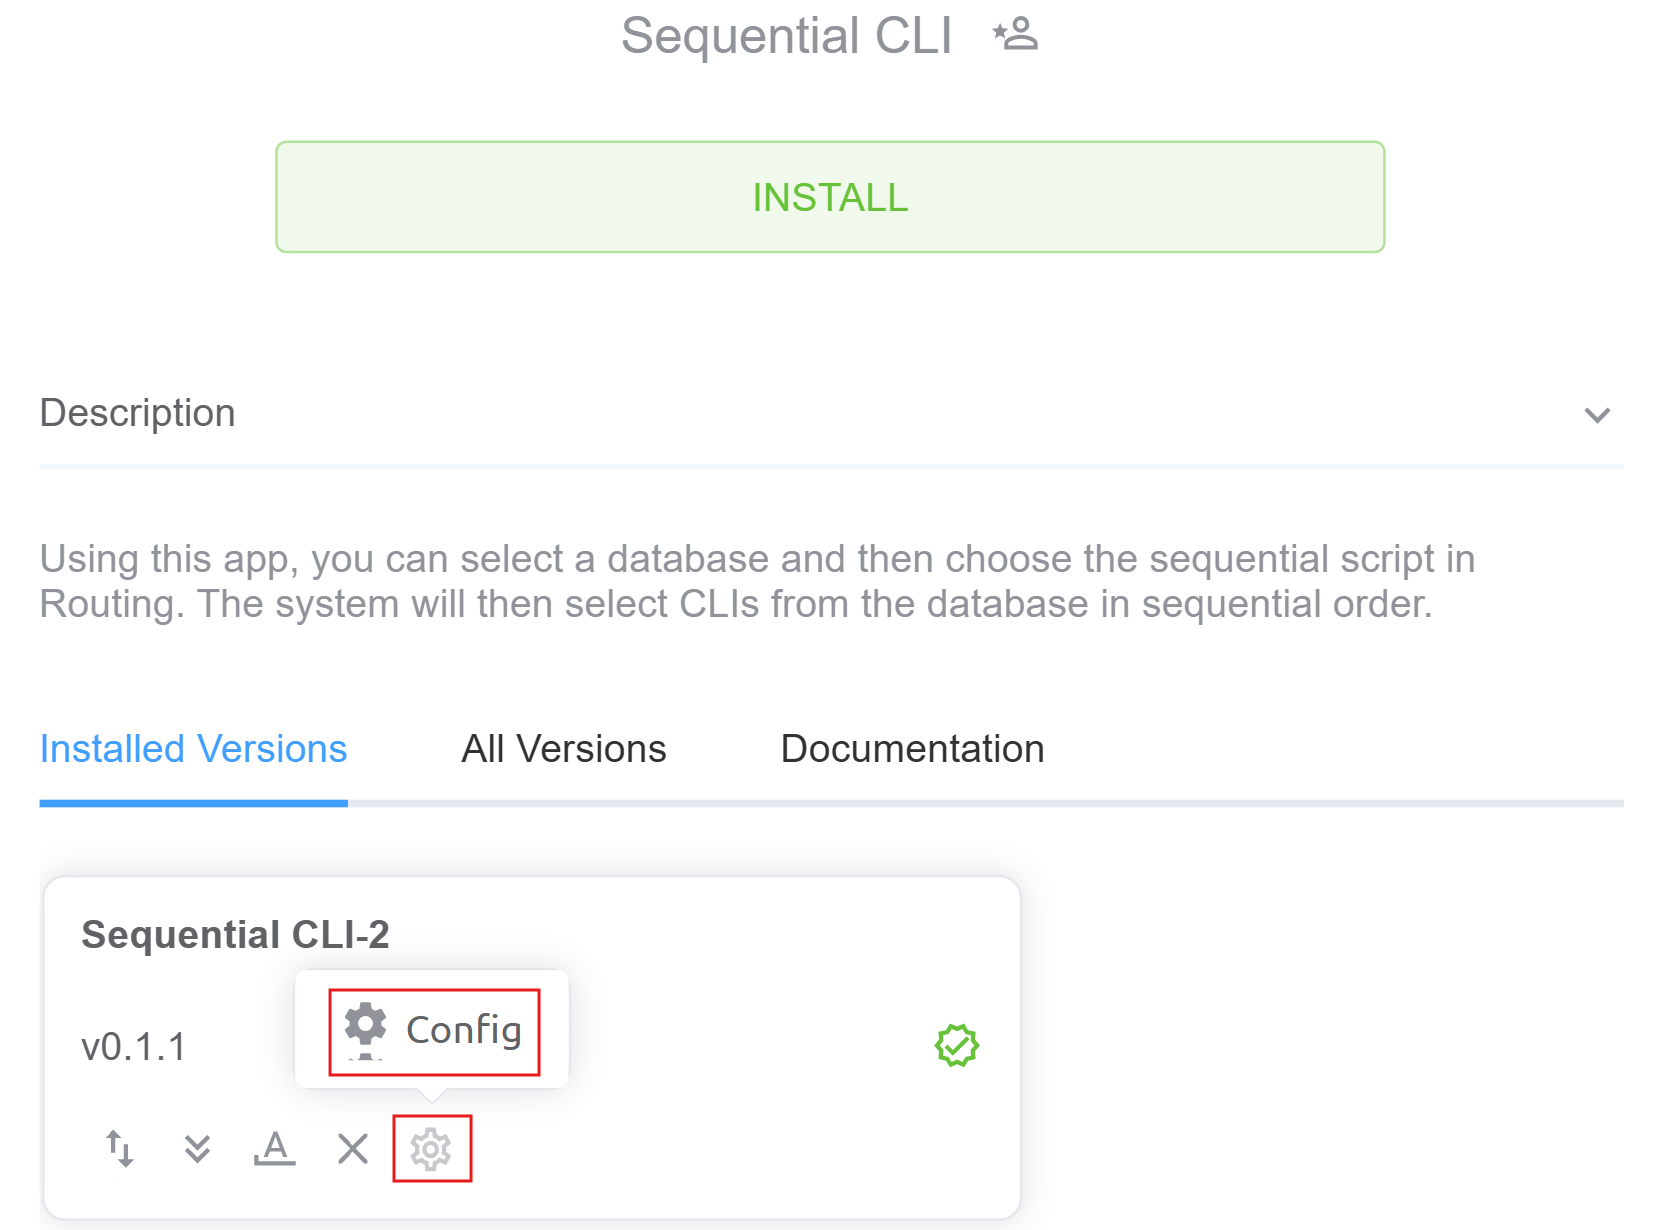
-
Select the
databaseand click onConfirm.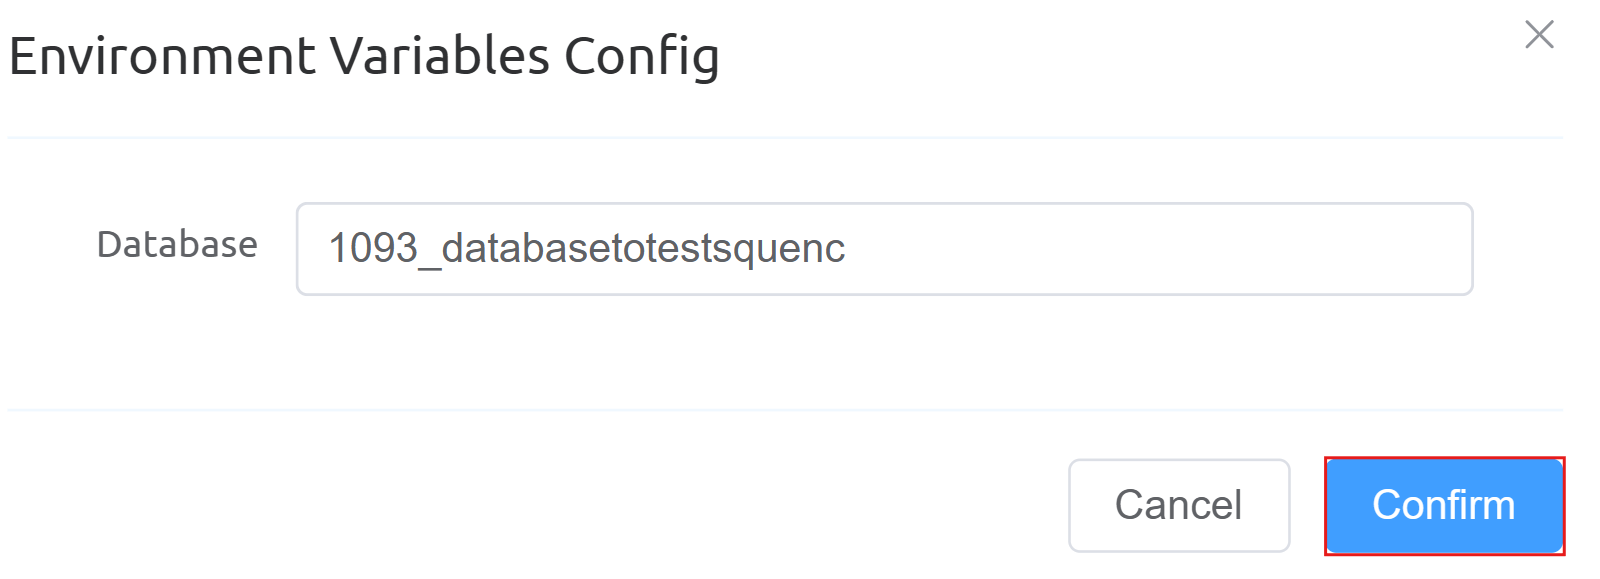
-
Navigate to Management Customer Customer[Name] Routing ScriptForge. Select the
Sequential CLIand clickSave.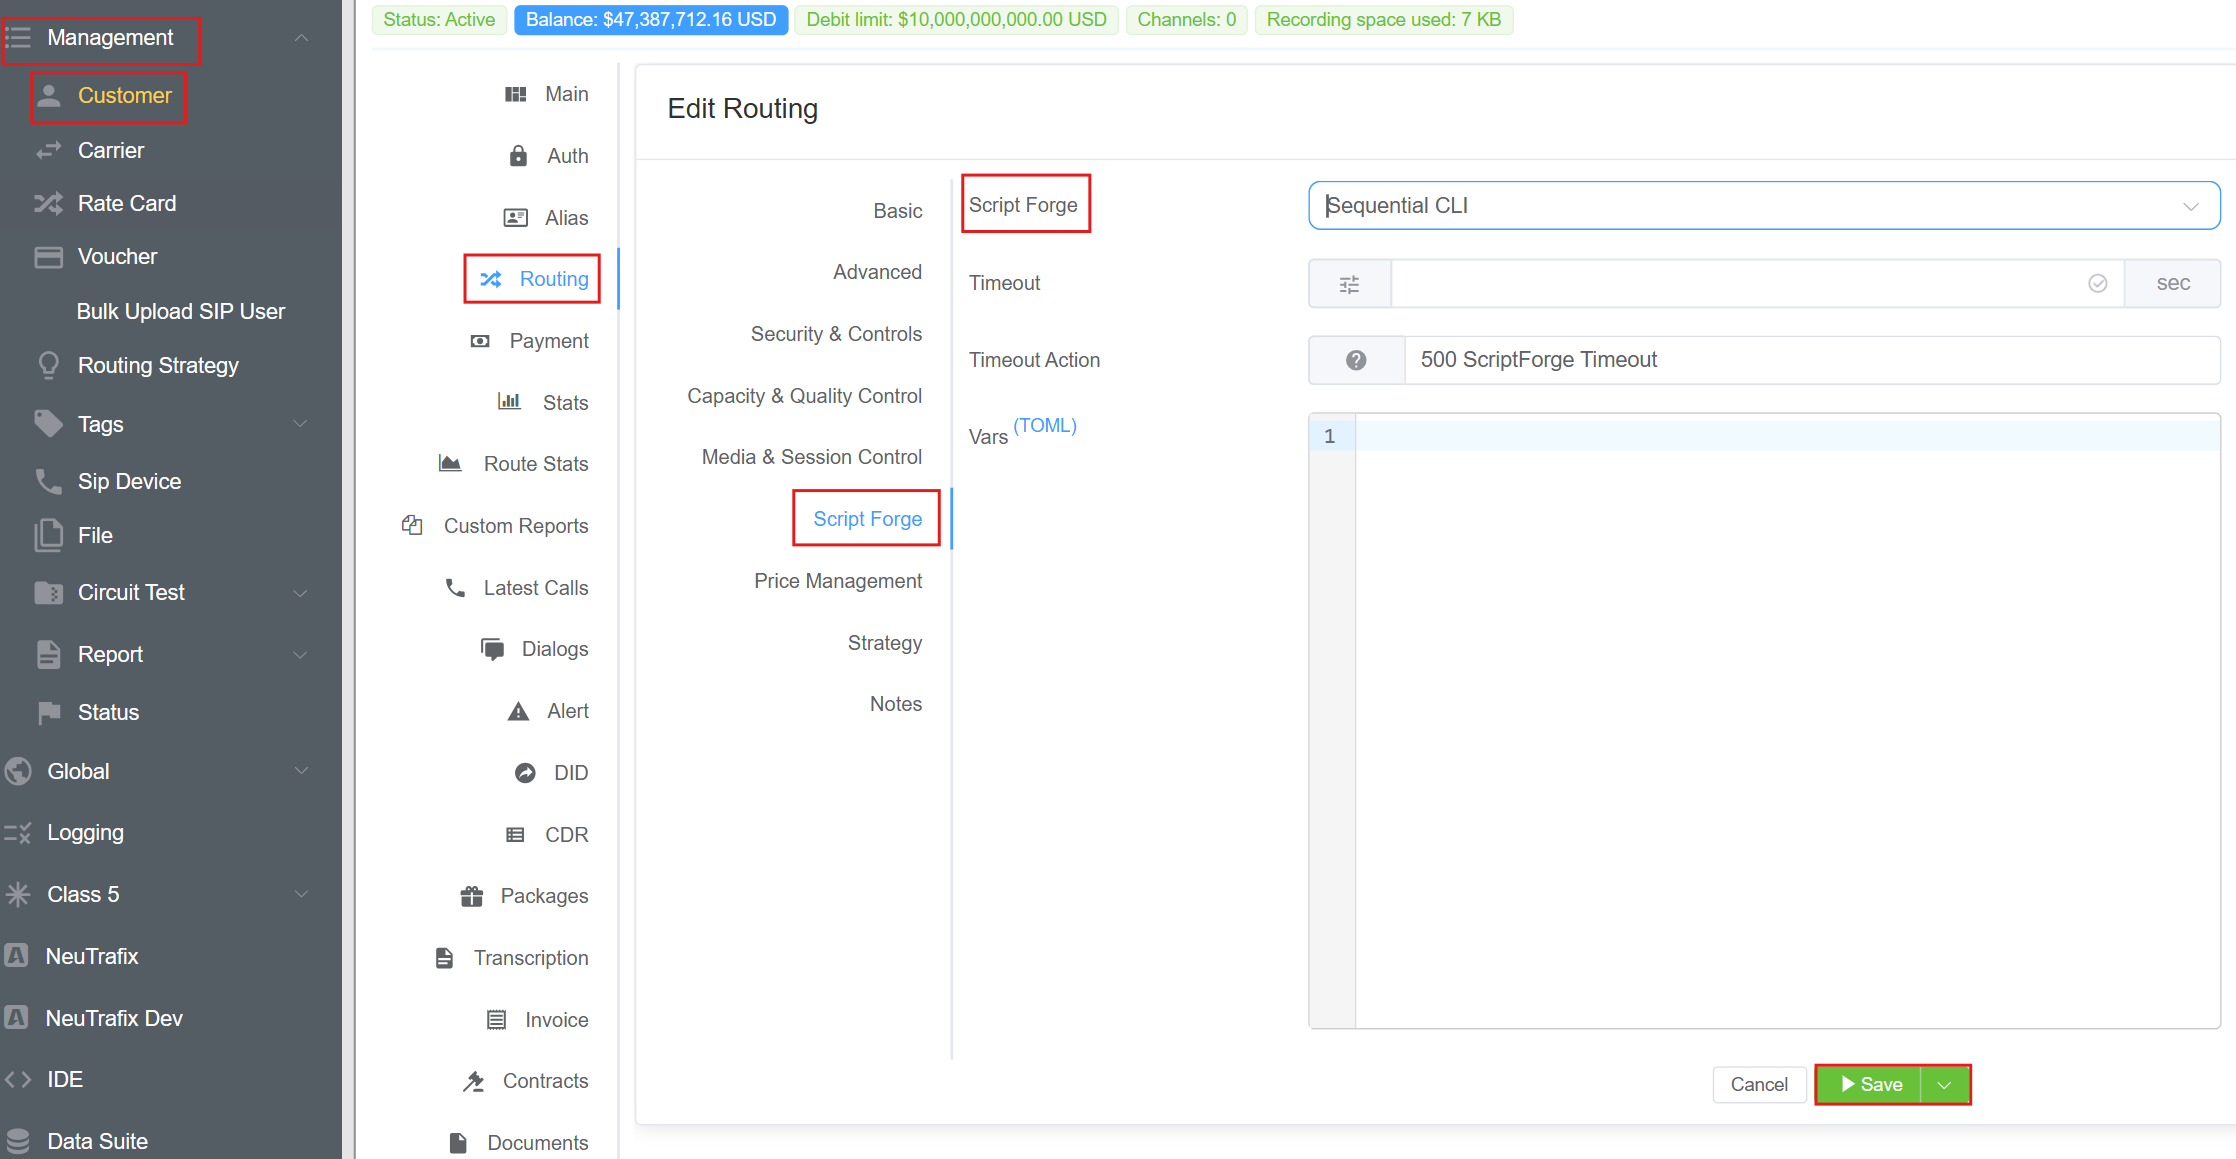
Webphone
Click here for a comprehensive introduction and step-by-step setup guide for the Webphone.
Cx MCP
Overview
The Cx MCP (ConnexCS MCP App) provides an extensible Model Context Protocol (MCP) server for the ConnexCS Application Platform, enabling seamless integration between AI agents, tools, and external services.
Instead of building integrations manually, users can leverage MCP to connect applications, execute actions, and access data through standardized interfaces, enabling scalable automation and AI-driven workflows.
How It Works
The app provides a set of default MCP tool calls out of the box.
You can review, edit, or extend these tools from the IDE section of the app. Once customized, your modified tools will be used in place of the defaults.
Steps to Use the App
-
Navigate to Setup App Store Cx MCP and click
Install.
-
Fill in the
App Name,Versionand hitInstallagain.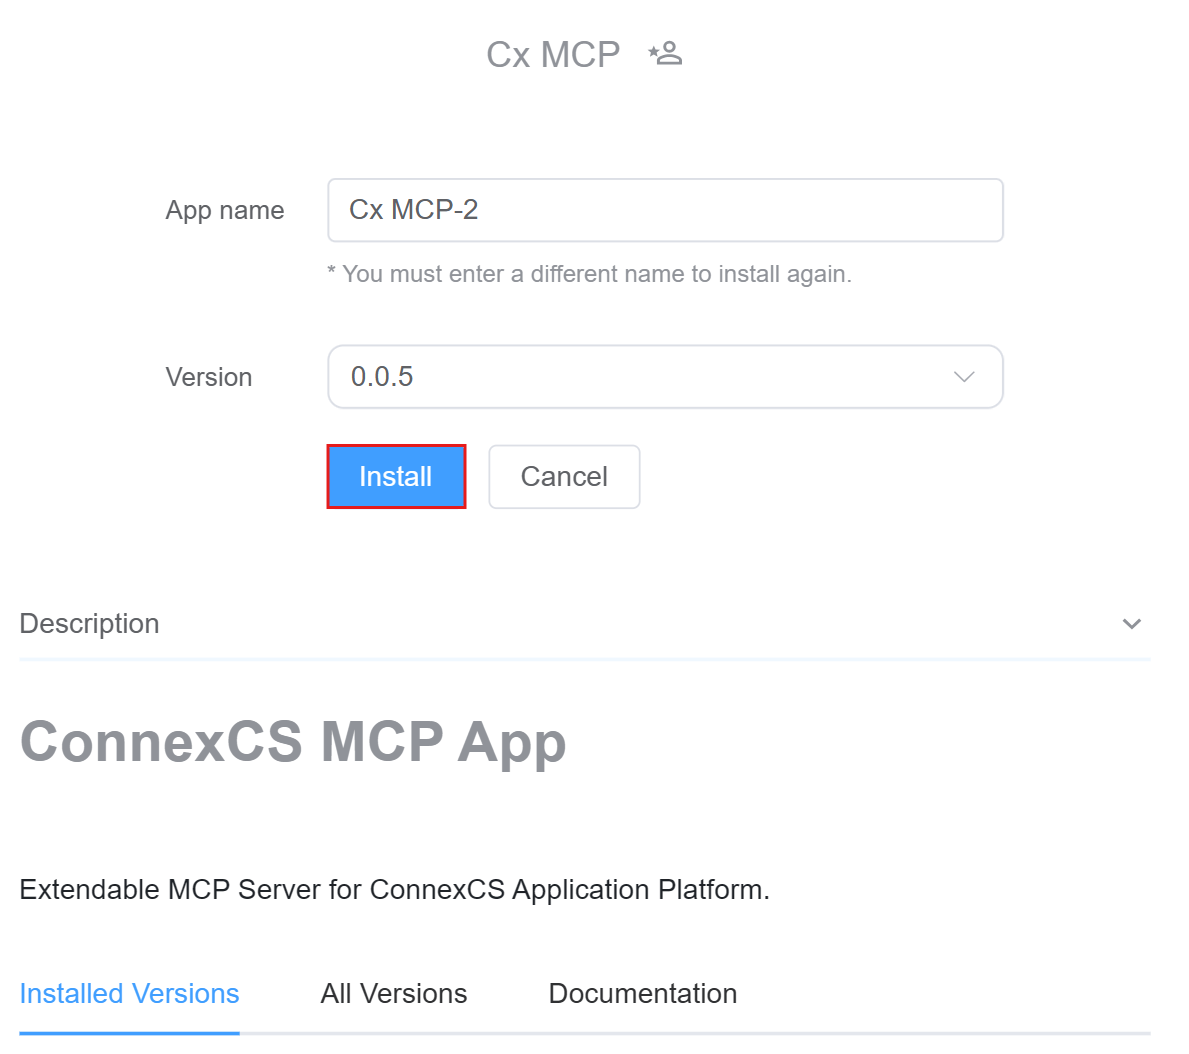
-
The installed versions are visible and click on
Config(settings button). -
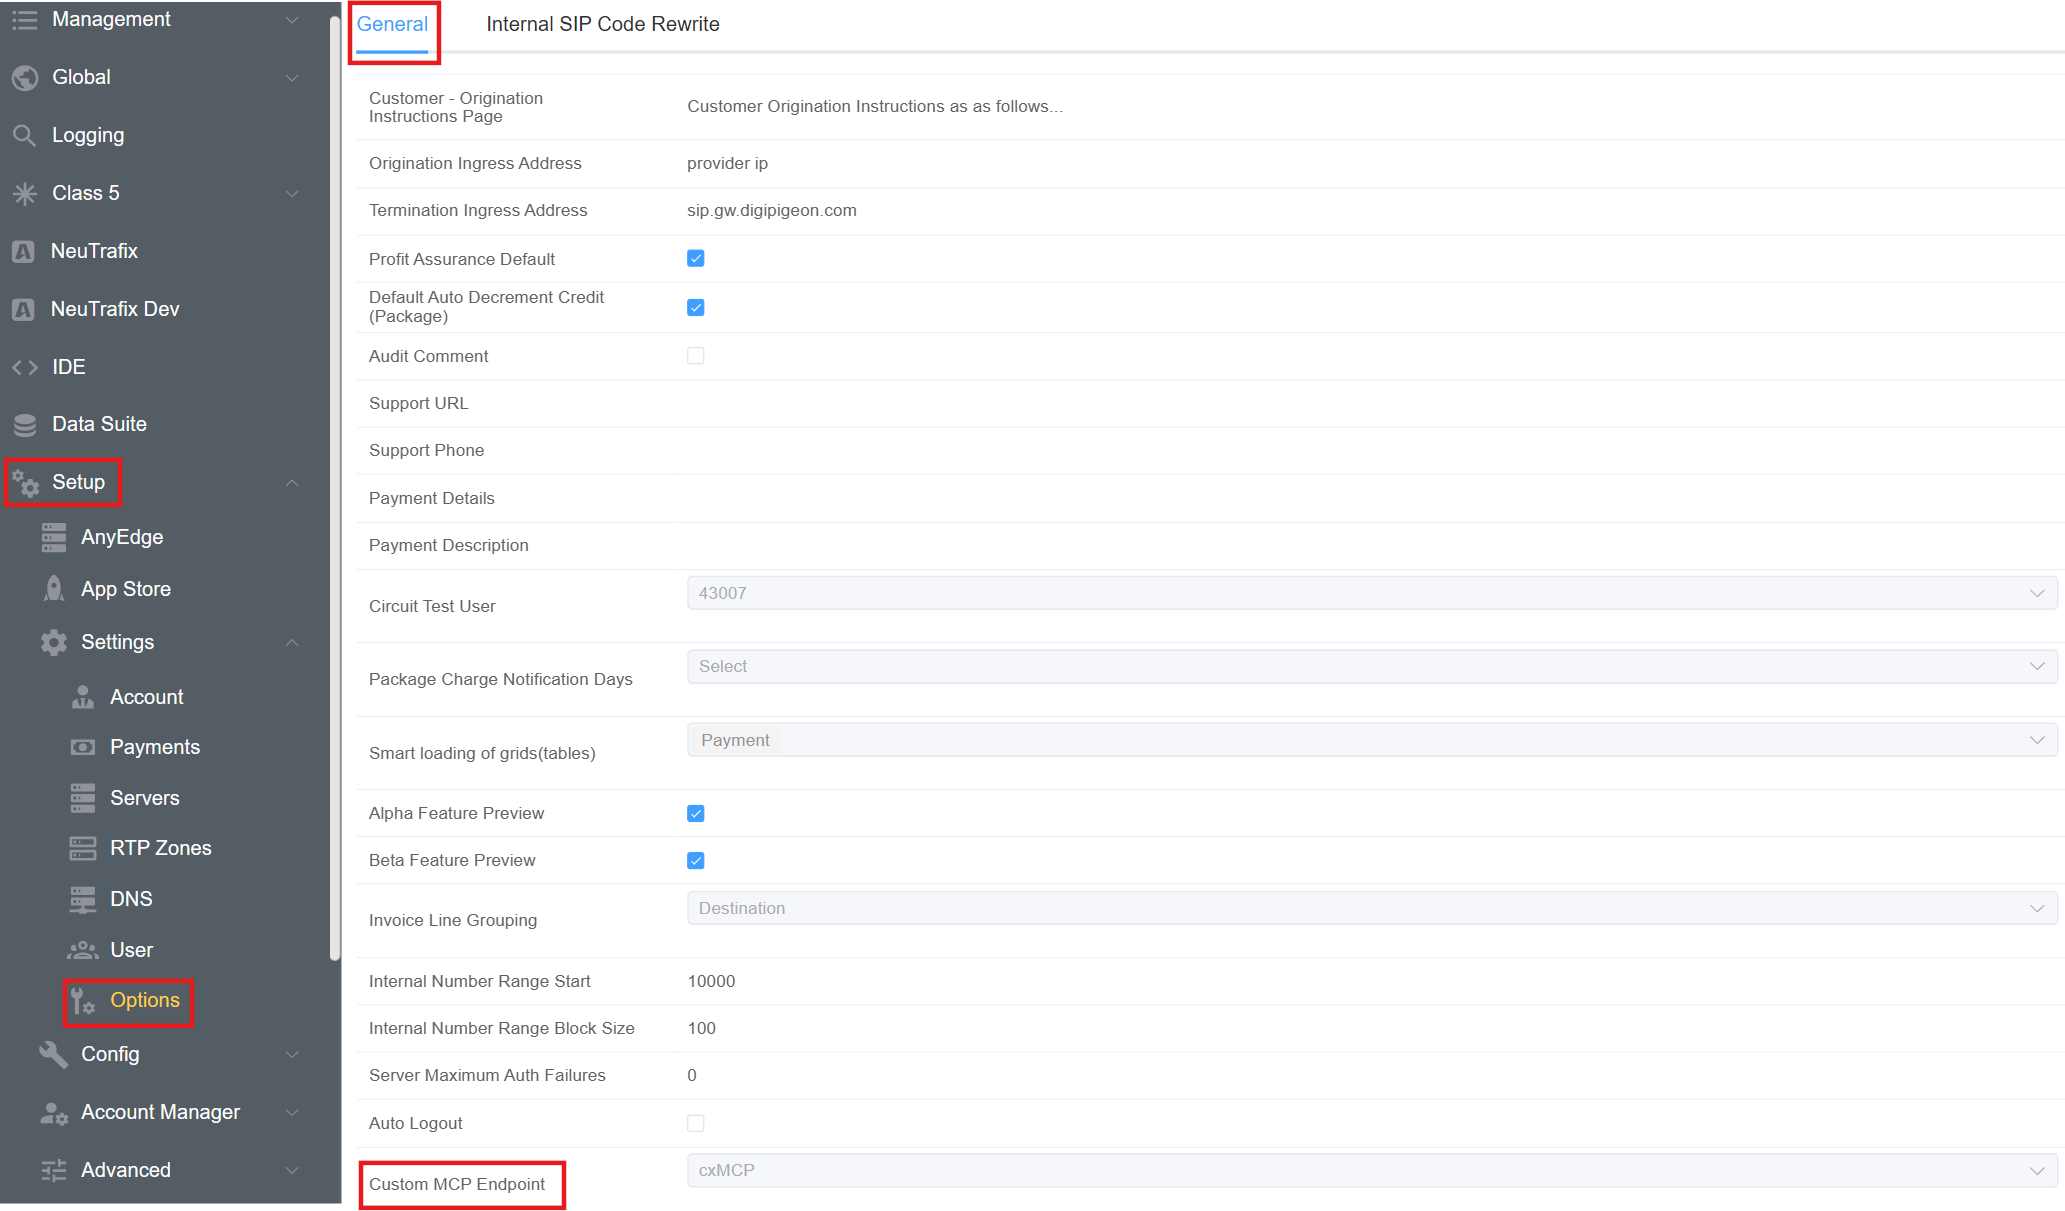
Point the MCP Server to Your App: Navigate to Setup Options General Custom MCP Endpoint. Select the app from the drop-down menu.
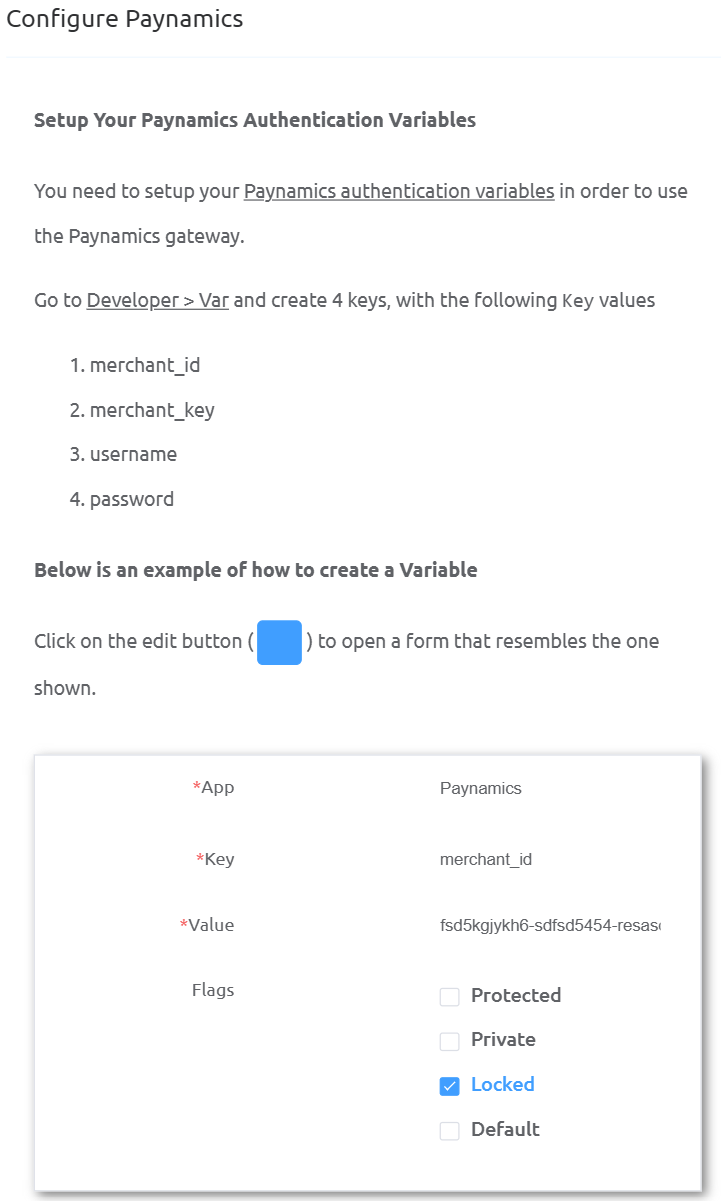
Paynamics
Overview
The Paynamics application in ConnexCS enables users to process payments through the Paynamics payment gateway, providing a secure and streamlined way to handle transactions within the platform.
It supports payments exclusively in Philippine Peso (PHP), ensuring compatibility with Paynamics’ supported currency, and is designed to facilitate billing, top-ups, and payment workflows efficiently.
Steps to Use the App
-
Navigate to Setup App Store Paynamics and click
Install.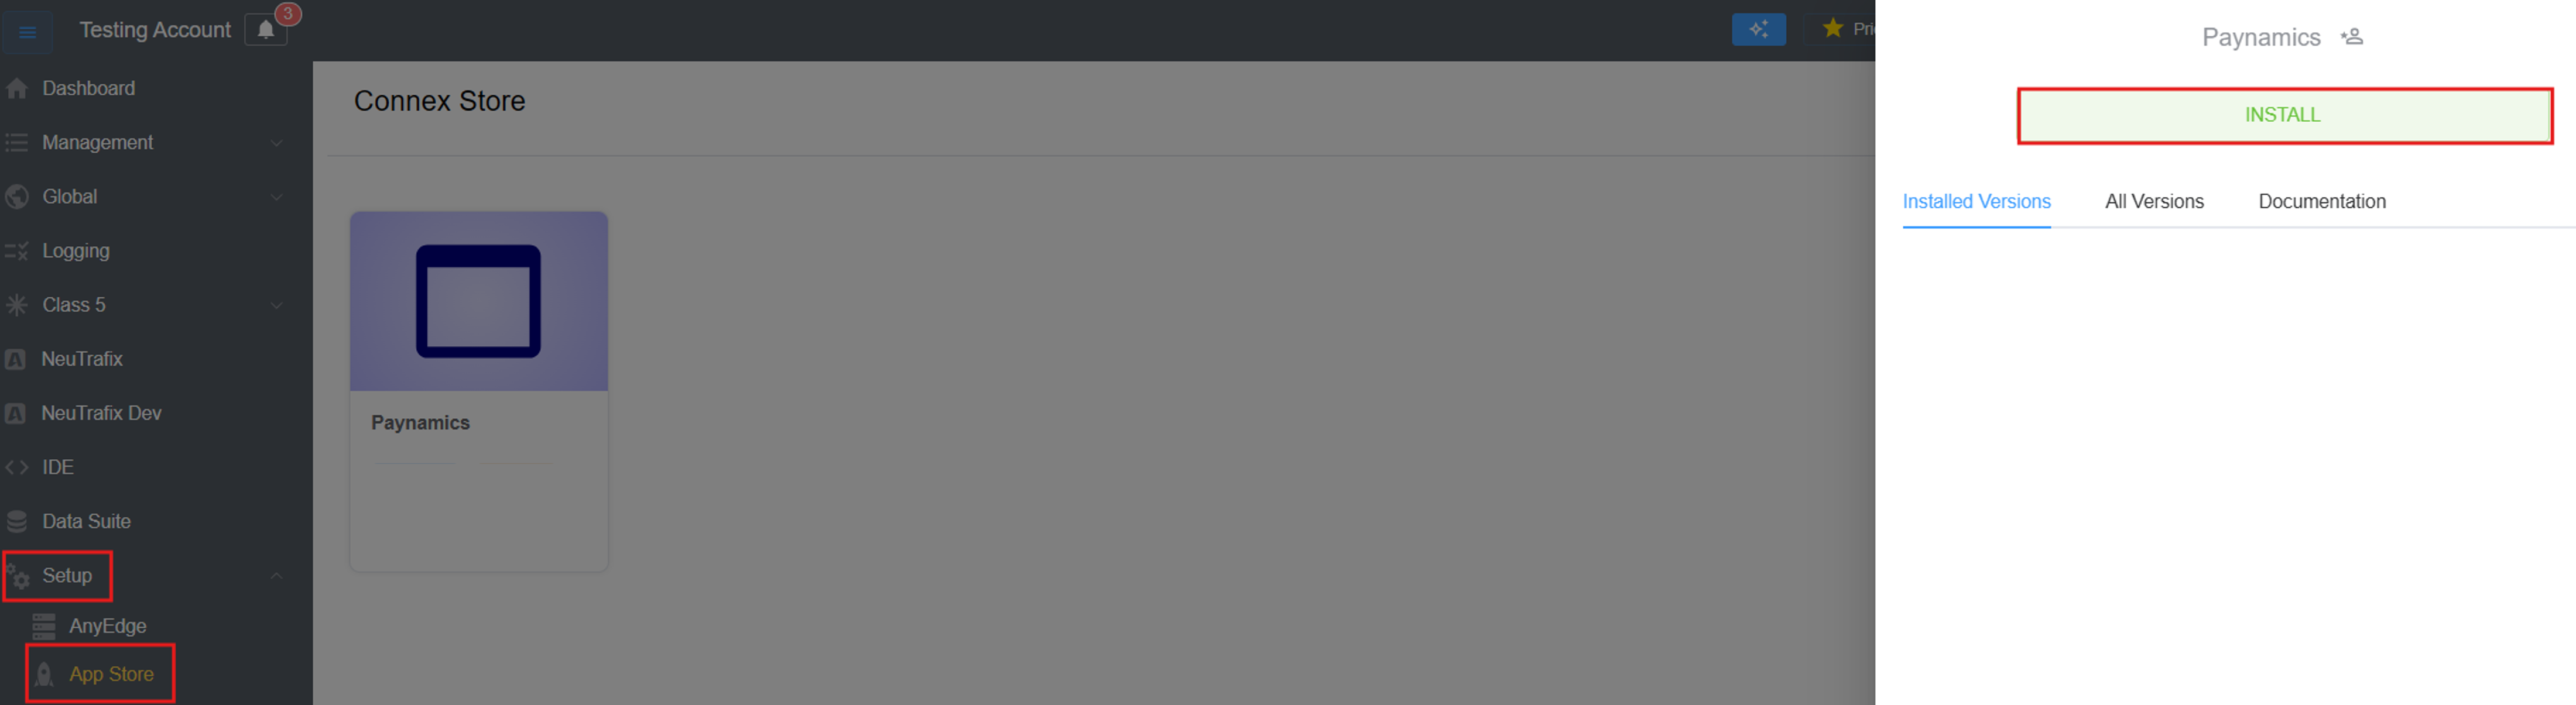
-
Fill in the
App Name,Versionand hitInstallagain.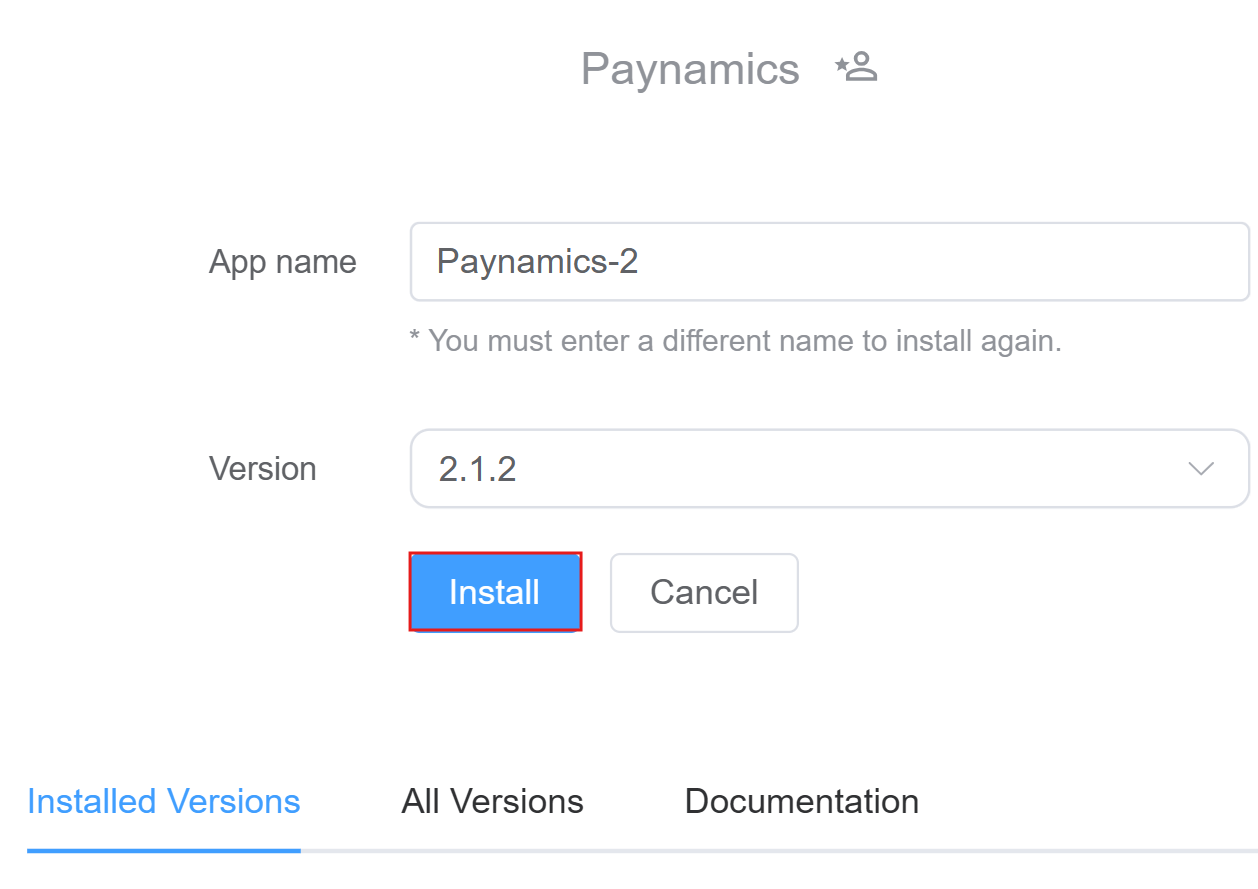
-
The installed versions are visible and click on
Config Paynamics(settings button).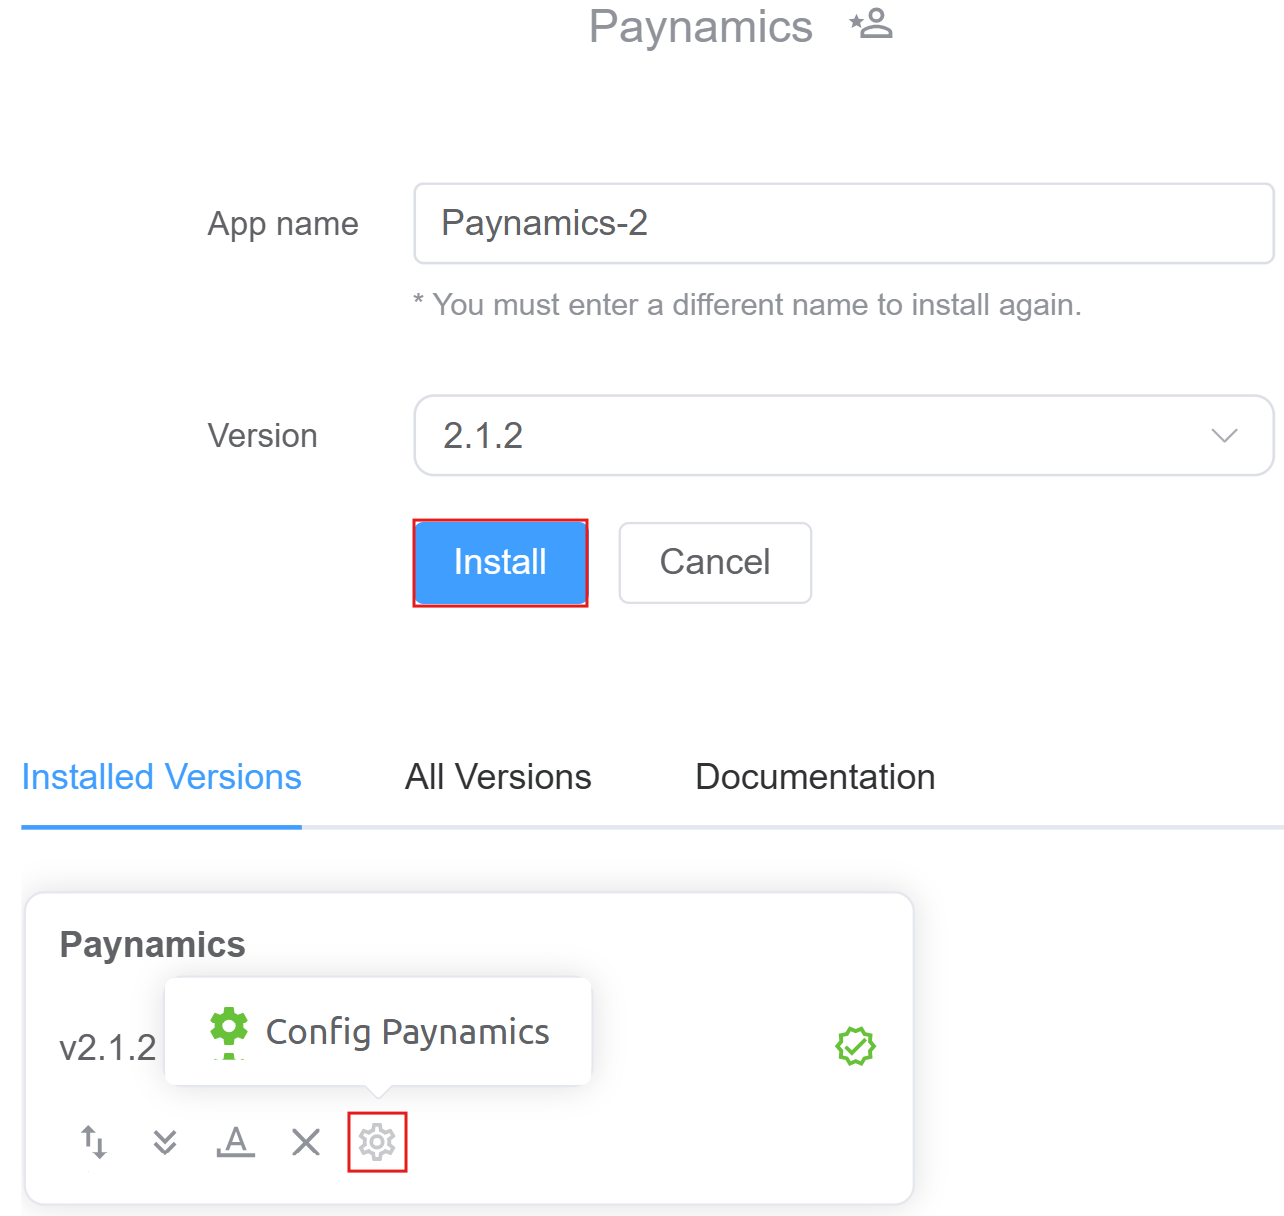
-
Follow the configuration steps as shown in the following image.