Templates
Setup Config Templates
Create your own Templates to customise the content displayed on outbound emails/SMS, the Customer Portal, and WebPhone. ConnexCS Templates use the mustash-compatible template language Handlebars.
Template Syntax
It's important for you to follow the template syntax and enter fields such as {email} or {account_name} exactly. If not, the system won't correctly replace when the template is rendered.
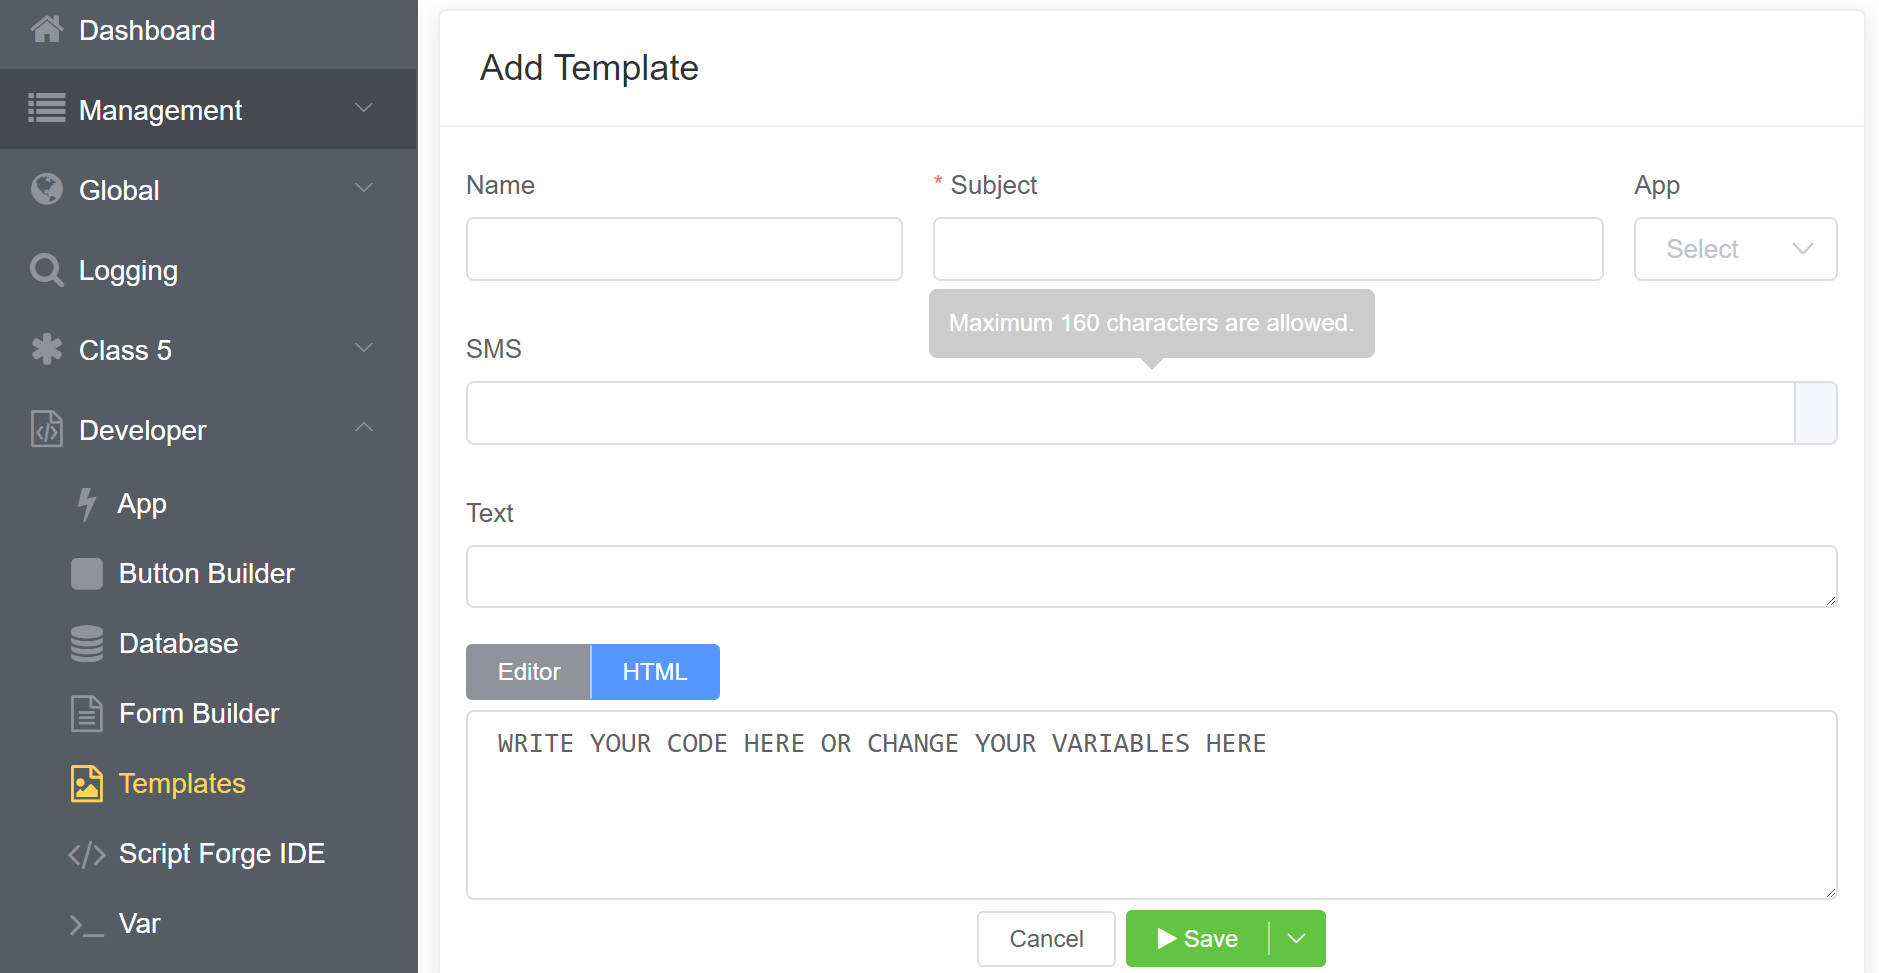
Add Template
Click the blue to add a new Template.
- Name the template.
- Subject for the communication (supports variables).
- SMS field doesn't actually send the SMS, but it's usable when other parts of the system have SMS set.
-
Use Text or HTML for the content of the communication.

Select Save to complete the configuration.
Rendering Variables
The templating system will replace placeholders with the variable when it's rendered.
Invoice
Templates use Handlebars as markup.
A handlebars expression looks like:
When the template gets executed, the contents get replaced with values from a variable.
Here, we've made the variables available for creating a customized Invoice.
Handlebars make use of Built-in Helpers.
| Built-in Helper Name | Explanation | Syntax | Template | Example Input | Example Output |
|---|---|---|---|---|---|
| #if | The "if" helper shows content conditionally; if the input is useful it will display the information; otherwise, it keeps the section empty, if its argument returns false, undefined, null, "", 0, or [] | {{#if content1}}{{content2}}{{/if}} | {{#if account.postcode}}{{account.postcode}}{{/if}} | It will take the value of postcode from the account information already added while subscribing | |
| #unless | It's the opposite of "if" helper, will render the block when the argument returns "false" values. | {{#unless name}} {{/unless}} | {{#unless name}} WARNING: This entry doesn't have a name!{{/unless}} |
{} | WARNING: This entry doesn't have a name! |
| #each | "each" helps loop through lists, and "this" refers to the current element. It simplifies list processing. | {{#each content}} |
|
{ people: [ "XXX", "YYY", "ZZZ", ], } | |
| #with | "with" helper changes this context to focus on specific data, making it easier to work with. You can consider the "with" helper as information filter. | {{#with content}} {{content1}} {{content2}....} {{/with}} | {{#with person}} {{firstname}} {middlename} {{lastname}} {{/with}} | { person: { firstname: "Ben", middlename: "Roy" lastname: "Charles", }, } | Ben Roy Charles |
| #lookup | The "lookup" helper is used to retrieve values from an object or array based on a provided key or index. | {{#each content}} {{.}} xxxx {{lookup ../}} {{/each}} | {{#each people}} {{.}} lives in {{lookup ../cities @index}} {{/each}} | { people: ["Adam", "Ben"], customer: [ "PM Dialer", "Phonebook", ], } | Adam is customer of PM Dialer Ben is customer of Phonebook |
| #log | The "log" helper in Handlebars allows you to print data at specific points in the template, helping you debug and understand the rendering process. | {{log 'xxxx'}} | {{log 'this is a simple log output'}} | null |
Invoice Variables
We've several invoice variables which you can use and customize your Invoice form.
Before describing those variables, we first discuss the steps for creating the Invoice Template
- Login to your Control Panel.
- Click on Developer > Templates and click on the blue
+button. - Enter the details like Name, Subject, App, SMS, Text.
- Click on the HTML tab and write the code for generating the Invoice.
Note
You just need to add or remove the variables from the invoice template that we'll offer.
| Variable Name | Explanation |
|---|---|
| account.name | Provides you with the account name |
| account.address | Provides you with the account address |
| account.city | Provides you with the city name associated with the account |
| account.county | Provides you with the county name associated with the account |
| account.postcode | Provides you with the postcode associated with the account |
| company.name | Provides you with the country name |
| company.address | Provides you with the country address |
| company.postcode | Provides you with the country postcode |
| account.id | Provides you with the Account Number |
| invoice.id | Provides you with the Invoice number |
| {#if lines.0.start_date}}{{dateFormat lines.0.start_date 'll'}} to {{dateFormat lines.0.end_date 'll'}}{{/if}} | Billing Period |
| dateFormat invoice_date | Invoice Date |
| dateFormat date_due | Provides you with the Due Date |
| company.currency | Provides you with the Total Due Amount |
| sec2min duration (converts seconds to minutes) | Provides you with the total Billable Minutes |
| connected | Call Count |
| numberFormat unit_price, {numberFormat net, {numberFormat tax, numberFormat sub_total | Gives you the total Amount |
| nl2br account.config.payment_details | Account Details |
| account.phone | Telephone |
| account.email | Billing Email |
| dateFormat date | Formats the date to: YYYY-MM-DD |
| numberFormat (Input: 55662890) | Formats the provided number (Output: 5,56,62,890) |
| currencyFormat currency (Input: 25000) | Formats the provided currency and displays the amount in dollars (Output: $25,000) |
| 'math', function | It performs mathematical functions like addition, subtraction, division, and multiplication. |
| sub_total{{sub_total} ($10) | Sub total amount |
| tax {{ tax}} ($1) | Tax applied on the bill |
| total {{ total} | Total amount due (Sub total amount + Tax amount = $10 + $1= $11) |
Info
You can use nlb2r function to create the next line.
Stock Templates
ConnexCS provides standard templates which you can customise as you wish. To customise any template, click on the template name, modify as needed, and click Save. To revert the template to its original configuration, select the checkbox next to the Name and click Reset.
ScriptForge Integration
Dynamic Templates with custom variables are made by including ScriptForge(further details here. It's done by using the scriptforge tag. Ex: To include a ScriptForge script with ID 1234, use {{scriptforge 1234}}.
This will pass ALL the variables in the current scope to ScriptForge. Whatever ScriptForge returns is then made available back in the main scope for use with the template system.
Sample RSS Feed Injection into a template
This example can be used to provide a custom page in the WebPhone
ScriptForge
1 2 3 4 5 | |
Template
<h1>Here is the news</h1>

{{scriptforge 1234}}
<h1>News</h1>
{{#each items}}
<h2>{{title}}</h2>
{{/each}}