Portal
Document Metadata
Category: Setup & Configuration → Integrations → Portal
Audience: Administrators, Engineers, Support Team
Difficulty: Intermediate
Time Required: 10–20 minutes
Prerequisites: ConnexCS account with Integrations and Branding permissions, custom domain / CNAME record access
Related Topics: API Integrations, Multi-Brand Support
Next Steps: API Integrations, JWT Keys / Tokens
Setup Integrations Portal
The Portal lets you add domains and sub-domains to the Control Panel, which the customer can access through the Customer Portal.
You can provide several domains for your customers through different brands, and each domain can have different permissions, currencies, default, etc.
Deployment
Customers are instructed to point a CNAME record to portal.connexcs.com; secure certificates are deployed automatically upon configuration.
Portal Setup
Step 1: Set up the CNAME record
-
Access your domain account at your domain host.
-
Locate the page for updating your domain's DNS (Domain Name System) records.
You can refer the page to as DNS Management, Name Server Management, or Advanced Settings.
-
Locate the
CNAMErecords for your domain. -
Add a new domain record (such as
portal.yourdomain.com, whereyourdomain.comis the domain that you own). -
Point it toward
portal.connexcs.com. -
If asked, we recommend setting
TTLat 300 (seconds), which is 5 minutes. -
You can add the domain to ConnexCS as soon as you configure it.
Your should expose your Customer Portal via a CNAME which you set up. This won't work with A records or pointing directly.
Step 2: Add a Domain to Portal
- In Portal, click .
- Enter the details in their respective fields of the ensuing window.
- Click the
Savebutton. Soon after, a certificate gets issued for the domain.
Note
You should expose your Customer Portal via a CNAME that you setup. This won't work with A records or by pointing directly.
<img src= "/setup/img/portal12.png"style="border: 2px solid #4472C4; border-radius: 8px;"
Configuration Options
Click each tab to view the configuration details
- Domain: The URL your customers use to access their portal.
- Brand Name: The name that appears on the portal for your customers.
- Customer Sign up: Allow customers to sign up independently.
- Carrier Sign up: Allow carriers to sign up independently.
- Currencies: Choose the currencies available for your customers when they sign up.
- Template Customer: Select a pre-configured template customer on your account, preset with default values and gets set when a customer independently creates their account via the portal (See "Template Customer example" below). Automatically replicate settings for new customers.
Available values for this template are:
- Customer [Fields in the customer itself, such as debit limit]
- Routes
- Payments (Any associated payment configurations are copied)
- Alerts
- Packages
- Contracts (Required contracts (e.g., if two contracts are needed at sign-up) are duplicated automatically)
Select the sections/features displayed to your customers (see "Override Options" below). Individual settings can be customized per customer.
Common
| Feature | Description |
|---|---|
| Balance | Customer's current account balance |
| Call Detail Record (CDR) | Displays detailed information of each call like call details, destination etc. Click here to know more. |
| Breakout | Offers billing-accurate CDR insights, including customer profits, costs, billed amounts, ASR, and ACD. Click here to know more. |
| Latest Calls | Provides records of recent incoming and outgoing calls, their SIP traces, and run simulated calls. Click here to know more. |
| CLI | Displays the number of an incoming call. Click here to know more. |
| Customer ACD | View Average Call Duration as a total or per-carrier basis. Click here to know more. |
| Customer ASR | View Average Call Duration as a total or per-carrier basis. Click here to know more. |
| Customer CPS | View calls per second over time. Click here to know more |
| Customer Channels | View ccustomer channels. Click here to know more. |
| Customer DTMF | View DTMF percentages of each carrier. Click here to know more. |
| Carrier CPS | View carrier's calls per second. Click here to know more. |
| Carrier Channels | View carrier's channels. Click here to know more. |
| Carrier DTMF | View DTMF percentages of each carrier. Click here to know more. |
| Carrier Portal | Allow portal access to your carrier, just like customer portal. |
| Rate Cards | View Customer Rate Cards and Provider Rate Cards of your customer. Click here to know more. |
| DID | View the list of DIDs. Click here to know more. |
| DID (Editable) | Allows customer to edit the DIDs. |
| DID Destination Lock | Locks DID Destination so that it cannot be changed (in url destination). |
| DID Tags | Add tags for informational purposes. Click here to know more. |
| IP Auth (Editable) | Allows your customer to edit the IP Auth settings. Click here to know more. |
| SIP Auth (Editable) | Allows your customer to edit the SIP Auth settings. Click here to know more. |
| User Registration | View active registrations. Click here to know more. |
| Queue | The Queue, like Groups, routes calls to the longest-idle agent in a team-based call queue. Click here to know more. |
| Audio | Allow your customer to upload and store audios for IVR or Queue PBX functions. Click here to know more. |
| Interconnect Info | Information on termination and origination address. Click here to know more. |
| Packages | Packages to offer predefined products and services. Click here to know more. |
| Show RTP Servers | It will display the RTP Servers used by your customers. |
| Routes (Editable) | View, configure and edit Routing options for customers. Click here to know more. |
| Summary | Display the summaries of live calls (last 24 hours), Daily, Monthly. This data updates every hour. Click here to know more. |
| Data Management (Data Suite) | Allows customers to create custom persistent data storage. Click here to know more. |
| Allow Route Public Note | Notes entered here get displayed on the Customer Portal when logged in. Click here to know more. |
| Recording | The Recording area allows you to listen to recorded calls, provided this feature is available on your account. Click here to know more. |
| Download Recording | Allows your customer to download call recordings. Click here to know more. |
| Invoice | Allows customers to generation invoices. Click here to know more. |
| Status | Use Status to create customer-facing status pages, automating outage and downtime notifications. Click here to know more. |
| Public Status | Make the status visibility as public. |
| Alert | Allows your customers to apply Alerts for Balance, ASR, ACD, CDR etc. Click here to know more. |
| Editable Balance Alert | Allows your customers to edit Blalance alert threshold. Click here to know more. |
| Payments | Displays various payment modes. Click here to know more. |
| Pending Bank Payments | Displays any pending bank payments. |
| Block PayPal | Allows your customers to block PayPal payment mode. |
| Block Stripe | Allows your customers to block Stripe payment mode. |
| Voucher | Enable pre-generated codes with monetary value to be used for account top-ups. Click here to know more |
| Dialog | Display the status of current active calls on the account. Click here to know more. |
Class 5 Access
| Feature | Description |
|---|---|
| AI Agent | It replaces AI Call Center Agents. |
| App | It helps to create small drag and drop applications. Use ConneXML here. Click here to know more.. |
| Conference | Allows multiple participants to interact simultaenuously. Click here to know more. |
| IVR | An anutomated telephone system that allows customers to interact with the system via keypad inputs or voice. Click here to know more. |
| Group | route calls to a designated team based on your configured strategy. Click here to know more. |
Customized report view that shows different levels of detail depending on whether the user is a carrier or a customer.Select the columns to display in the Report Breakout Report.
Select which CDR fields are available for viewing by different user types. Select the columns to display in the Management Customer [Choose Customer] CDR Report.
- Javascript: You can ad Custom Javascript in the form of raw Javascript.
For example,
alert('Hello World');
Or in reference to an external Javascript File. Ex:
<script src="https://www.mydomain.com/custom.js"></script>
- CSS Add custom CSS to modify how various elements are displayed. For example,
h1 {
  display: block;
  font-size: 2em;
}
-
Upload Logo - Upload your logo in
jpg,pngorgifformat (max 350px wide) to Management File Public.A list of available files will now appear in the "Upload Logo" Box.
-
Footer - Enter text to display at the bottom of the page, for example Copyright My Company
You can now associate brands with Portal, and send an e-mail with your brand or domain name with this feature.
A customer can sign into the various domains available in the system.
Each domain can have different price points, support levels, features, etc.
Template Customer example
If you want to give all your customers $5.00 credit, create an account from: Management Customer. Add $5.00 in Payments for that account.
When a new customer creates an account from the Customer Portal, they will see a payment created for $5.00 at the same time of account creation.
Override Options
To override these options for specific customers, go to Management Customer [Choose Customer] Edit Config Portal Access.
Select items from the "Show" heading to display the feature, or from the Hide options to prevent it from appearing.
Steps to create a new Domain:
-
Go to Setup Integrations Portal.
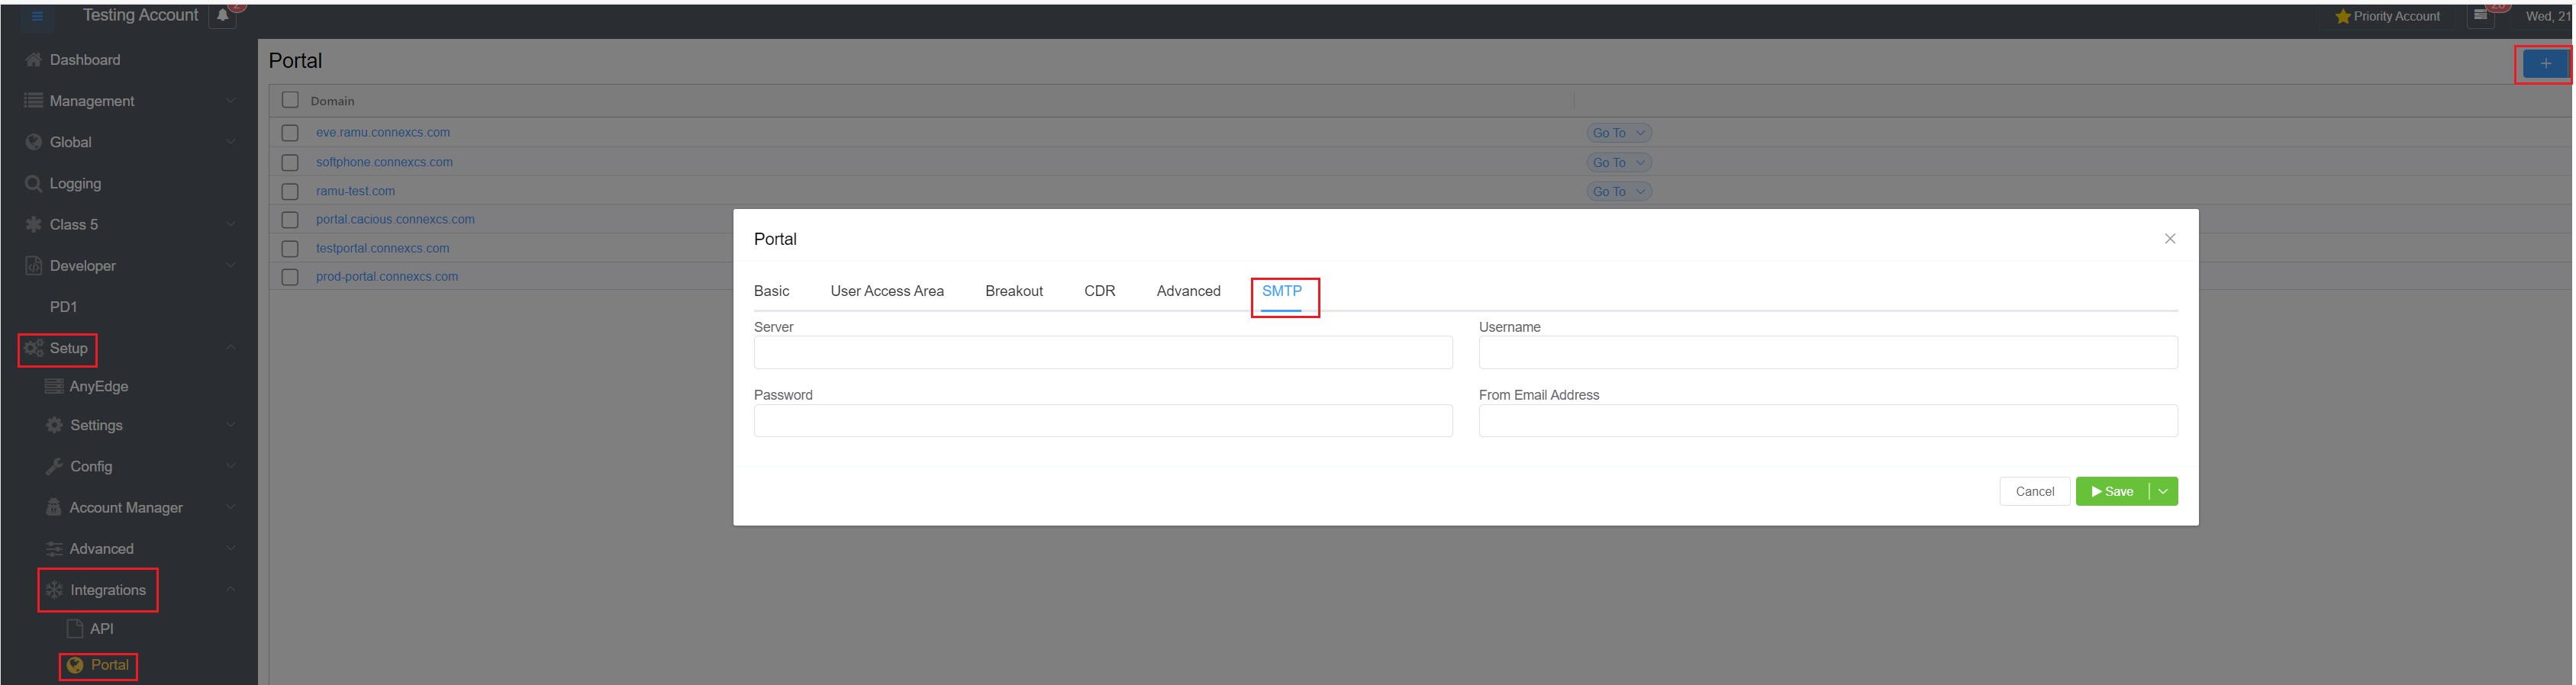
-
Click on
+button and click on the SMTP tab. -
A window with several fields will appear. You need to fill out the fields:
3.1 Server: ConnexCS defines the SMTP server for your brand or domain.
3.2 Username: Define the name you want for the domain.
3.3 Password: Define the password for the e-mail address.
3.4 From Email Address: This defines the name of your domain e-mail.
Steps to add Domain to the Customer:
- Go to Management Customer Customer Name.
- Select the customer you want to associate with the brand.
- Click on
Edit. - Click on
Configand in the Domain field you can select the domain from the dropdown menu. - Click on
Saveand the customer will be associated with that particular Domain/ Brand.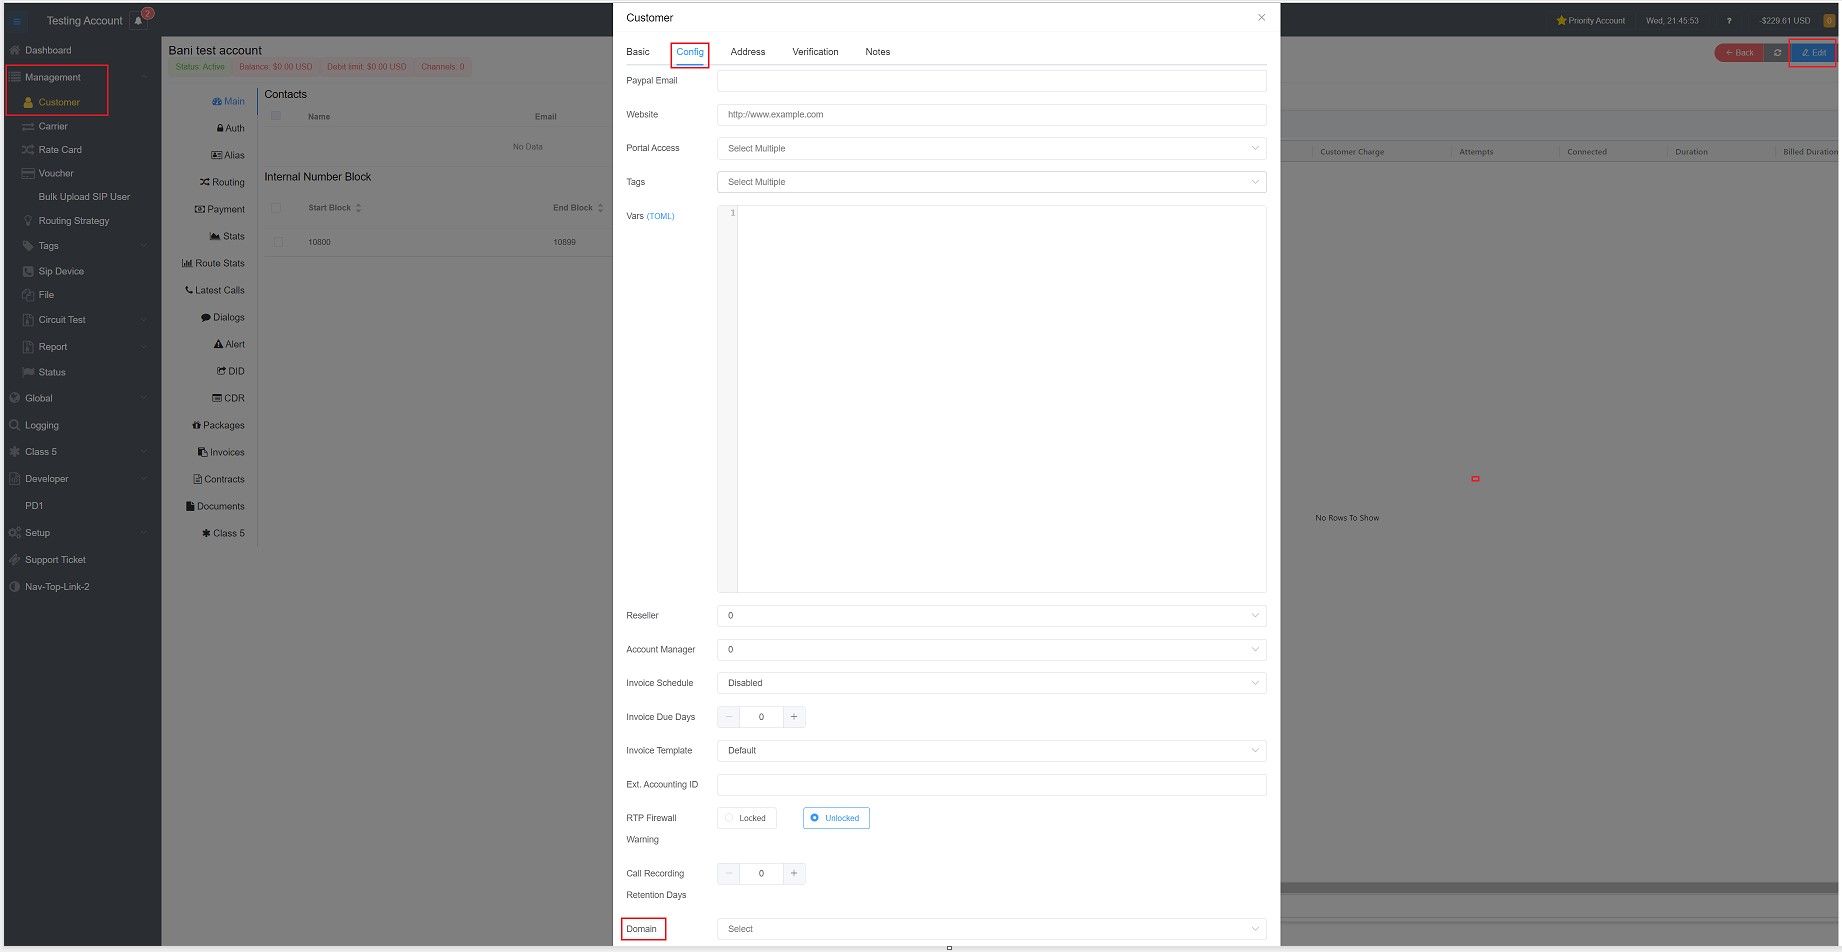
Note
- Multiple customers can be associated with one domain.
- Only one customer can log in to one Domain.
User Access
To configure Users to access the Customer Portal, follow the steps to Add Contact.
Any Contact configured on the account can login to the Customer Portal.
Multi Brand Support
By leveraging a single ConnexCS account, customers can seamlessly run multiple brands, each with its own distinct identity and customer base.
It's achieved by deploying independent customer portals tailored to the specific needs and preferences of each target market.
Key Benefits
- Enhanced Market Penetration:
Effectively reach and engage customers across various market segments, such as residential, business, wholesale, and international, with tailored offerings and pricing strategies for each.
Enter new markets and capture new customer bases without the overhead of managing separate infrastructure or systems.
- Improved Customer Segmentation:
Maintain clear separation between customer groups, ensuring data privacy and preventing cross-contamination of services.
Deliver personalized experiences to each customer segment with customized features, pricing plans, and support channels within their dedicated portal.
- Increased Profitability:
Develop and implement distinct pricing and service packages for each brand, maximizing revenue generation from each customer segment.
Reduce operational costs and improve efficiency by managing multiple brands from a single, centralized platform.
- Enhanced Brand Differentiation:
Preserve the unique identity and brand image of each brand within the ConnexCS ecosystem.
Foster stronger customer loyalty by providing a seamless and personalized experience for each brand's customer base.
ConnexCS Multi-Brand Management empowers businesses to:
-
Operate on all levels of the market: From SMBs to enterprises and wholesale, effectively serve diverse customer needs with tailored offerings.
-
Maximize revenue potential: Capture a larger market share and increase profitability by effectively targeting and serving distinct customer segments.
-
Gain a competitive edge: Differentiate themselves in the market by offering a unique and personalized experience to each customer segment.