ConneXML
Document Metadata
Category: Class 5 Services / ConneXML Scripting & Application Control
Audience: Administrators, Engineers, Support Team
Difficulty: Intermediate to Advanced
Time Required: Approximately 1–2 hours
Prerequisites: Active ConnexCS account with Class 5 module access; familiarity with XML scripting, IVR logic, and call-flow constructs
Related Topics: Class 5 Apps & Workflow Builder, Class 5 IVR Configuration
Next Steps: Create a new ConneXML application, author XML logic using supported verbs (e.g.,
Class 5 ConneXML
Introduction
What's ConneXML?
ConneXML is a set of instructions you can use to tell Class 5 Applications what to do when you receive an incoming call.
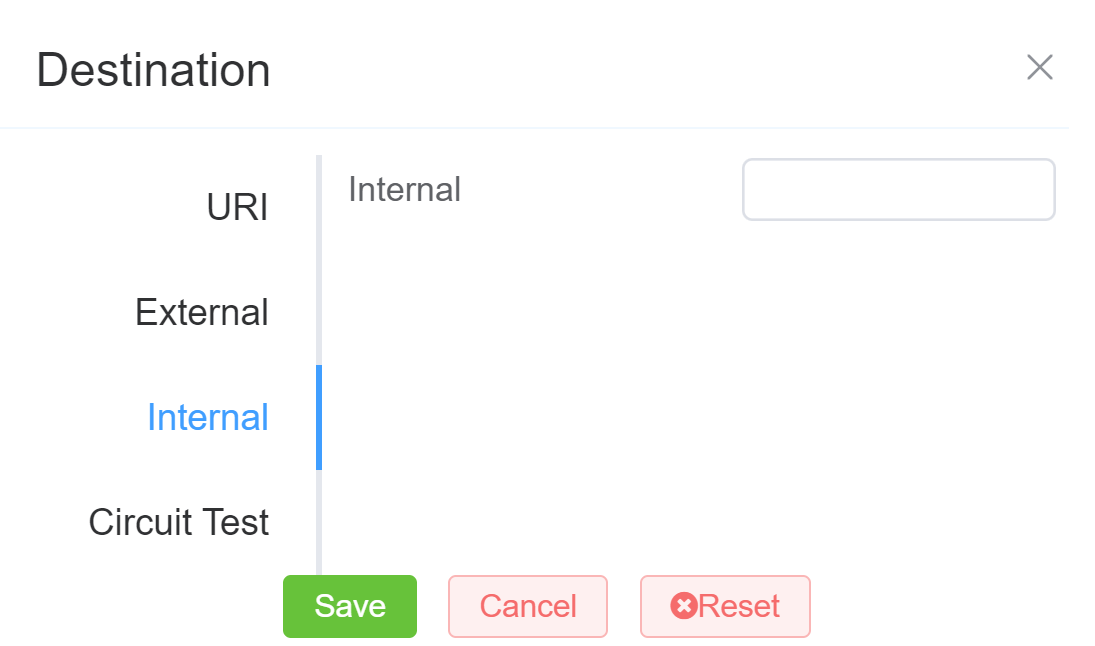
When the customers receive an External or Internal Call, it hits the DID section.
In the DID section you can allocate the calls at different places. Click on Call Destination:
1.URI: Its points to a client's server. You can send the call either to the Destination DID or an IP address.
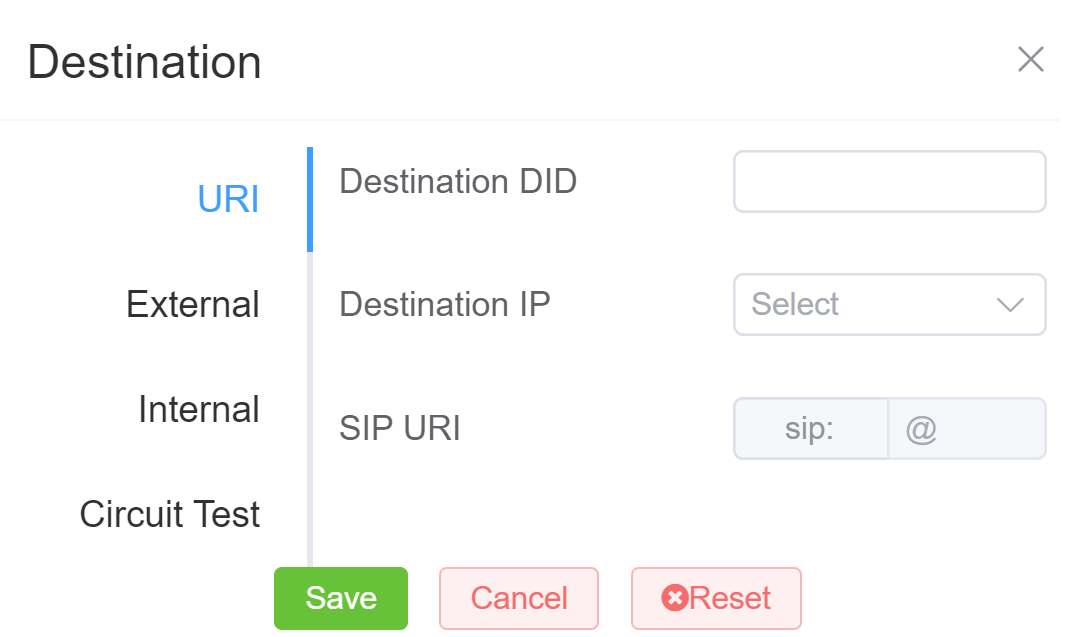
2.External: Allows you to re-direct the call out back again to the network.
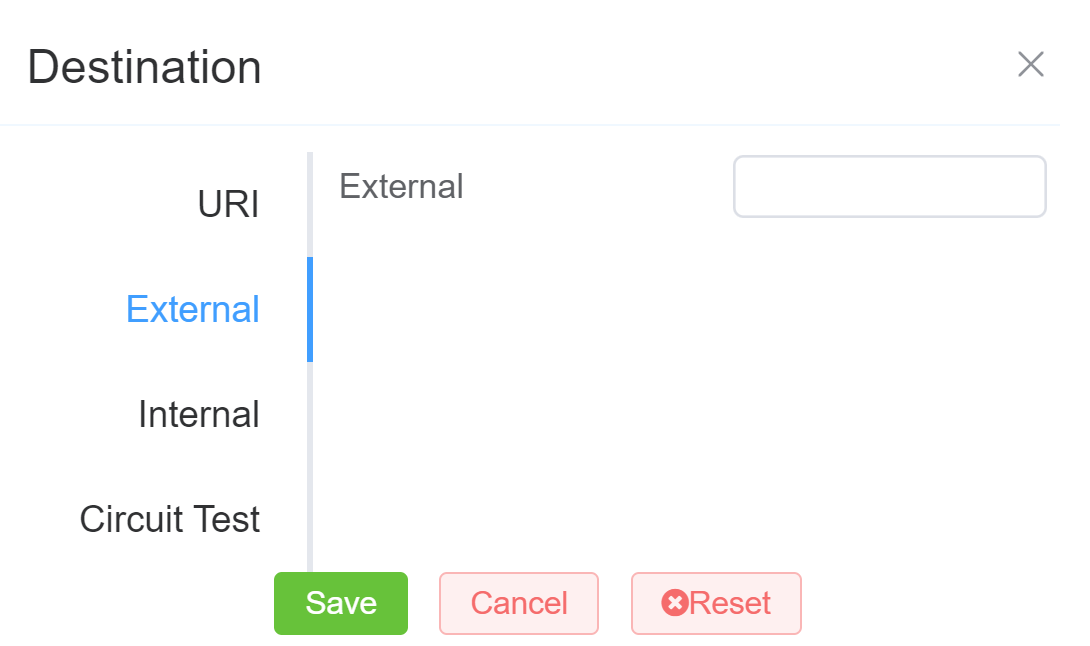
3.Internal: Allows you to route the call internally like a SIP user or a Queue.
Later, the Class5 Applications makes an HTTP request to the URL endpoint you configured for that number. The endpoint will contain instructions telling ConnexML what to do next with the call.
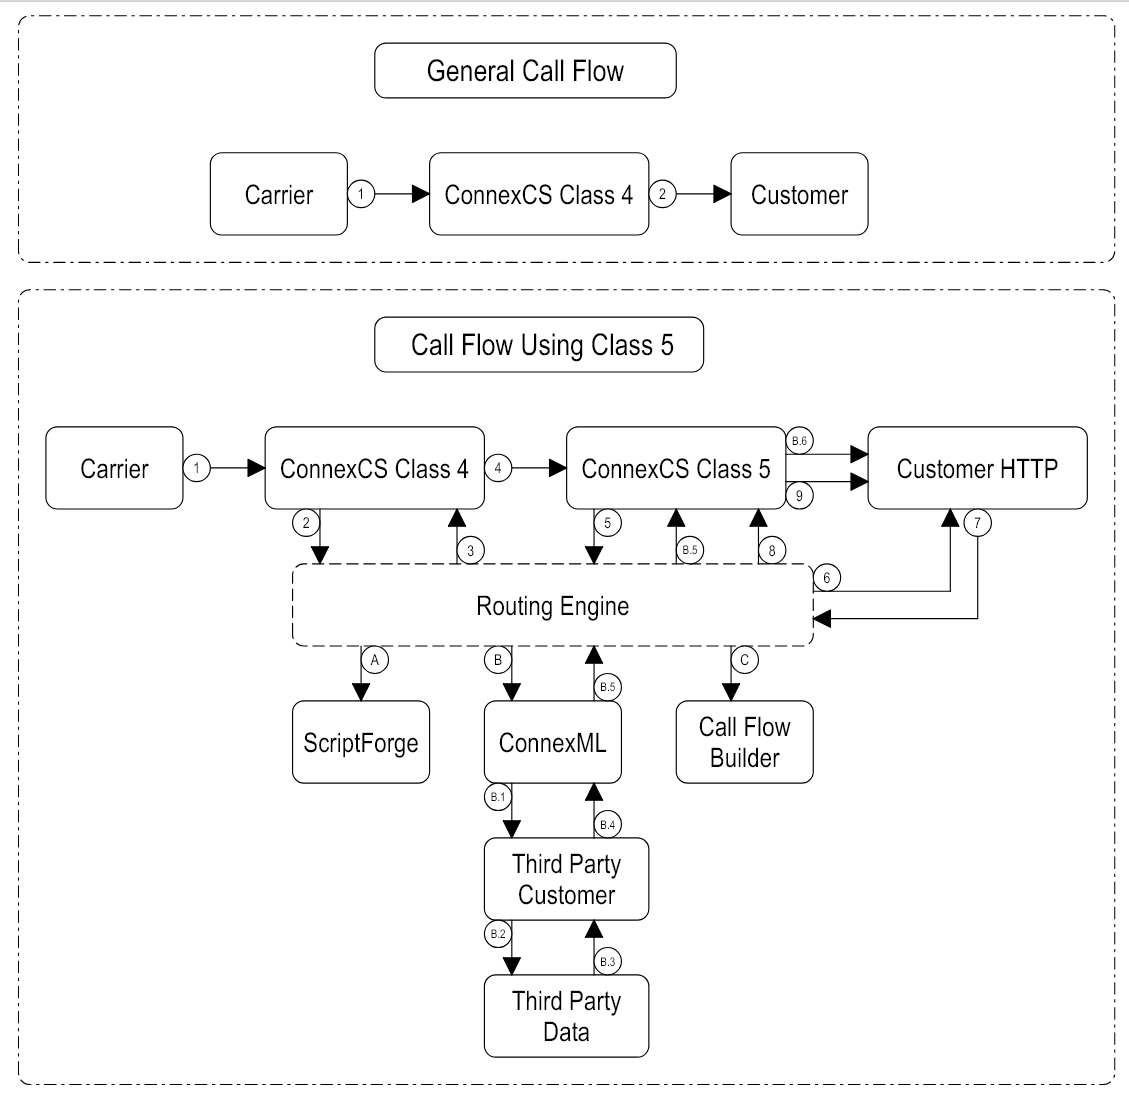
How does ConneXML work?
In a general call scenario, the call goes from the Carrier to ConnexCS Class 4 to the Customer.
Now let's understand how ConneXML can control calls.
In this case, the call goes from Carrier to ConnexCS Class 4 to ConnexCS Class 5.
The Class 5 initially doesn't pass the call to the Customer.
The call gets terminated here and instead Class 4 sends a request to the Routing Engine via HTTP and then the HTTP replies back to the Class 4 system.
Class 4 passes the call to Class 5. Then Class 5 asks the Routing Engine how to handle the call.
Further, the Routing Engine questions the same thing to the Customer on how to handle the call. The Customer can ask to collect some information or play a music or something else via a an HTTP Request. The same request is sent to the Class 5 from the Routing Engine. The Class 5 then replies to the requests of the customer.
Another scenario might be when the Routing Engine might talk to the ConnexCS Applications like ScriptForge, ConneXML, Call Flow Builder.
In case it hits the ConneXML application, ConneXML can as to direct it (Routing Engine) to a 3rd party customer and that customer can access the 3rd party data hit back to ConneXML, then the Routing Engine followed by Class 5 Application and lastly the Customer.
ConneXML uses the standard .xml markup language.
.
How to reach and code the ConneXML Editor?
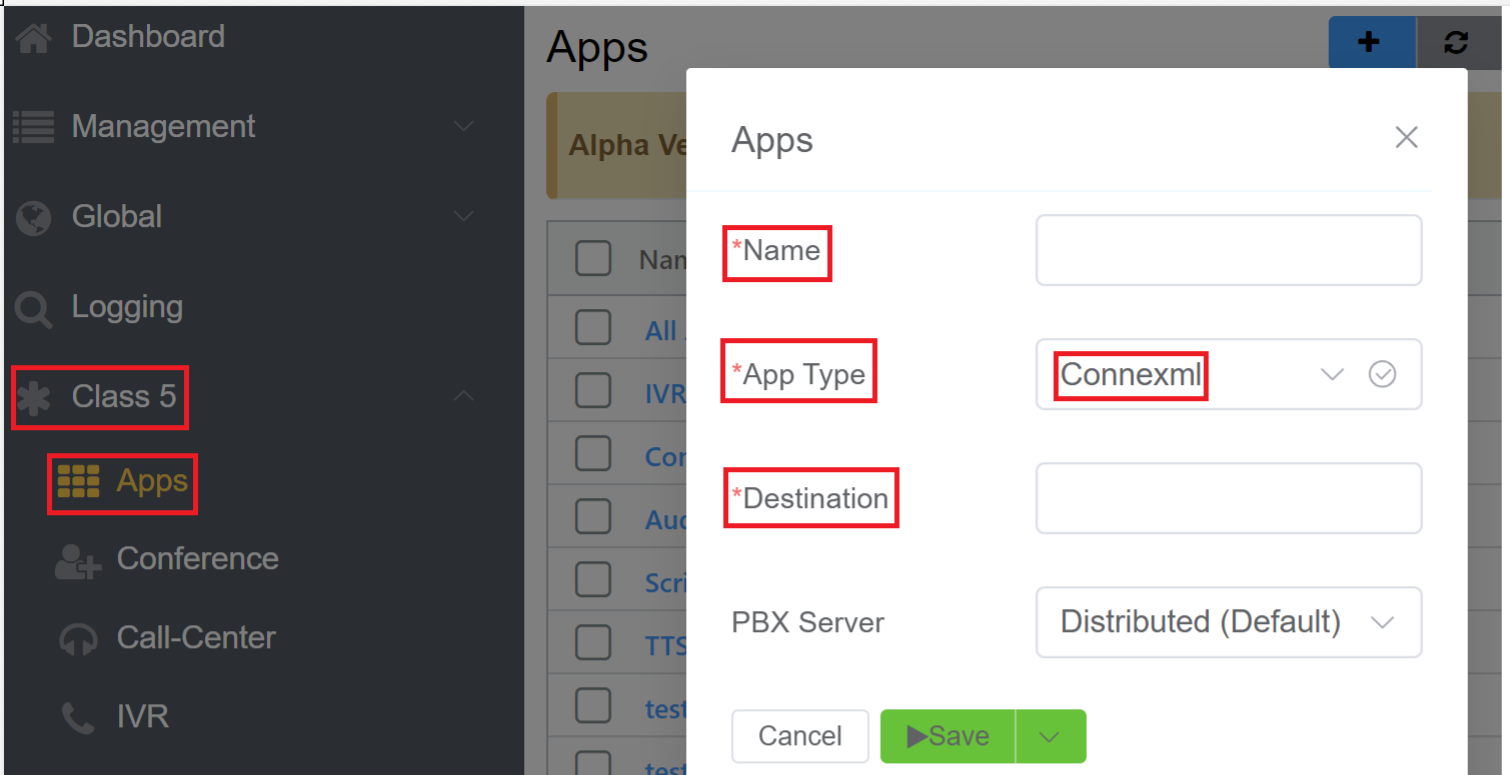
To get ConneXML working you will need to:
- Go to Class 5 Apps.
- On the top right click on blue
+sign. - Add new and make sure you choose App Type = ConneXML. The destination can be alpha-numeric and contains an endpoint, for example "customer_a_connexml".
4.After saving the above information. Click on Go to App to enter the ConneXML editor. Write your code and click Save.

5.If you initially want this to hit a customers server same as before, you can use something like this in the XML field.
<?xml version="1.0" encoding="UTF-8"?>
<Response>
    <Redirect method="POST">https://yourdomain.com/yourscript.php</Redirect>
</Response>
6.Point the DID to internal and then the name of the endpoint that you created (for example customer_a_connexml)
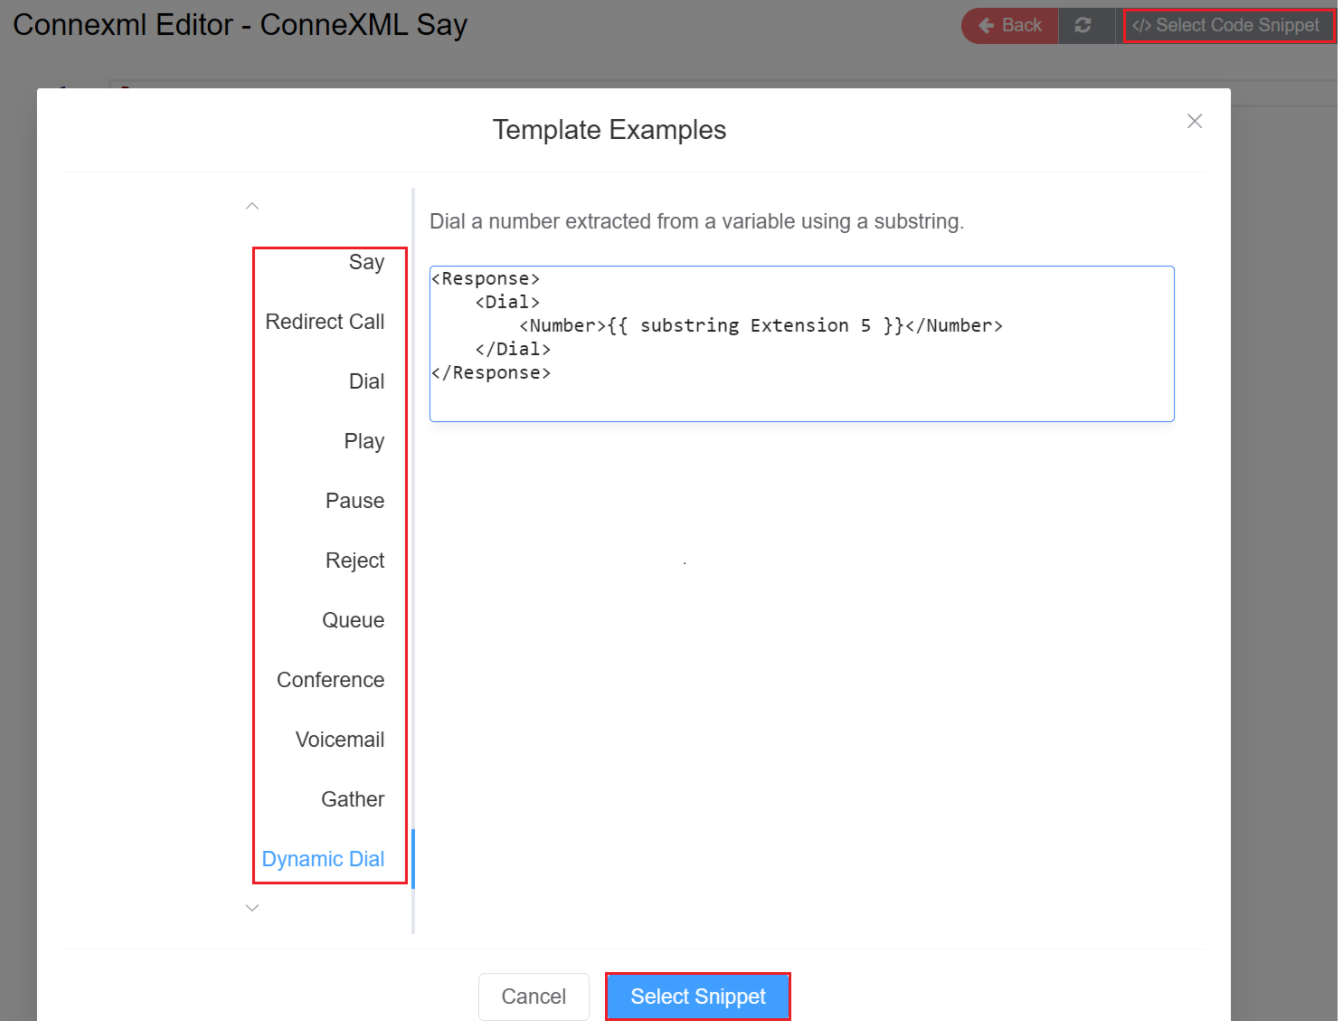
7.Select Code Snippet: Enables you to choose pre-made ConneXML codes for faster and more convenient use. You choose from multiple available options.
ConneXML Components
In ConneXML, the XML components can be divided into 4 categories:
Response: Its the root element tag that defines the main body of the ConneXML document. All the verbs must be contained inside the Response body.Verbs: Just like in english language, Verbs are action words which tells what action to perform on the received call.Attributes: These are the methods for each Verb. Verbs may have optional XML attributes that override the flow of execution, allowing you customize the verb behavior.Nouns: As the name suggests, a noun can described on which the action has to be performed. For example, it can be a phone number on which a Dial action has to be performed.
Example
<Response> <!--Body of the code>
    <!-- Here, Play and Dial are the Verbs -->
    <Play loop="2">http://www.music.com/fun.wav</Play>
    <Dial>
        <!-- Number is a Dial Noun -->
        <Number>189765441</Number>
    </Dial>
</Response>
Note
Verbs and Nouns are case-sensitive.
In the next section, we shall discuss the various Verbs,Attributes and Nouns.
Verbs, Attributes and Nouns
Hangup
The current call is terminated with the Hangup verb.
It has no attributes and doesn't include any nouns.
Example
<?xml version="1.0" encoding="UTF-8"?>
<Response>
    <Hangup/>
</Response>
Pause
The Pause verb waits silently for a given amount of time, or by default, 5 seconds.
Pause doesn't use any nouns, and a self-closing tag is mandatory.
Example
<?xml version="1.0" encoding="UTF-8"?>
<Response>
    <Say>I will pause default time starting now!</Say>
    <Pause/>
</Response>
| Attribute | Description | Seconds | Default Value |
|---|---|---|---|
length |
How many seconds for waiting | 1-180 |
5 |
Example
<?xml version="1.0" encoding="UTF-8"?>
<Response>
    <Pause length="10"/>
    <Say>I just paused 10 seconds</Say>
</Response>
Say
Text to speech is enabled for any application by using the Say verb, which speaks the provided text back to the caller.
Example
<?xml version="1.0" encoding="UTF-8"?>
<Response>
    <Say>This is better  text to speech.</Say>
</Response>
Note
The Text to Speech package needs to be added to your account for this feature to work.
Reject
This verb rejects the current call.
Note
Reject can't be nested in any other verb and reject can't include any other verb.
Example
<?xml version="1.0" encoding="UTF-8"?>
<Response>
    <Reject/>
</Response>
| Attribute | Description | Options | Default |
|---|---|---|---|
reason |
The sound to play in order to explain why the call was turned down | rejected, busy |
rejected |
Example
<?xml version="1.0" encoding="UTF-8"?>
<Response>
    <Reject reason="busy"/>
</Response>
Play
The Play verb allows you to play back to the caller a WAV audio file.
You can use Play as a verb standalone or as a noun nested inside Gather to play audio while you wait for DTMF tones.
| Attribute | Description | Options | Default Value |
|---|---|---|---|
loop |
How many times you wish to repeat the audio | [1-100] |
1 |
The value of Play can either be:
- Local files: You can play from default built-in messages. List of default sounds to follow.
- Remote HTTP: You can play from a remote datasource, the file can be anywhere on the internet; starts with HTTP.
- User Files: You can play the audio that you have uploaded with ConnexCS. Login to your account Management File Upload.
Example
-
Loop
<?xml version="1.0" encoding="UTF-8"?> <Response> <Play loop="3">ivr/ivr-invalid_number_format.wav</Play> </Response> -
Local Files
<?xml version="1.0" encoding="UTF-8"?> <Response> <Play>ivr/ivr-invalid_number_format.wav</Play> </Response> - Remote HTTP
<?xml version="1.0" encoding="UTF-8"?> <Response> <Play>https://file-examples.com/storage/fef3ad87fb6568c5a9d7b04/2017/11/file_example_WAV_1MG.wav</Play> </Response> - User Files
<?xml version="1.0" encoding="UTF-8"?>
<Response>
    <Play>user/adam.wav</Play>
</Response>
Redirect
The current call gets transferred to another ConnexCS Class 5 application using the Redirect verb.
Redirect doesn't allow for the nesting of nouns.
Example
<?xml version="1.0" encoding="UTF-8"?>
<Response>
    <Redirect>http://yourdomain.com/connex/test.xml</Redirect>
</Response>
| Attribute | Description | Options | Default Method |
|---|---|---|---|
method |
The type of redirect method used URL | GET, POST |
POST |
Example
<Response>
    <Redirect method="GET">https://yourdomain.com/yourscript.php</Redirect>
</Response>
Note
After Redirect, all verbs are unreachable and disregarded.
Gather
During a call, the Gather verb accumulates DTMF tones.
You can create an interactive IVR with text-to-speech by nesting Say within Gather.
Example
<?xml version="1.0" encoding="UTF-8"?>
<Response>
    <Gather actionOnEmptyResult="false" action="https://yourdomain.com/youwebserver.php" method="GET" numDigits="6" finishOnKey="*" timeout="120">
        <Play>https://samplelib.com/lib/preview/wav/sample-12s.wav</Play>
    </Gather>
    <Say>Sorry.The entered number in invalid</Say>
</Response>
| Attribute | Description | Options | Default Method |
|---|---|---|---|
method |
The type of redirect method used URL | GET, POST |
POST |
action |
Delegates the current call's control to the returned TeXML file | URLs |
|
actionOnEmptyResult |
When there is no DTMF input, you can still force Gather to send a webhook to the action URL by using actionOnEmptyResult.When Gather runs out of time while awaiting DTMF input, it will automatically move on to the following ConneXML command |
true, false |
|
numDigits |
Total number of digits to be gathered | ||
minDigits |
Minimum number of digits to be gathered | [1-128] |
1 |
maxDigits |
Maximum number of digits to be gathered | [1-128] |
128 |
timeout |
You can configure the timeout to determine how long ConnexCS will wait (in seconds) before sending data to your action URL to wait for the caller to press or say another number |
[1-120] |
5 |
| Noun | Description |
|---|---|
Say |
Reads the supplied text back to the caller |
Play |
Plays the audio URL back to the caller |
Enqueue
The current call is enqueued in a call queue using the Enqueue verb.
Example
<?xml version="1.0" encoding="UTF-8"?>
<Response>
    <Enqueue>1000</Enqueue>
</Response>
Dial
An existing call is transferred to a different destination using the Dial verb.
Dial will end this call if:
- The called person doesn't answer.
- The number is invalid.
- ConnexCS receives a busy signal.
Example
<?xml version="1.0" encoding="UTF-8"?>
<Response>
    <Dial>123456</Dial>
</Response>
| Attribute | Description | Options | Default Method |
|---|---|---|---|
callerId |
Caller ID that must be a valid E.164 format number | ||
fromDisplayName |
The fromDisplayName string to be used as the caller ID name (SIP From Display Name) presented to the destination. The string should have a maximum of 128 characters, containing only letters, numbers, spaces, and -_~!.+ special characters. If omitted, the display name will be the same as the number in the callerId field | ||
hangupOnStar |
By tapping the * key on their phone, the initial caller can hang up on the called party using the hangupOnStar attribute. It doesn't apply for Conference noun |
true, false |
false |
ringTone |
The ringback tone played back to the caller | at,au,bg,br,be,ch,cl,cn,cz,de,dk,ee,es,fi,fr,gr,hu,il,in,it,lt,jp,mx,my,nl,no,nz,ph,pl,pt,ru,se,sg,th,uk,us,us-old,tw,ve,za |
us |
timeout |
timeout in |
||
hangupOnStarContext |
Hangs up on * only in the specified context |
| Noun | Description | Default Method |
|---|---|---|
Number |
Its is an E.164 phone number | |
Queue |
Its a queue name | |
Client |
It specifies a client identifier to dial | |
Conference |
You can connect to a conference room using the Dial verb's Conference noun |
|
Voicemail |
You can access Voicemail using the Dial verb's Voicemail noun. Click here to know more about Voicemail Dialpad options |
|
barge |
Allows you to join an ongoing call, without alerting the participants | whisper, bridge, commands |
| Noun | Attribute | Description | Options | Default Method |
|---|---|---|---|---|
Voicemail |
Inbox |
It sends you to the inbox to leave a message | ||
user |
The user attribute specifies the SIP user | |||
Barge |
whisper |
If enabled, allows you to speak privately to one or both legs of the call without the other party hearing. | a(aleg), b(bleg), ab(both legs) |
ab |
bridge |
Allows an eavesdropper to listen in on a call without being an active participant. The eavesdropper can monitor the conversation on one or both legs of the call | a(aleg), b(bleg),ab (both legs) |
ab |
|
command |
DTMF signals during eavesdrop | true, false |
true |
|
Client |
statusCallbackEvent |
An outbound call starts when you use Dial to dial out to a client. When the phone rings, the call switches from the initiated event to the ringing event, answered when the call is answered, and completed when the call is ended. You can also sign up for the webhooks for the various call events. |
initiated, ringing, answered, completed |
none |
statusCallback |
For every event listed in the statusCallbackEvent attribute, you may define a URL to send webhook requests to using the statusCallback attribute Non-relative URLs (underscores aren't allowed) require a valid hostname |
any URL |
none | |
statusCallbackMethod |
Lets you define the HTTP method ConnexCS should use when making requests to the URL specified in the statusCallback attribute. |
GET, POST |
POST |
|
Queue |
music |
Music attribute specifies the music file to play when a caller is in the queue | ||
action |
When action= pickupagent is assigned to the queue |
Info
Conferenceis similar to how theNumbernoun lets you connect to another phone number.
Example
-
callerId
<?xml version="1.0" encoding="UTF-8"?> <Response> <Dial callerId="1234">12345</Dial> <Say>This is after hangup.</Say> </Response> -
fromDisplayName
<?xml version="1.0" encoding="UTF-8"?> <Response> <Dial fromDisplayName="1234">12345</Dial> <Say>This is after hangup.</Say> </Response> -
hangupOnStar
<?xml version="1.0" encoding="UTF-8"?> <Response> <Dial hangupOnStar="true">12345</Dial> <Say>This is after hangup.</Say> </Response> -
ringTone
<?xml version="1.0" encoding="UTF-8"?> <Response> <Dial fromDisplayName="1234" ringtone="in">160</Dial> </Response> -
timeout
<?xml version="1.0" encoding="UTF-8"?> <Response> <Dial timeout="60">123456</Dial> </Response> -
Number
<?xml version="1.0" encoding="UTF-8"?> <Response> <Dial> <Number>4423456789</Number> </Dial> </Response>" -
Queue
<?xml version="1.0" encoding="UTF-8"?> <Response> <Dial> <Queue>1000</Queue> </Dial> </Response> -
Client
<?xml version="1.0" encoding="UTF-8"?> <Response> <Dial> <Client>test1</Client> </Dial> </Response> -
Conference
<?xml version="1.0" encoding="UTF-8"?> <Response> <Dial> <Conference>Room5</Conference> </Dial> </Response> -
Voicemail
<?xml version="1.0" encoding="UTF-8"?> <Response> <Dial> <Voicemail /> </Dial> </Response> -
Voicemail Inbox
<?xml version="1.0" encoding="UTF-8"?> <Response> <Dial> <Voicemail inbox="true"> </Voicemail> </Dial> </Response> -
Barge (Default Method)
<?xml version="1.0" encoding="UTF-8"?> <Response> <Dial> <Barge></Barge> </Dial> </Response> -
Barge
<?xml version="1.0" encoding="UTF-8"?> <Response> <Dial> <Barge> whisper="a" <!-- Enables whisper mode in the A leg--> bridge="b" <!-- Enables listen to B leg --> commands="false" <!-- Disables DTMF signals/commands during barge --> </Barge> </Dial> </Response> -
Barge (Group)
<?xml version="1.0" encoding="UTF-8"?> <Response> <Dial> <Barge >GROUPA</Barge> <!-- Listens to the conversation of the specified group. If no group is mentioned, it can listen to any ongoing calls for this customer --> </Dial> </Response> -
statusCallbackEvent, statusCallback, statusCallbackMethod
Send updates about the call's lifecycle (initiated, ringing, answered, and completed) to the callback URL via HTTP POST requests.<?xml version="1.0" encoding="UTF-8"?> <Response> <Dial> <Client statusCallbackEvent="initiated ringing answered completed" statusCallback="https://api.example.com/compile?rateCompact=true&ids=101,202,303" statusCallbackMethod="POST"> 7900 </Client> </Dial> </Response> -
Queue music
<?xml version="1.0" encoding="UTF-8"?> <Response> <Dial> <Queue music="user/Adamcall.wav">20000</Queue> </Dial> </Response> -
Queue action
<?xml version="1.0" encoding="UTF-8"?> <Response> <Dial> <Queue action="pickup" music="ivr/ivr-invalid_number_format.wav">20000</Queue> </Dial> </Response> - user
<?xml version="1.0" encoding="UTF-8"?> <Response> <Dial> <Voicemail inbox="true" user="2890"> </Voicemail> </Dial> </Response> - hangupOnStarContext
<?xml version="1.0" encoding="UTF-8"?>
<Response>
    <Enter>A</Enter>

    <Press dtmf_leg="a" digit="#0" context="A">

        <Dial hangupOnStar="true" callerId="+44123">4421927526</Dial>

    </Press>
    <Dial hangupOnStar="true" hangupOnStarContext ="A">2919</Dial>
</Response>
In ConneXML, use & in place of & when specifying the AND operator.
Dynamic Dial
Dynamically dial a phone number based on a substring of a variable named Extension.
Example 1
<?xml version="1.0" encoding="UTF-8"?>
<Response>
    <Dial>
        <Number>>{{ substring Extension 5 }}</Number>
    </Dial>
</Response>
Actions: Extracts a substring from the Extension variable starting at the 5th character and uses it as the number to dial.
Example 2
Assuming the Extension variable is set to "1234567890":
The substring starting at the 5th character is "67890".
The system will dial the number "67890".
Example 3
Assuming the Extension variable is set to "afwd_[a-z0-9]+":
It means if you dial newsetup_160 and
<?xml version="1.0" encoding="UTF-8"?>
<Response>
    <Dial>
        <Number>{{ substring Extension 9 }}</Number>
    </Dial>
</Response>
"160"
Press
It helps to define on which leg of the call the DTMF will work. For example, dtmf_leg ='a' or dtmf_leg ='b'.
Example
When the digit 3 is pressed on the call leg b within the specified context A, the call will be transferred to test4.
<?xml version="1.0" encoding="UTF-8"?>
<Response>
    <Press dtmf_leg ='b'digit="3" context="A">
        <Transfer>test4</Transfer>
    </Press>
</Response>
| Noun | Description |
|---|---|
Transfer (Blind) |
Transfers the call to the given extension given immediately without verifying whether the recipient is available or willing to take the call |
Attended Transfer |
The transferring party confirms the recipient's availability before completing the transfer. |
Example Attended Transfer
<?xml version="1.0" encoding="UTF-8"?>
<Response>
    <Transfer attended="true">
    +1234567890
    </Transfer>
</Response>
Before
It initializes variables before executing other commands.
Example
<?xml version="1.0" encoding="UTF-8"?>
<Response>
    <Before><Set name="newHome" value="Adam"/><Set name="headerName" value="Joe"/></Before>
</Response>
newHome to "Adam".Sets the variable
headerName to "Joe".
Stream
Stream is a noun is used in conjunction with either Start or Connect.
When the <Start><Stream> command is used during a call, the call's raw audio stream is streamed to your WebSocket server near real-time.
Example
<?xml version="1.0" encoding="UTF-8"?>
<Response>
    <Start>
        <Stream url="wss://your-websocket-server.com/your-endpoint" />
    </Start>
</Response>
| Attribute | Description | Options | Default Method |
|---|---|---|---|
url |
The WebSocket destination address for stream delivery | none | |
statusCallback |
For every event listed in the statusCallbackEvent attribute, you may define a URL to send webhook requests to using the statusCallback attribute. Non-relative URLs (underscores aren't allowed) require a valid hostname |
any URL |
none |
statusCallbackMethod |
Lets you define the HTTP method ConnexCS should use when making requests to the URL specified in the statusCallback attribute. |
GET, POST |
POST |
mix_type |
Determines the type of audio stream | 1. mono: Single channel with only the caller's audio.2. mixed: Single channel combining both caller and callee audio.3. stereo: Two channels; one for the caller and one for the callee. |
mono |
| Noun | Description |
|---|---|
Parameter |
Its used to send key-value pairs to the WebSocket server. |
Example
<?xml version="1.0" encoding="UTF-8"?>
<Response>
    <Start>
        <Stream url="ws://fr1js1.connexcs.net:3001" mix_type="stereo" >
            <Parameter name="Hello" value="how are you, " />
        </Stream>
    </Start>
</Response>
Echo
Echo plays back everything that's spoken/played, like voice, audio, DTMF, etc.
It enables loopback on the calling channel.
It's an effective and quicker way to check a customer's audio quality and call path delay.
Example
<?xml version="1.0" encoding="UTF-8"?>
<Response>
   <Echo></Echo>
</Response>
Set
Set defines headers to be included in the SIP INVITE and set variables.
Example 1
<?xml version="1.0" encoding="UTF-8"?>
<Response>
    <Set name="name" value="Adam"/>
    <Set name="{{ x-name }}" value="Water" header="true" />
    <Dial>
        <Number>160</Number>
    </Dial>
</Response>
Sets the x-name header to the value of Water.
Result call will be sent to 160 and will have header INVITE sip:[email protected] SIP/2.0.
Example 2
<?xml version="1.0" encoding="UTF-8"?>
<Response>
    <Before>
        <Set name="newHome" value="Adam"/>
        <Set name="headerName" value="Joe"/>
    </Before>
    <Set name="name" value="" header="true"/>
    <Set name="{{ x-name }}" value="" header="true" />
    <Say>Hello my name is newHome</Say>
    <Say>Hello my name is headerName</Say>
    <Say>Hello my name is {{ x-name }}</Say>
    <Dial>
        <Number>160</Number>
    </Dial>
</Response>
-
The variables
newHomeandheaderNameare initialized. -
The SIP INVITE message is prepared with headers:
name: Joex-name: Adam
-
The system plays the following audio prompts:
Hello my name is Adam.Hello my name is Joe.Hello my name is.
-
Finally, the system dials the number
160. -
This script ensures that specific headers are included in the SIP INVITE if specified with
header="true"and provides clear audio prompts before connecting the call. -
If the Set elements don't include
header="true", they will only set the variables and not as headers in the SIP INVITE.
Enter
The Enter command tells the phone system to switch to a different menu or section (called a context or realm) during a call.
| Noun | Description | Example |
|---|---|---|
context |
Enables the same DTMF input to perform different actions depending on the current state of the call. | Call starts in context B, pressing 1 switches to context A, pressing 2 hangs up (in B) or plays a sound (in A) |
Example 1
<?xml version="1.0" encoding="UTF-8"?>
<Response>
    <Enter>B</Enter>
    <Press digit="2" context="A">
        <Play>user/adam.wav</Play>
    </Press>
    <Press digit="2" context="B">
        <Hangup/>
    </Press>
    <Press digit="1" context="B">
        <Enter>A</Enter>
    </Press>
</Response>
Digit 2 can be used to Play an audio file if you are in context A Or can be used to hangup if you are in context B.
| Verbs/Attributes/Nouns | ConnexCS (ConneXML) | TwilioTM (TwiML)1 | Telnyx (TeXML)2 |
|---|---|---|---|
| Play | ✅ | ✅ | ✅ |
| ➡️loop | ✅ | ✅ | ✅ |
| Hangup | ✅ | ✅ | ✅ |
| Pause | ✅ | ✅ | ✅ |
| ➡️length | ✅ | ✅ | ✅ |
| Say | ✅ | ✅ | ✅ |
| ➡️voice | ❌ | ✅ | ✅ |
| ➡️language | ❌ | ✅ | ✅ |
| ➡️loop | ✅ | ✅ | ✅ |
| Reject | ✅ | ✅ | ✅ |
| ➡️reason | ✅ | ✅ | ✅ |
| Dial | ✅ | ✅ | ✅ |
| ➡️Conference | ✅ | ✅ | ✅ |
| ➡️callerId | ✅ | ✅ | ✅ |
| ➡️fromDisplayName | ✅ | ✅ | ✅ |
| ➡️hangupOnStar | ✅ | ✅ | ✅ |
| ➡️hangupOnStarContext | ✅ | ❌ | ❌ |
| ➡️ringTone | ✅ | ✅ | ✅ |
| ➡️Number | ✅ | ✅ | ✅ |
| ➡️Queue | ✅ | ✅ | ✅ |
| ➡️Client | ✅ | ✅ | ❌ |
| 🟦statusCallbackEvent | ✅ | ✅ | ✅ |
| 🟦statusCallback | ✅ | ✅ | ✅ |
| 🟦statusCallbackMethod | ✅ | ✅ | ✅ |
| ➡️Voicemail | ✅ | ❌ | ❌ |
| 🟦Inbox | ✅ | ❌ | ❌ |
| ➡️Barge | ✅ | ❌ | ❌ |
| 🟦whisper | ✅ | ❌ | ❌ |
| 🟦bridge | ✅ | ❌ | ❌ |
| 🟦commands | ✅ | ❌ | ❌ |
| ➡️Dynamic Dial | ✅ | ❌ | ❌ |
| Enqueue | ✅ | ✅ | ✅ |
| Play | ✅ | ✅ | ✅ |
| Redirect | ✅ | ✅ | ✅ |
| ➡️method | ✅ | ✅ | ✅ |
| Gather | ✅ | ✅ | ✅ |
| ➡️method | ✅ | ✅ | ✅ |
| ➡️action | ✅ | ✅ | ✅ |
| ➡️actionOnEmptyResult | ✅ | ✅ | ❌ |
| ➡️numDigits | ✅ | ✅ | ❌ |
| ➡️minDigits | ✅ | ✅ | ✅ |
| ➡️maxDigits | ✅ | ✅ | ✅ |
| ➡️timeout | ✅ | ✅ | ✅ |
| digits | ❌ | ✅ | ✅ |
| Stop | ❌ | ❌ | ✅ |
| Transcription | ❌ | ❌ | ✅ |
| Stream | ✅ | ✅ | ✅ |
| 🟦url | ✅ | ✅ | ✅ |
| 🟦statusCallbackMethod | ✅ | ✅ | ❌ |
| 🟦statusCallback | ✅ | ✅ | ❌ |
| Refer | ❌ | ✅ | ✅ |
| Record | ❌ | ✅ | ✅ |
| HttpRequest | ❌ | ❌ | ✅ |
| Leave | ❌ | ✅ | ✅ |
| Pay | ❌ | ✅ | ❌ |
| Connect | ❌ | ✅ | ❌ |
| Suppression | ❌ | ❌ | ✅ |
| Press | ✅ | ❌ | ❌ |
| ➡️transfer | ✅ | ❌ | ❌ |
| Before | ✅ | ❌ | ❌ |
| Set | ✅ | ❌ | ❌ |
| Echo | ✅ | ❌ | ❌ |
| Enter | ✅ | ❌ | ✅ |
| 🟦context | ✅ | ✅ | ✅ |
Note
TwiML is a trademark of TWILIO.
Adding AI Agents
Overview
The AI Agent allows integration of AI agents into your call flow using three methods:
- File ID Method: References a pre-configured agent created in the IDE.
- Embedded Instructions Method: Directly embeds instructions for the AI agent within the XML.
- App Script Method: Involves creating an app in the IDE with custom scripts that handles specific functions, such as retrieving information or managing call transfers, combined with XML call flow that invokes the AI agent.
graph TD
    A[AI Agent Integration Methods] --> B[File ID Method]
    A --> C[Embedded Instructions Method]
    A --> D[App Script Method]

    B --> E[References a pre-configured agent created in the IDE]
    C --> F[Embeds instructions for the AI agent within the XML]
    D --> G[Creates an app with custom scripts in the IDE]
    G --> H[Functions like retrieving info or call transfers]
    H --> I[Combined with XML call flow to invoke the AI agent]
How It Works
- File ID Method: Uses the agent's file ID from the IDE to engage pre-configured behaviors.
- Embedded Instructions Method: Embeds natural language instructions directly in the XML.
- App Script Method: Uses a custom app built in the IDE with cxLLM to define complex interactions, such as call transfers, and combines this with an AI agent in the XML response.
graph TD
    A[Start Call Flow] --> B[File ID Method]
    A --> C[Embedded Instructions Method]
    A --> D[App Script Method]

    B --> E[Use Agent's File ID from IDE]
    E --> F[Engage Pre-Configured Behaviors]

    C --> G[Embed Natural Language Instructions]
    G --> H[Directly in XML]

    D --> I[Custom App in IDE with cxLLM]
    I --> J[Define Complex Interactions]
    J --> K[Call Transfers and AI Agent in XML Response]
Example: File ID method
<?xml version="1.0" encoding="UTF-8"?>
<Response>
    <Dial>
        <LLM-Agent>asst_MTbETp3jyb9tG9eAepFGxgPb</LLM-Agent>
    </Dial>
</Response>
asst_MTbETp3jyb9tG9eAepFGxgPb, created and configured in the IDE.
Example: Embedded Instructions Method
<?xml version="1.0" encoding="UTF-8"?>
<Response>
    <Dial>
        <LLM-Agent>You are a knowledgeable fitness coach, providing advice on workout routines, nutrition, and healthy habits. Offer personalized guidance based on the user's fitness level, goals, and preferences, and motivate them to stay consistent and make progress toward their objectives.</LLM-Agent>
    </Dial>
</Response>
Example: XML Integration (App Script Method)
App Script Example (within the IDE):
1 2 3 4 5 6 7 8 9 10 11 | |
Example: XML Response
<?xml version="1.0" encoding="UTF-8"?>
<Response>
    <Say>Hi, we are redirecting your call to our revolutionary AI Agent.</Say>
    <Dial>
        <LLM-Agent appId="0506a202-4377-11ef-9324-d05099d1f064">
        You are the friendly and professional receptionist for a company Test Account specializing in revolutionary technology. Begin each conversation by saying 'Hello' and then pausing briefly. Greet callers and provide information, informing them that there are 5 key members in the organization: Jonathan Hulme, Rizwan Syed, Adam Nawaz, Ankit Patel, and Bani Gandhi. Let the caller know that you can transfer them to any of these individuals. However, if none of these names are mentioned, politely inform the caller that you cannot transfer the call and encourage them to continue the conversation. Always be polite, concise, and clear in your responses.
        </LLM-Agent>
    </Dial>
</Response>
Condition Field
A condition field determines if a given condition is met before performing a corresponding action or logic.
It functions as a decision-making component that determines a system's flow or behavior.
Example
<?xml version="1.0" encoding="UTF-8"?>
<Response>
    <!-- Initial Greeting -->
    <Say>Welcome to the conference system. Please enter your 1-digit conference code.</Say>
    <Gather actionOnEmptyResult="true" method="GET" numDigits="1" timeout="120">
        <Play>https://samplelib.com/lib/preview/wav/sample-12s.wav</Play>
    </Gather>
    <!-- Logic for conference -->
    <Condition field="${gather_result}" expression="1">
        <Say>You have pushed 1, which was the correct digit and connecting to the conference.</Say>
        <Dial>
            <Conference>MyConferenceRoom</Conference>
        </Dial>
    </Condition>
    <!-- If no valid input, play an error message -->
    <Say>No input received.</Say>
</Response>
Gather tag collects the user's input, allowing up to 120 seconds for a response.
Processing the Input:
The Condition tag evaluates a specific field (field="${gather_result}") against a condition (expression="1").
Field: ${gather_result} refers to the value collected from the user's input (via the Gather tag).
Expression: "1" specifies the required value for the condition to be true
Handling Valid and Invalid Inputs: If the condition is met (user pressed 1), the system responds accordingly. If no input is received or the input doesn't match the condition, an error message is played.
Variables
Variables refer to the fields or parameters being tested to see if the provided condition is true or false.
These variables are typically set dynamically by previous operations or user inputs, such as collected values, system-generated data, or context-specific states.
Types of Variables
| Attribute | Description | Acceptable Values |
|---|---|---|
| year | calendar year | 0 - 9999 |
| yday | day of year | 1 - 366 |
| mon | month (Jan = 1, Feb = 2, etc.) | 1 - 12 |
| mday | date of month | 1 - 31 |
| week | week of year | 1 - 53 |
| mweek | week of month | 1 - 6 |
| wday | day of week, numeric (sun = 1, mon = 2, etc.) | 1 - 7 |
| sunmontuewedthufrisat | day of week | sun, mon, tue, wed, thu, fri, sat |
| hour | hour | 0 - 23 |
| minute | minute (of the hour) | 0 - 59 |
| minute-of-day | minute of the day (midnight = 1, 1am = 60, noon = 720, etc) | 1-1440 |
| time-of-day | time range | hh:mm-hh:mm |
| time range, with seconds | hh:mm:ss-hh:mm:ss-hh:mm:ss-hh:mm:ss |
|
| date-time | date time range, note the ~ delimiter | YYYY-MM-DD hh:mm**~**YYYY-MM-DD hh:mm |
| date time range, with seconds, note the ~ delimiter | YYYY-MM-DD hh:mm:ss**~**YYYY-MM-DD hh:mm:ss |
Variable Examples in Condition Field
-
year: calendar year<?xml version="1.0" encoding="UTF-8"?> <Response> <Condition year="2024"> <Say>Welcome to the events of 2024!</Say> </Condition> </Response> -
yday: day of the year<?xml version="1.0" encoding="UTF-8"?> <Response> <!-- Welcome Message --> <Say>Welcome to the system. Checking the day of the year.</Say> <!-- Condition to check the value of yday --> <Condition yday="1"> <Say>It's the first day of the year!</Say> </Condition> </Response> -
mon: month<?xml version="1.0" encoding="UTF-8"?> <Response> <Condition mon="1"> <Say>Welcome! It's January, starting the month strong!</Say> </Condition> </Response> -
mday: date of the month<?xml version="1.0" encoding="UTF-8"?> <Response> <Condition mday="1"> <Say>Welcome! It's the first day of the month.</Say> </Condition> </Response> -
week: week of the year<?xml version="1.0" encoding="UTF-8"?> <Response> <Condition week="1"> <Say>Welcome to Week 1 activities.</Say> </Condition> </Response> -
mweek: week of the month<?xml version="1.0" encoding="UTF-8"?> <Response> <Condition mweek="2"> <Say>Welcome to the second week of the month. Stay tuned for updates.</Say> </Condition> </Response> -
wday: day of the week<?xml version="1.0" encoding="UTF-8"?> <Response> <Condition wday="3"> <Say>Today is Tuesday. Keep going!</Say> </Condition> </Response> -
sunmontuewedthufrisat: days of the week<?xml version="1.0" encoding="UTF-8"?> <Response> <Condition sunmontuewedthufrisat="mon,tue,wed,thu,fri"> <Say>It's a weekday. Let's get to work!</Say> </Condition> </Response> -
hour<?xml version="1.0" encoding="UTF-8"?> <Response> <Condition hour="12"> <Say>Good afternoon! You are connecting at noon.</Say> </Condition> </Response> -
minute<?xml version="1.0" encoding="UTF-8"?> <Response> <Condition minute="30"> <Say>It's 30 minutes past the hour, proceeding with the action.</Say> </Condition> </Response> -
minute-of-day<?xml version="1.0" encoding="UTF-8"?> <Response> <!-- Check if the time is before noon (720 minutes) --> <Condition minute-of-day="720"> <Say>The time is before noon. Connecting you to morning services.</Say> </Condition> </Response> -
time-of-day<?xml version="1.0" encoding="UTF-8"?> <Response> <!-- Check time of day and respond accordingly --> <Condition time-of-day="09:00-17:00"> <Say>Good day! Our office hours are from 9 AM to 5 PM.</Say> </Condition> </Response> -
time-of-day: time range with seconds<?xml version="1.0" encoding="UTF-8"?> <Response> <!-- Check time range --> <Condition time-of-day="09:00:00-17:00:00"> <Say>Welcome! You are accessing the system during business hours.</Say> </Condition> </Response> -
date-time<?xml version="1.0" encoding="UTF-8"?> <Response> <!-- Evaluate date-time range --> <Condition date-time="2024-11-22 10:00**~**2024-11-22 14:00"> <Say>The current time is within the specified range.</Say> </Condition> </Response> -
date-time: date-time range with seconds<?xml version="1.0" encoding="UTF-8"?> <Response> <Condition date_time="2024-11-22 14:00:00**~**2024-11-22 16:00:00"> <Say>The date-time is within the specified range. Proceeding with the action.</Say> <Dial> <Number>+123456789</Number> </Dial> </Condition> <Say>The date-time is outside the specified range. Please try again later.</Say> </Response>
Wrap-Around
Time and date variables can use wrap-around to handle ranges that span across boundaries. It can include days, months, or years, ensuring continuous coverage even when transitioning from the end of one period to the beginning of the next. A wrap-around condition allows a range of time or dates to seamlessly cross a natural boundary.
Wrap Around Condition Examples
-
Time Range (Crossing Midnight)
<Condition time="22:00-06:00"> <!-- Handles times from 10 PM to 6 AM (crossing midnight) --> </Condition> -
Month Range (Crossing Year End)
<Condition mon="10-2">
<!-- From October to February -->
</Condition>
Blocks
A block of time is a continuous period, such as 9:00–11:00 or 14:00–16:00.
Comma-separated values let you specify multiple such periods in one statement.
This approach is useful for defining non-continuous time ranges within a single field.
Example
<?xml version="1.0" encoding="UTF-8"?>
<Response>
    <condition time="09:00-12:00,14:00-17:00">
        <Say>The support system is available during this time. Connecting you to a support agent now.</Say>
        <Dial>
            <Number>+123456789</Number>
        </Dial>
    </condition>
    <Say>The support system is currently unavailable. Please try again during our working hours: 09:00-12:00 or 14:00-17:00 GMT.</Say>
</Response>