Carrier
Management Carrier
Document Metadata
Category: Carrier Management / Termination & Origination Configuration
Audience: Administrators, Engineers, Support Team
Difficulty: Intermediate to Advanced
Time Required: Approximately 1–2 hours
Prerequisites: Active ConnexCS account with Carrier-module access; understanding of SIP trunking, termination/origination routing, and rate-card setup.
Related Topics: Carrier Rate Cards, Routing Overview
Next Steps: Configure carrier authentication & endpoints, build provider routing strategies, and validate routing behaviour using Logs, Circuit Test, or Debugging Tools.
Overview
The Carrier Interface in ConnexCS provides functionalities for managing carrier settings, credit, authentication, and response handling.
Use the Carrier section in ConnexCS for simplified Carrier management where you can add, configure, and delete Carriers.
Key Features
-
Call Completion:
-
A call may not complete if a customer lacks credit.
-
Calls will still connect if a carrier doesn't have credit; the carrier credit field is informational and doesn't prevent calls.
-
-
Carrier Rate Card Structure: Every carrier has one or more rate cards. Each rate card contains the charges imposed by the carrier.
Key Considerations
The system doesn't display the "Auto-generate invoice" option in this section.

Carrier Functions
From the Carriers page, you can perform several management operations.
-
:Add new Carriers (see Create Carrier below for details.)
-
Refresh: Refresh the page, helpful when making edits or looking at real-time changes. This created page is like a web app so some information will update automatically.
-
Bulk Edit: Select several Carriers, then click Bulk Edit to change the fields such as Channels Status, Flow Speed (CPS), Portal Access, and Country.
-
Delete: To delete several carriers at a time, select one or more carriers from the list and then click the trash bin icon and confirm.
-
?: Link to documentation for the current page.
-
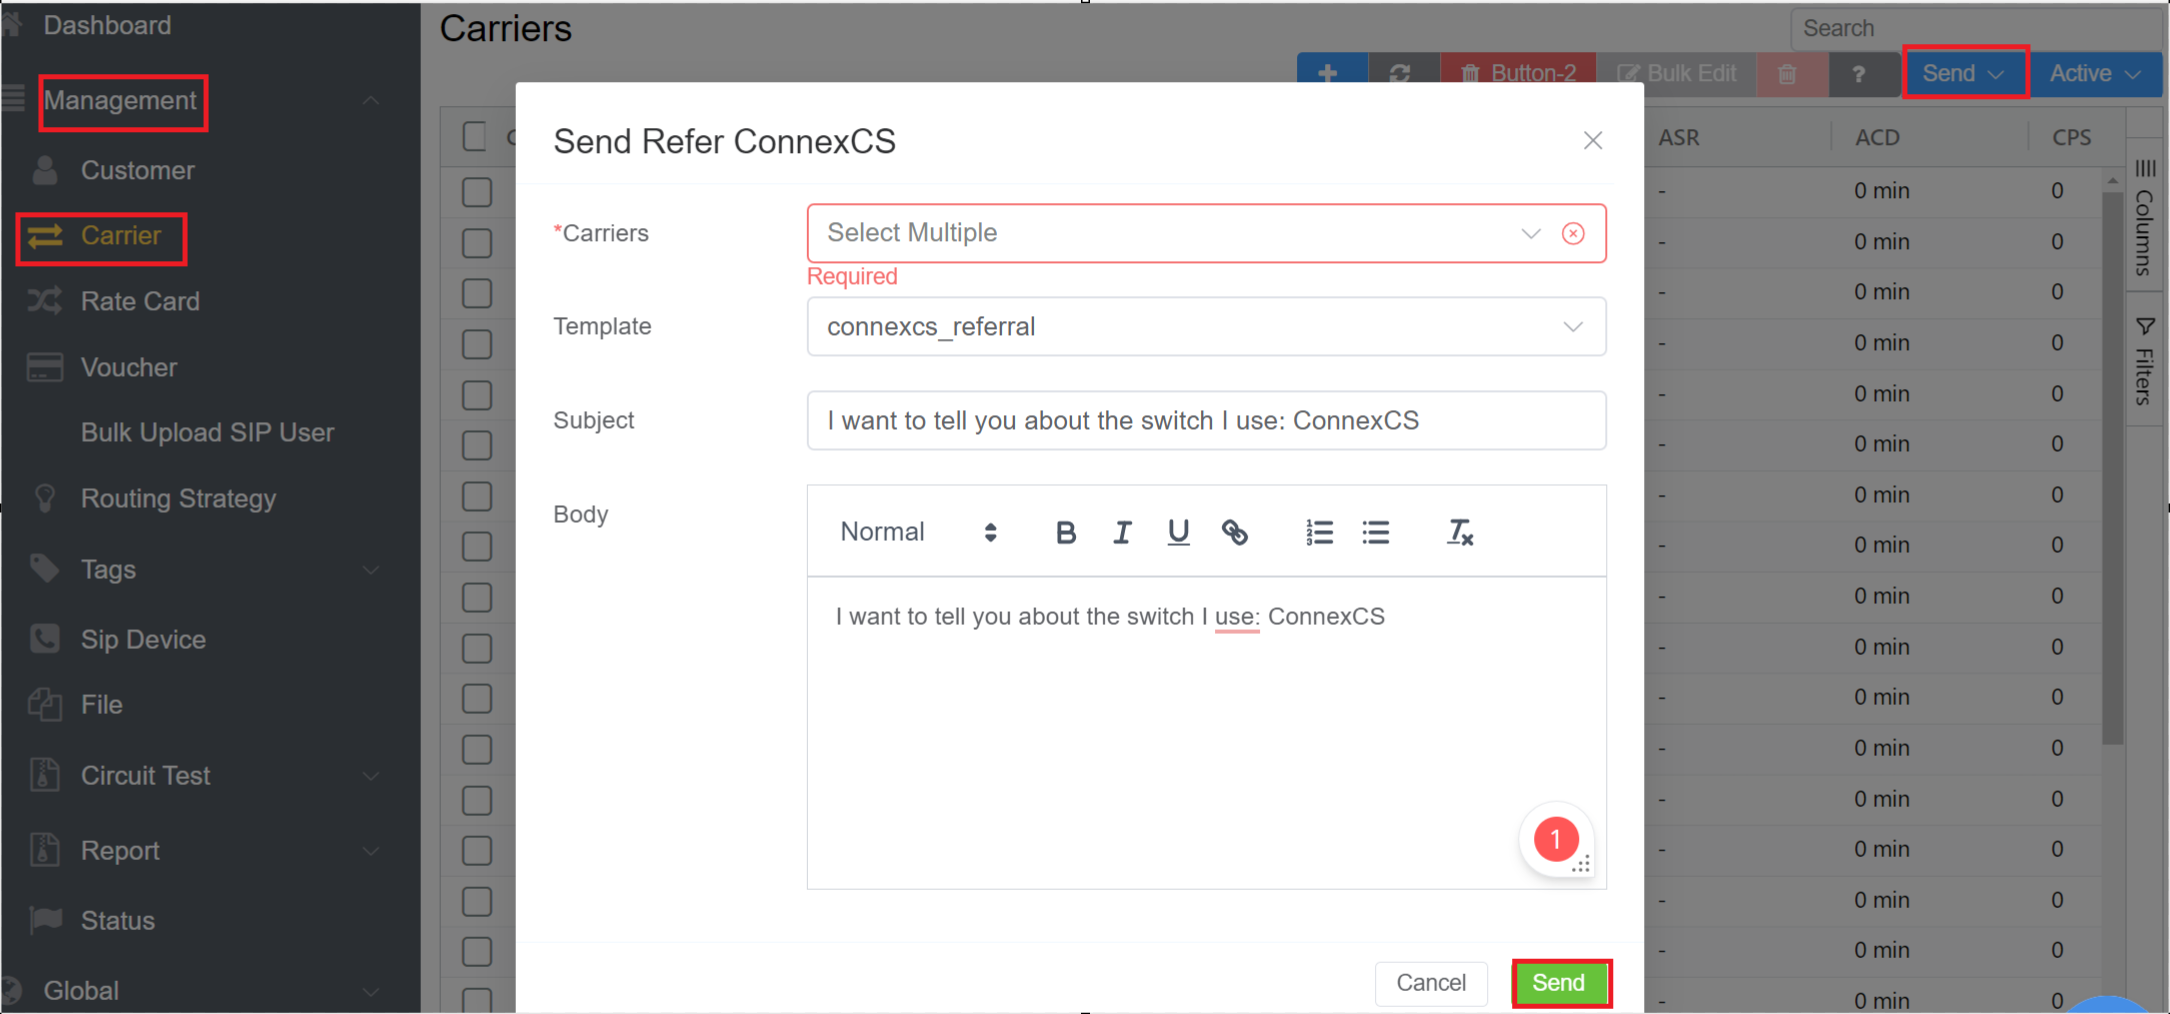
Send: ConnexCS includes Refer ConnexCS for your customers.
-
Select several customers using the tick-box selector on the left side of each row. (Customers aren't visible to each other in the sent message.)
- Click on "Send" at the top right then choose Refer ConnexCS.
- Refer ConnexCS: This feature allows you to send simple ConnexCS Referrals to you customers.
- You can send referrals to multiple Customers.
- You can select the Template from the drop-down list.
- Enter the Subject.
- Write the Body of the referral.
- Click on
Send.
-
Active: Used to sort Carriers based on the selected status. Results on the page will automatically arrange themselves according to the filter.
-
Search: The search box on the Carrier Management screen is for finding specific information among your carrier listings.
-
Audit Log: Click "View Audit Log" to the right of the Edit button to view changes made to the carrier configuration.
-
Credit column: Amounts listed here are purely informational; calls are still connected by a carrier even if the amount listed here is at zero credit.
Carrier View Modification
- Columns pop out on the right allowing you to add / remove options, change column order, and in some cases you can create row groups and total values for pivot functionality.
-
Filters pop out on the right allowing you to filter your carriers.
-
Adjust Column ordering
Create Carrier
- Click .
- Enter relevant carrier details.
- Click
Save.
Click each tab for field explanations:
- Carrier Name: Enter a unique name for the carrier.
- Channels: Add the number of channels (ports) in numeric digits. Set this to ZERO for unlimited channels.
- CPS: Enter the carrier's max allotted calls-per-second.
-
Status: The carrier's status. A drop-menu contains the following options:
Active- carrier available to process calls.Inactive- carrier won't process any calls.Pending Approval- carrier is undergoing a verification process, but their credentials are in the system. -
Currency: Choose the relevant currency for each carrier's country.
- URL: Enter the carrier's portal URL, ex: portal.yourcarrier.com
- Username: Add a unique name for the portal.
- Password: Enter the password used to sign into the carrier portal.
- Portal Access: Decides if the current carrier has access to the portal.
- First Reply Timeout: Length of time for the carrier to respond after the first invite, which is the SIP 100 Trying (could be considered a ping message, regardless if the call completes, this should be received quickly). Default = 3 seconds. Recommended = 1 second.
- PDD Timeout: Length of time for the carrier to respond to the call. If the carrier does not respond in the time selected, then another carrier will be tried. Default = 5 seconds. Recommended = 6 seconds.
- Ring Timeout: Length of time to ring, or the SIP 180/183 - Session in Progress. Default = 60 seconds. (The previous 2 timeouts are before carrier selection, this timeout is after carrier selection.)
- PayPal Email: Enter the PayPal e-mail associated with the carrier's account.
- Website: Add the carrier's official website.
-
P-Asserted-ID: Consider a network level identifier, you can select how calls to the provider is handled based on the PA-ID:
Default: Call passed to the provider (no manipulation).Remove: Strips PA-ID before passing the call to the provider.If Available: It will add PA-ID if one has been provided, otherwise the call will still be allowed.Required: Call won't be delivered to the provider without the PA-ID. -
Consec Fail Backoff: When Enabled, if a carrier goes down, only a fraction of calls will be sent to the carrier until the start to complete again (calls aren't completely disabled otherwise there is no way to know when the carrier is back up again). The First Reply Timeout is skipped.
- Purpose: Helps determine if a route is down.
- Functionality:
- Counts the number of consecutive failed calls.
- Resets to zero when a call successfully connects.
- If 10,000 consecutive calls fail, it indicates a route is likely down.
- Tags and TOML: Not applicable to carriers.
- Ext.Accounting ID: This is used to fill in work in an external accounting field to correlate between Connexcs and the external accountancy system.
- Call Recording Retention Days: How long the customer wants to keep the recorded calls.
- Gateway Failover: Enables automatic switching between multiple IP addresses configured within a carrier's authentication settings. By default, when a call reaches this carrier, it is attempted on one of the IPs configured in the carrier's authentication settings. If the call fails, it does not fail over to a different IP within the same carrier. However, enabling Gateway Failover allows the call to fail over to a different IP within the same carrier.
Gateway Failover typically offers several options that determine the behavior when a call fails on the first IP:
- None: No failover occurs.
- Failover 1: After a call fails on the first IP, the system attempts to route the call through one alternative IP configured in the authentication setting.
- Failover 2: After a call fails on the first IP, the system attempts to route the call through up to two alternative IPs.
- Failover 3: After a call fails on the first IP, the system attempts to route the call through up to three alternative IPs.
- Address: Include the address of the carrier, including the country and postcode or ZIP code.
- Propagate Username: Enable this to retain the display name of the FROM field in the SIP header (ex: Company Name, Username).
Special Considerations
Bandwidth.com has diverged from the SIP spec and exposed an internal IP address required for sequential requests.
To ensure compatibility, set the switch manufacturer to bandwidth.com.
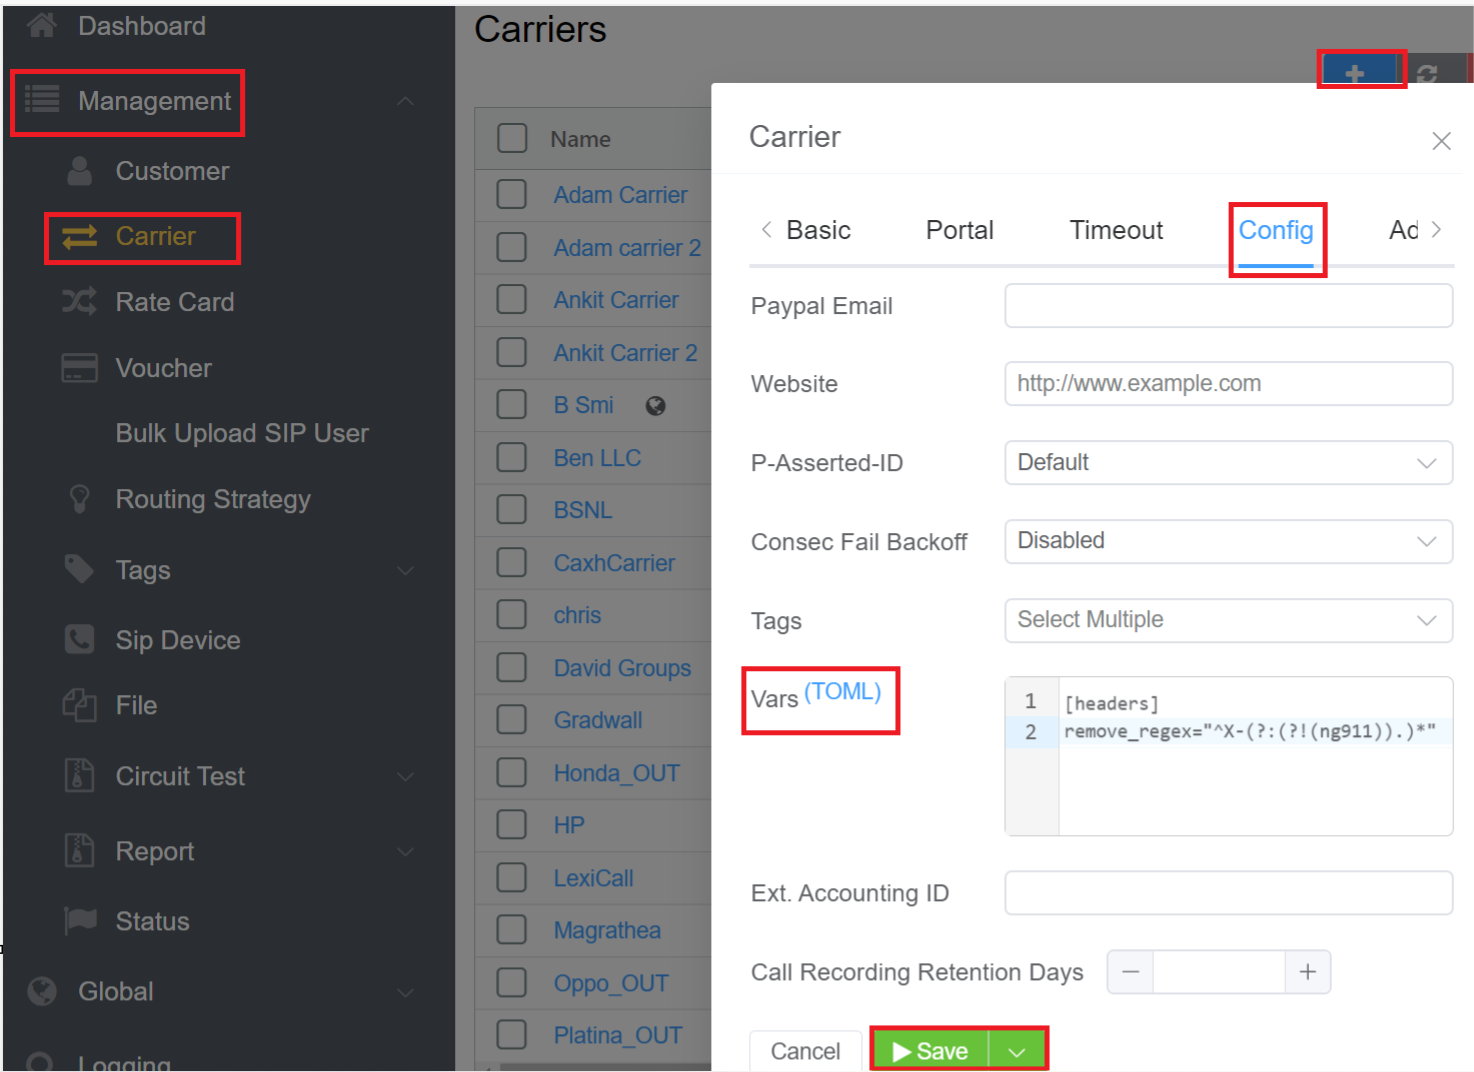
Headers from Customers to Providers
Customize the handling of X-Headers between the User Agent Client (UAC) and the carrier. By default, all UAC-originating X-Headers are removed for standardization, but this configuration allows selective retention of specific headers crucial for carrier communication.
When the Carrier requires information on the headers sent from the UAC, you can use below discussed process:
- Login to your account.
- Navigate to Management Customer Carrier blue
+button Config VarsTOML. - Consider an example here: Example of how to retain X-ng199 but remove all other X-headers
- Enter the code in the VarsTOML section.
1 2 | |
The Default Setting is:
1 2 | |
5.Click Save.
Warning
Misconfigured regular expressions may remove essential SIP headers and break SIP protocol behaviour, leading to call failures or service disruption. This is an advanced configuration and must be used with care.