WebPhone App
Document Metadata
Category: Setup & Configuration → Integrations → WebPhone
Audience: Administrators, Engineers, Support Team
Difficulty: Intermediate
Time Required: 20–30 minutes
Prerequisites: ConnexCS account with WebRTC-capable server setup (TLS, WebSocket, DNS)
Related Topics: API & SDK Integrations (for embedding WebPhone), Certificates & Domain Setup
Next Steps: WebPhone App Platform
Warning
We advise users to switch to this new App Platform (WebPhone App) as the previous WebPhone development has been put on hold.
Introduction
The ConnexCS WebPhone Application is fully customizable. It replaces the old legacy Web Phone Application.
Our new Apps Platform lets you build your ideal and robust WebPhone. You can configure the WebPhone that resonates with your preferences.
Customers can make calls over the internet with the ConnexCS WebPhone App (softphone). It operates straight from a browser, without the need to install any software.
This cross-platform application is ideal for call centers and similar deployments. It works with Windows, Mac, Android, iOS, and other operating systems.
The ConnexCS WebPhone is fully compatible with smartphones, ensuring seamless usability across mobile devices.
Key Components
-
WebRTC: A technology that enables voice and video communication via a web browser.
-
WebPhone: A browser-based SIP client that serves as the user interface for making and receiving calls.
-
SIP Server: The backend component responsible for handling call signaling and connections.
-
DNS Records: Required to configure domain names for WebPhone and WebRTC services.
-
Certificates: Used for secure communications.
Benefits and Features
-
Seamless Browser-Based Communication:
- Eliminates the need for standalone SIP clients.
- Works directly within modern web browsers.
-
Automatic Certificate Deployment: Ensures secure connections without manual intervention.
-
Flexible DNS Configuration:
- CNAME records allow quick switching between servers in case of failures.
- Users can update DNS settings via ConnexCS without downtime.
-
Multi-Server Support:
- Customers can distribute traffic across multiple WebRTC servers.
- Ensures redundancy and failover support.
Technical Details
Application
ConnexCS WebPhone is a PWA-based WebRTC application.
WebRTC (Real-Time Communications) is a browser protocol that runs on top of an HTTPS connection.
ConnexCS WebPhone uses WebRTC (HTTPS port 443) for SIP Signaling and WebSockets (random UDP ports) for the Media.
BitDefender and WebSockets
BitDefender blocks WebSockets unless the phone and WebRTC domains get whitelisted.
A PWA (Progressive Web Application) is an application written inside the web browser, and it uses a modern API.
State-level firewalls
WebRTC is effective for bypassing state-level firewalls by:
- Running Signaling over a widely unblocked port (443).
- Sending all Data (Signaling and Media) over an encrypted connection.
Security and Encryption
ConnexCS WebPhone encrypts all information (Signaling & Media) between the browser and the ConnexCS platform.
You can achieve this by leveraging TLS (Transport Layer Security) protocol support on the underlying browsers. Presently, all modern browsers support TLS 1.0, 1.1, 1.2 & 1.3.
MITM (Man-in-the-Middle) attacks actively intercept traffic between endpoints, while still operating within a TLS framework. This kind of attack counteracts with PKI (Public Key Infrastructure), a native HTTPS feature.
PKI ensures end-point integrity, so you can be confident that the endpoint you connect with is the one you expect, without any intermediaries.
Debugging SIP Messages
If you need to debug Web Phone and see the SIP messages, you can enter *#0*# into the dial pad, this will switch on debugging mode in the browser console.
Configure WebPhone
Tip
Before you proceed with installing and using the WebPhone Application, make sure you meet the necessary prerequisites.
-
A working ConnexCS account.
-
Servers are deployed.
-
WebRTC is configured. (Before proceeding, ensure that WebRTC is properly configured. If you haven’t set it up yet, click on the link to get started.)
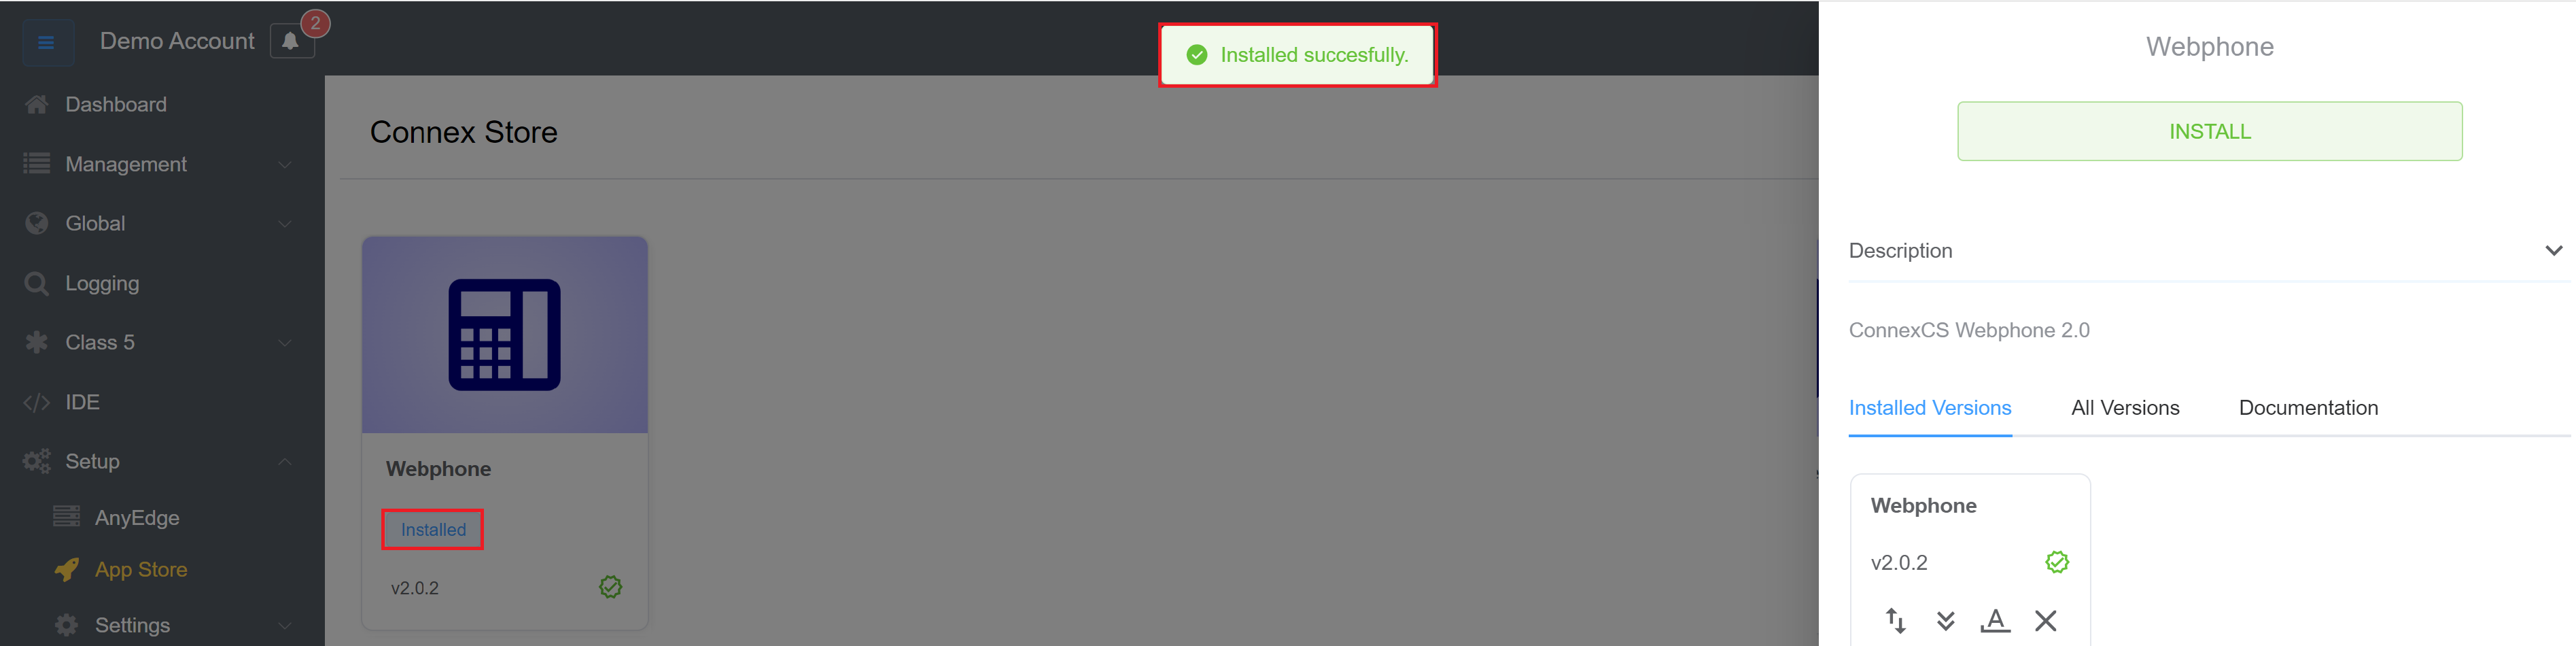
Step 1: Installing
- Login to your account.
- Navigate to Setup App Store.
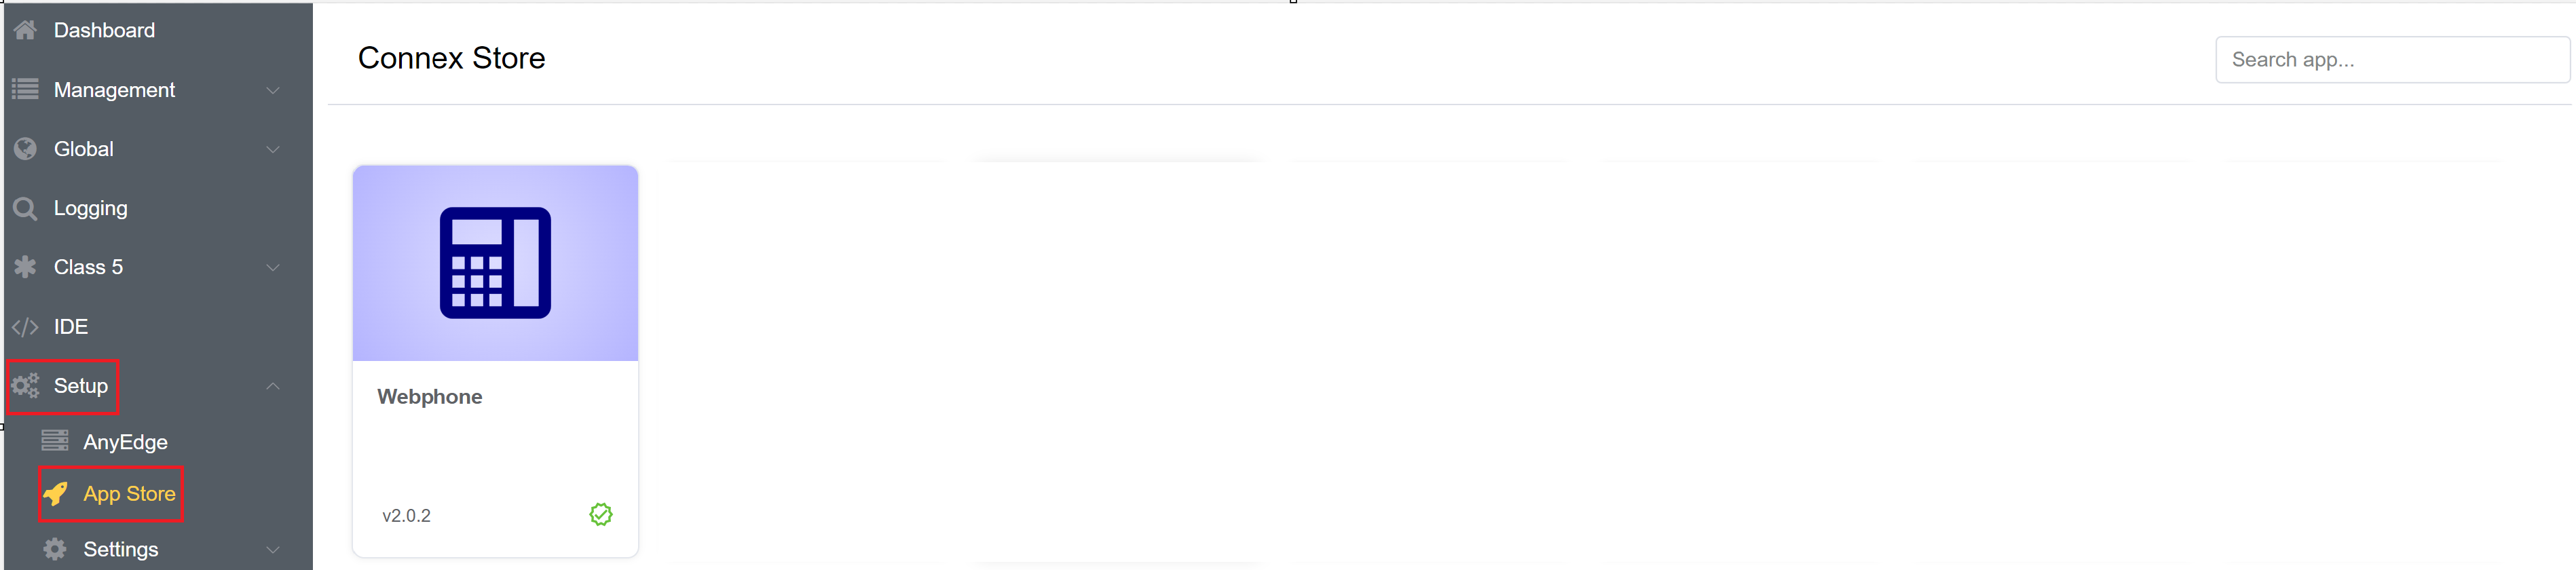
- Click on WebPhone.
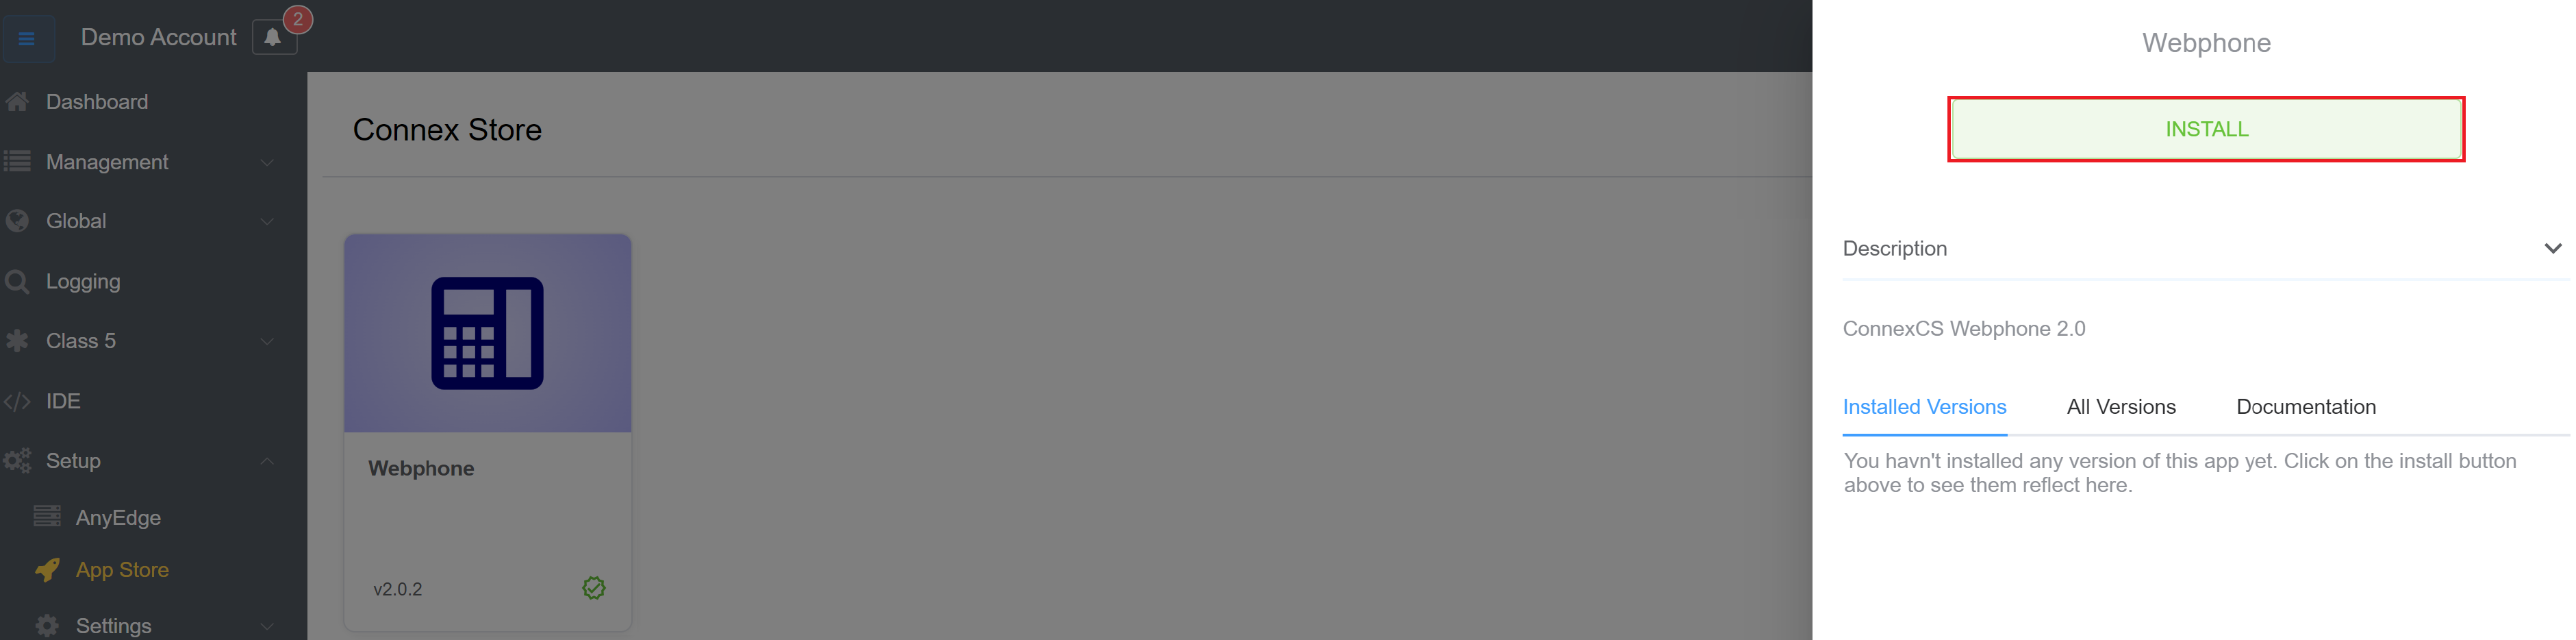
- Click Install.
- After hitting the Install button. A window appears which has 2 fields, App Name and Version. We shall keep the default App name and the suggested version of the App.
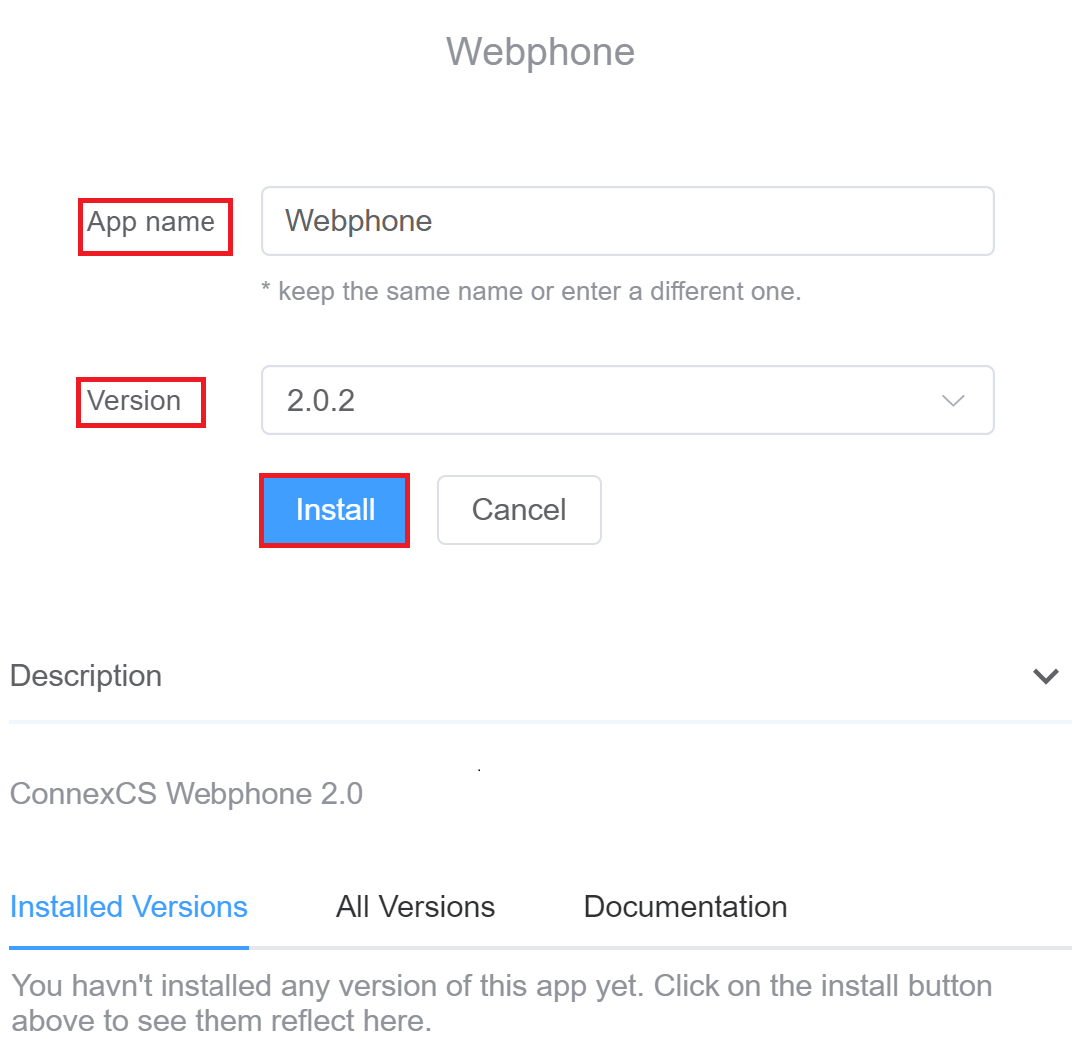
- Click on Install and the App will be installed on your user account.
Step 2: Publishing
- Navigate to the IDE section, and from the dropdown select the WebPhone App.
- Click on the Domain, and press the blue plus sign to add the domain of your WebPhone.
- To keep things simple, we will use a top-level domain provider by ConnexCS.
- Enter your unique name in the first part of the domain and we will deploy this for you on the .cnx.page domain.
- Click on Save.
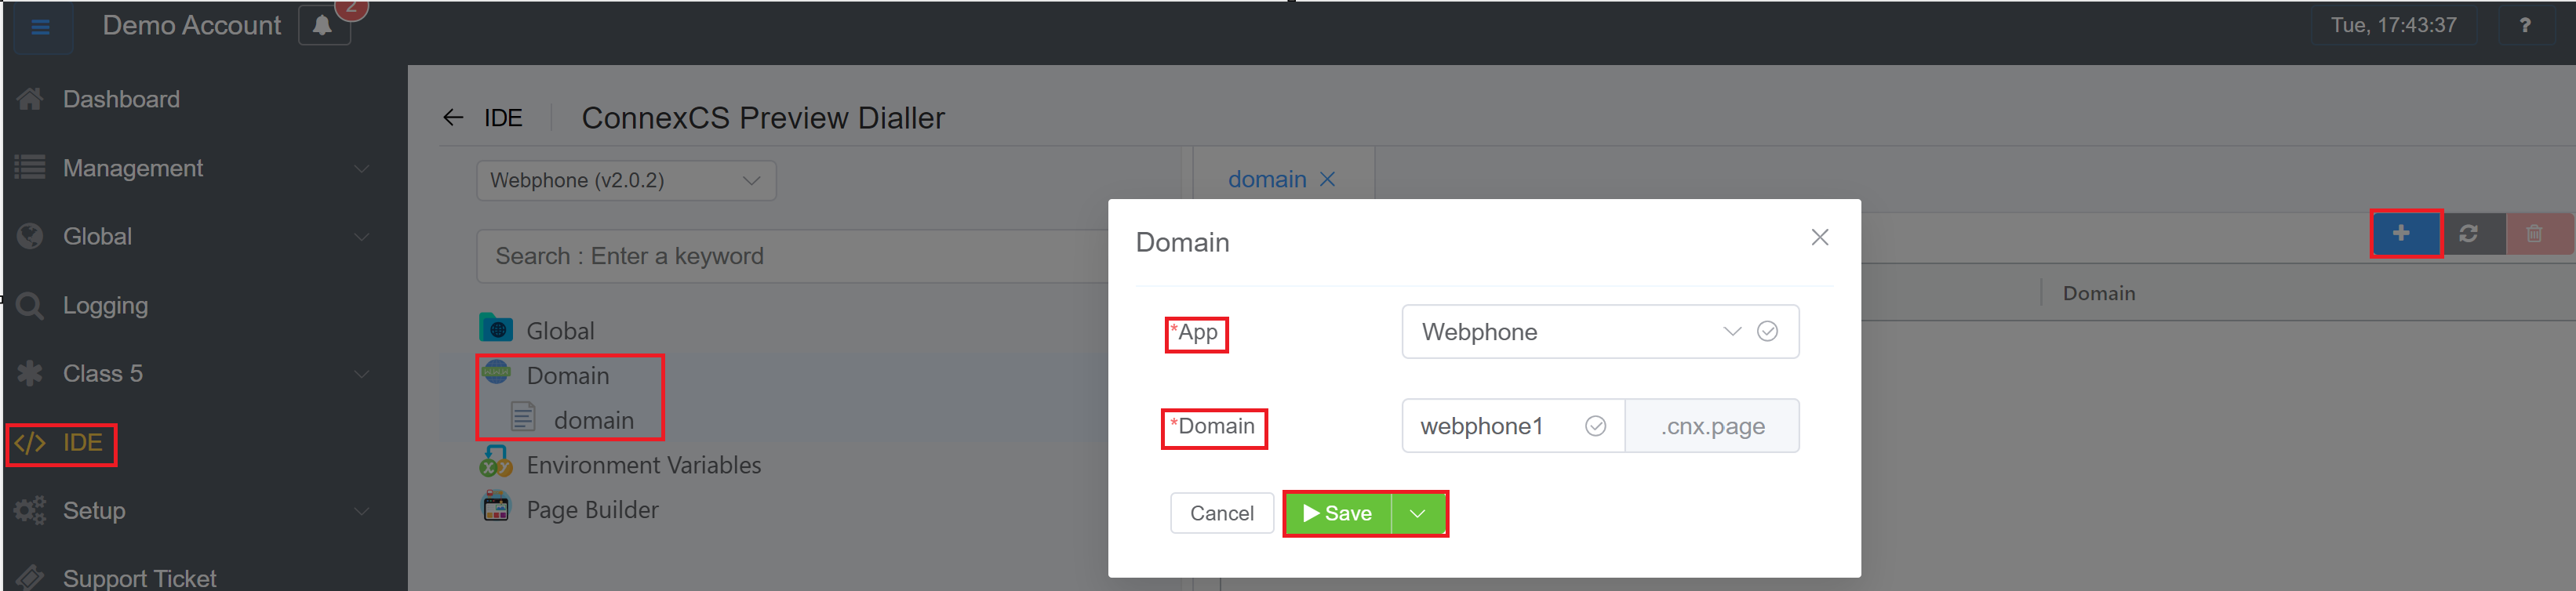
Note
Please note you can change this later if you want to deploy this on your own domain.
Step 3: Create Certificates
There are 2 ways to create a certificate:
-
Use ConnexCS's domain, for example
yourservername.host.connexcs.net. -
Use your own domain.
-
SIP Switch (Domain B): Create the WebRTC domain and it's CNAME should point towards the DNS you create.
-
Navigate to Setup Settings DNS to create your DNS.
-
Enter the domain (ex: test1), then select the checkbox for the A record for the IP of the server you want to use.
- Setup a DNS (Domain Name System) record within ConnexCS, then point a
CNAMEon your domain to the ConnexCS setup domain.
-
-
After you configure the domains, verify the certificates in Setup Information Certificates.
-
Step 4: Add WebRTC to server
To setup WebRTC on a server:
- Ensure Domain (B) (signaling domain from above) points ONLY to the server where you enable WebRTC.
- Navigate to Setup Settings Servers select the server, then Edit.
- Update the FQDN (Fully Qualified Domain Name) to the server.
- Ensure that you enable both TLS and WebRTC.
- Run
Install Serverif any settings gets changed.
AnyEdge and WebRTC
If you are using AnyEdge, you can enable WebRTC automatically by adding a domain name to your AnyEdge Domain.
Custom Domain Setup
Step 1: Set up the CNAME record
-
Access your domain account at your domain host.
-
Locate the page for updating your domain's DNS (Domain Name System) records.
-
Locate the
CNAMErecords for your domain. -
Add a new domain record such as
app.mycustomdomain.com. -
Point it toward
cnx.page.
Step 2: Add a Domain to App
Click here to check the steps for adding the Domain to your App.
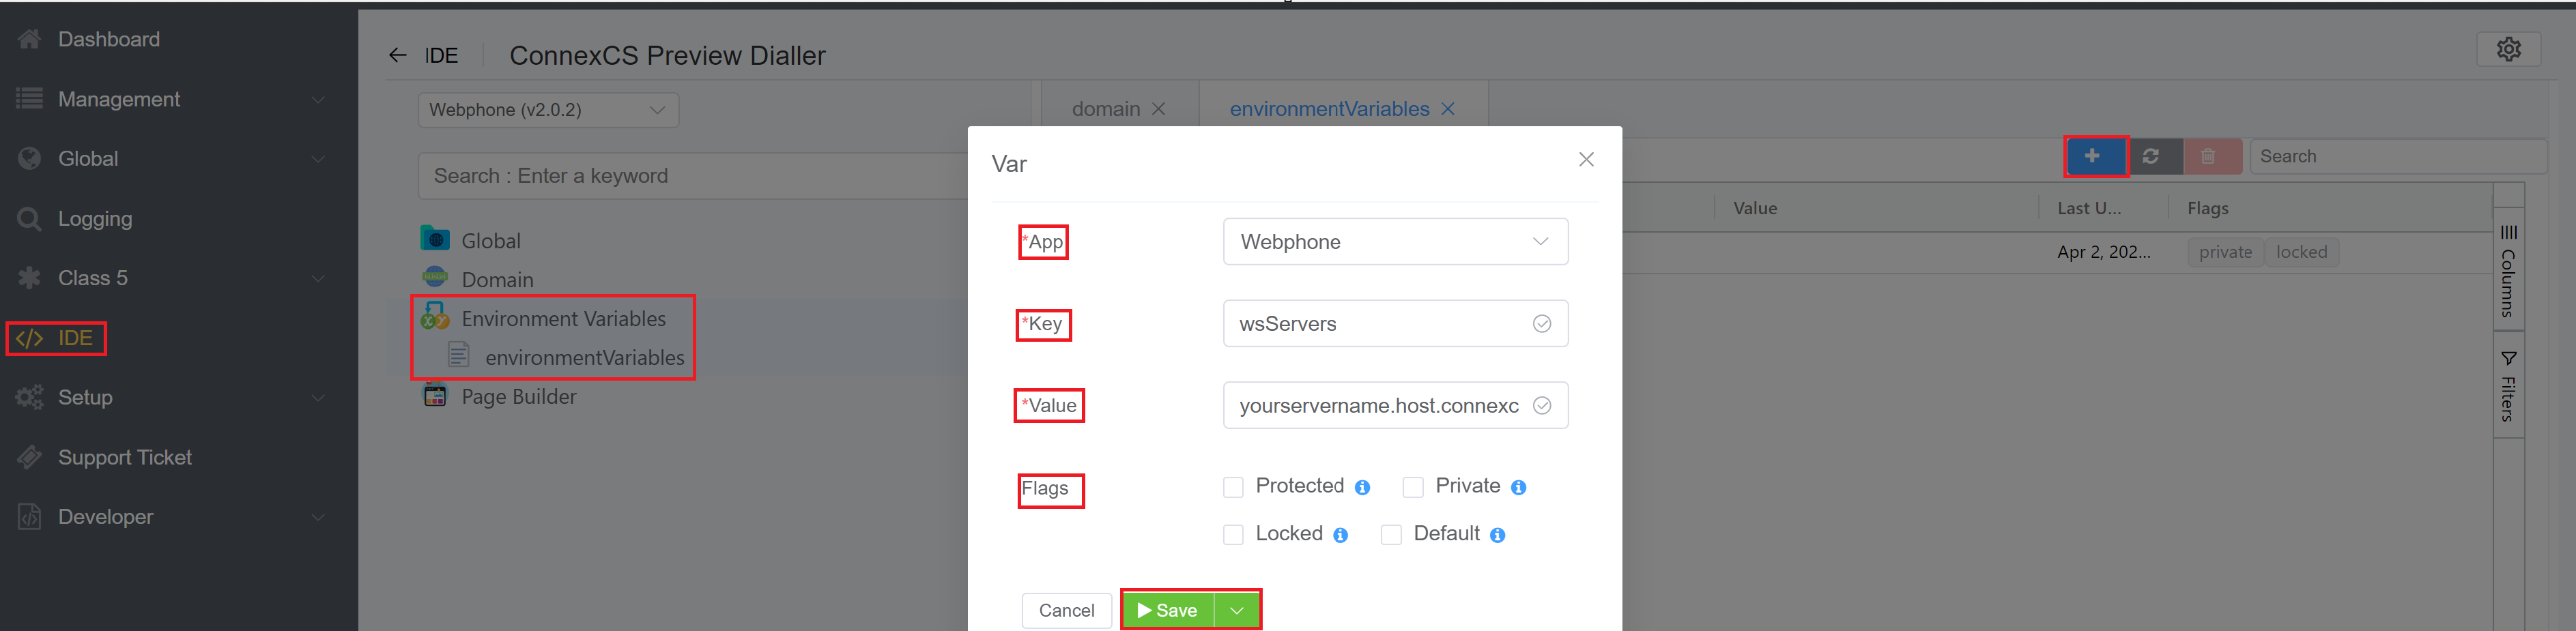
Step 5: Configuring (Optional Step)
- Go to IDE WebPhone Environmental variables.
- Click on the blue plus sign to create a new variable.
- A window will pop-up, where you need to enter the key as wsServers (example value) and value as yourservername.host.connexcs.net (example value). These values and will appear in the drop-down on the Webphone login-page.
- Key = wsServers
- Value = yourservername.host.connexcs.net (you can separate each with ' if there are multiple)
- For selecting Flags click here.
- Click on Save.
Step 6: Login
- Now let's have a look at the deployed domain.
- Enter in the domain name in the URL e.g., webphone1.cnx.page.
- Enter the Username and Password.
- Select the Server from the dropdown. If you don’t want the customer to type-in the server, you can add the servers in the drop-down in the next step which is Configuration. You won't have the drop-down if you don’t fill out the information of the servers in the environmental variables.
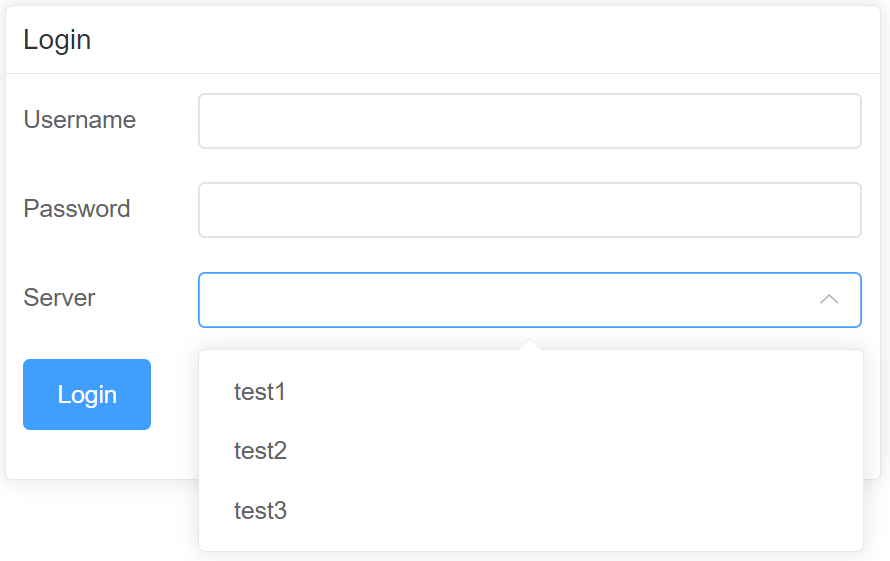
- After logging in you can dial from your WebPhone.
Navigation
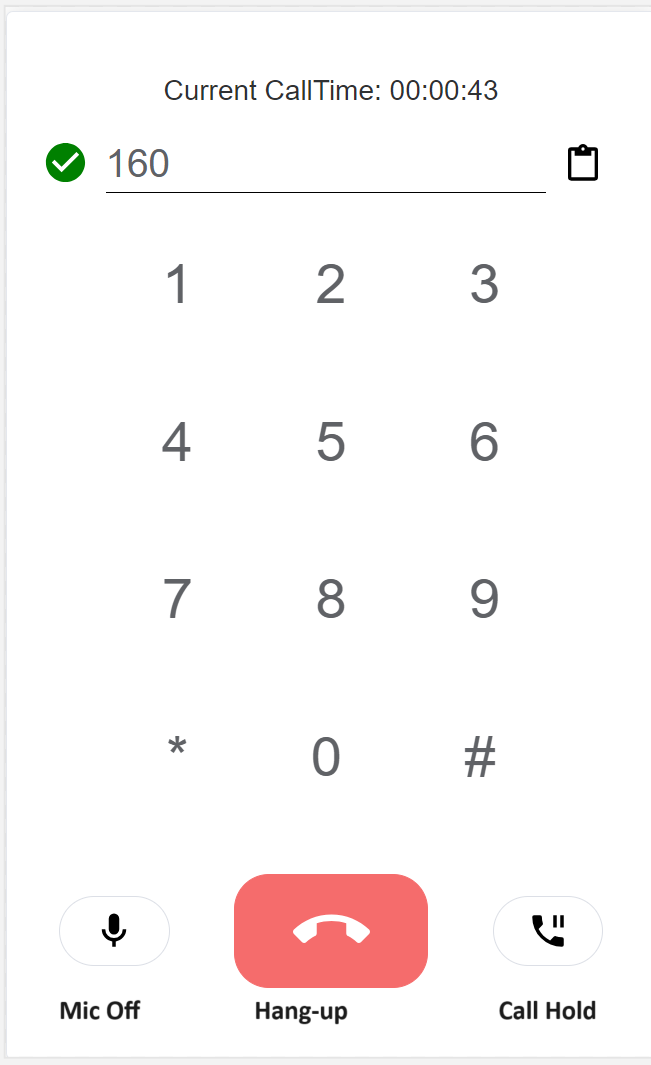
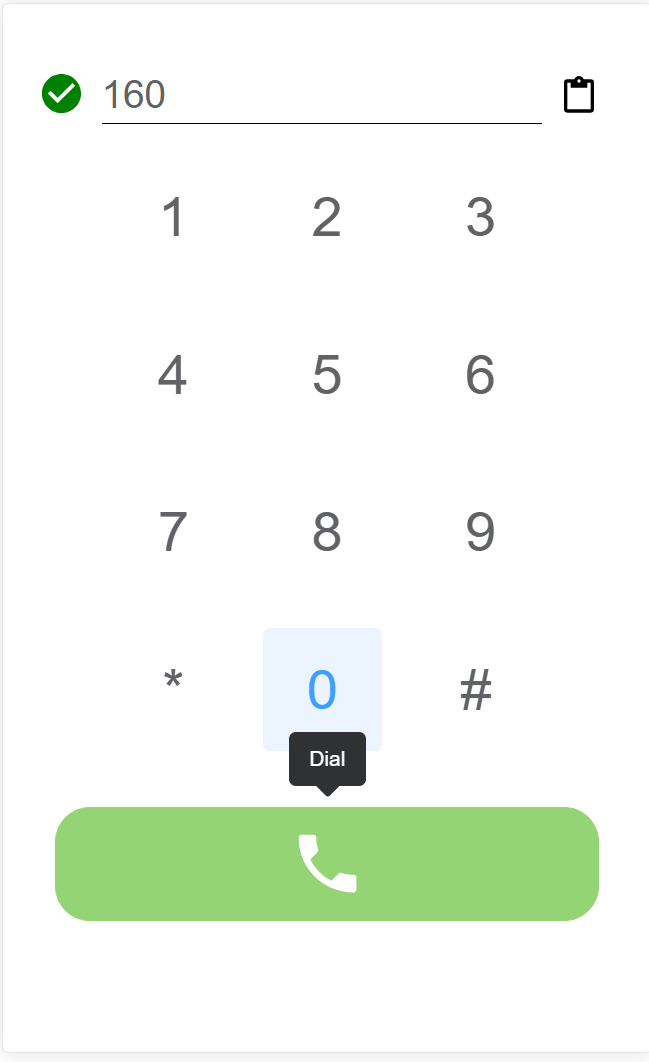
- Dialpad: Dialpad for making and answering calls.
- Mic Off: Mute the call.
- Hangup: Disconnect the call.
- Call Hold: Hold the call.
- Clipboard: When you copy something on your computer, it's stored on the clipboard. You can then paste it on the Webphone.
- Log Out (top-right): Click on this button to sign out of the Webphone.
- Current Call Time: Displays the duration of the ongoing call.