Direct Inward Dial (DID)
Document Metadata
Category: Customer Account Management / Direct Inward Dial (DID)
Audience: Administrators, Engineers, Account Managers
Difficulty: Intermediate to Advanced
Time Required: Approximately 45–90 minutes
Prerequisites: Active ConnexCS account; knowledge of DID / inbound routing, customer- and carrier-rate-card setup
Related Topics: Customer – Routing, Global DID Management
Next Steps: Bulk DID Upload, Advanced DID Features: ScriptForge, STIR/SHAKEN settings
Management Customer [Customer Name] DID
Overview
A Direct Inward Dial (DID) number is one that exists on the public telephone network. It enables customers to receive calls from the public telephone network.
How it works?
When you dial the number, the carrier delivers the call to ConnexCS. ConnexCS then passes it to the customer based on the configured settings. It allows inbound calls to bypass a PBX (Private Branch Exchange) or another routing to connect directly to the destination number.
graph TD
A[Dialed Number] --> B[Carrier Delivers Call to ConnexCS]
B --> C[ConnexCS Processes Call]
C --> D{Check Routing Rules}

D -- Direct Routing --> E[Forward Call to Customer]
D -- PBX Bypass --> F[Connect Directly to Destination Number]

E --> G[Call Successfully Connected]
F --> G[Call Successfully Connected]
Global DID
You can also configure and manage a DID for specific Customers or Carriers in Global DID, which displays all configured DID.
Key Features
- Inbound Call Routing: Calls from the public network are directed to customer systems.
- Custom Destination Management: Calls can be forwarded to SIP URIs, external numbers, or internal extensions.
- Retain Display Name Option: Configurable settings to preserve caller name information. By default, the display name is stripped to prevent unnecessary data exposure.
- Capacity Limits: Manage call flow with channel restrictions.
- Media and Call Recording Settings: Control media proxy modes and enable call recording.
- Billing Packages: Assign recurring cost structures to DIDs.
- ScriptForge Integration: Custom script-based call handling.
Configure Direct Inward Call
To configure individual DIDs, click
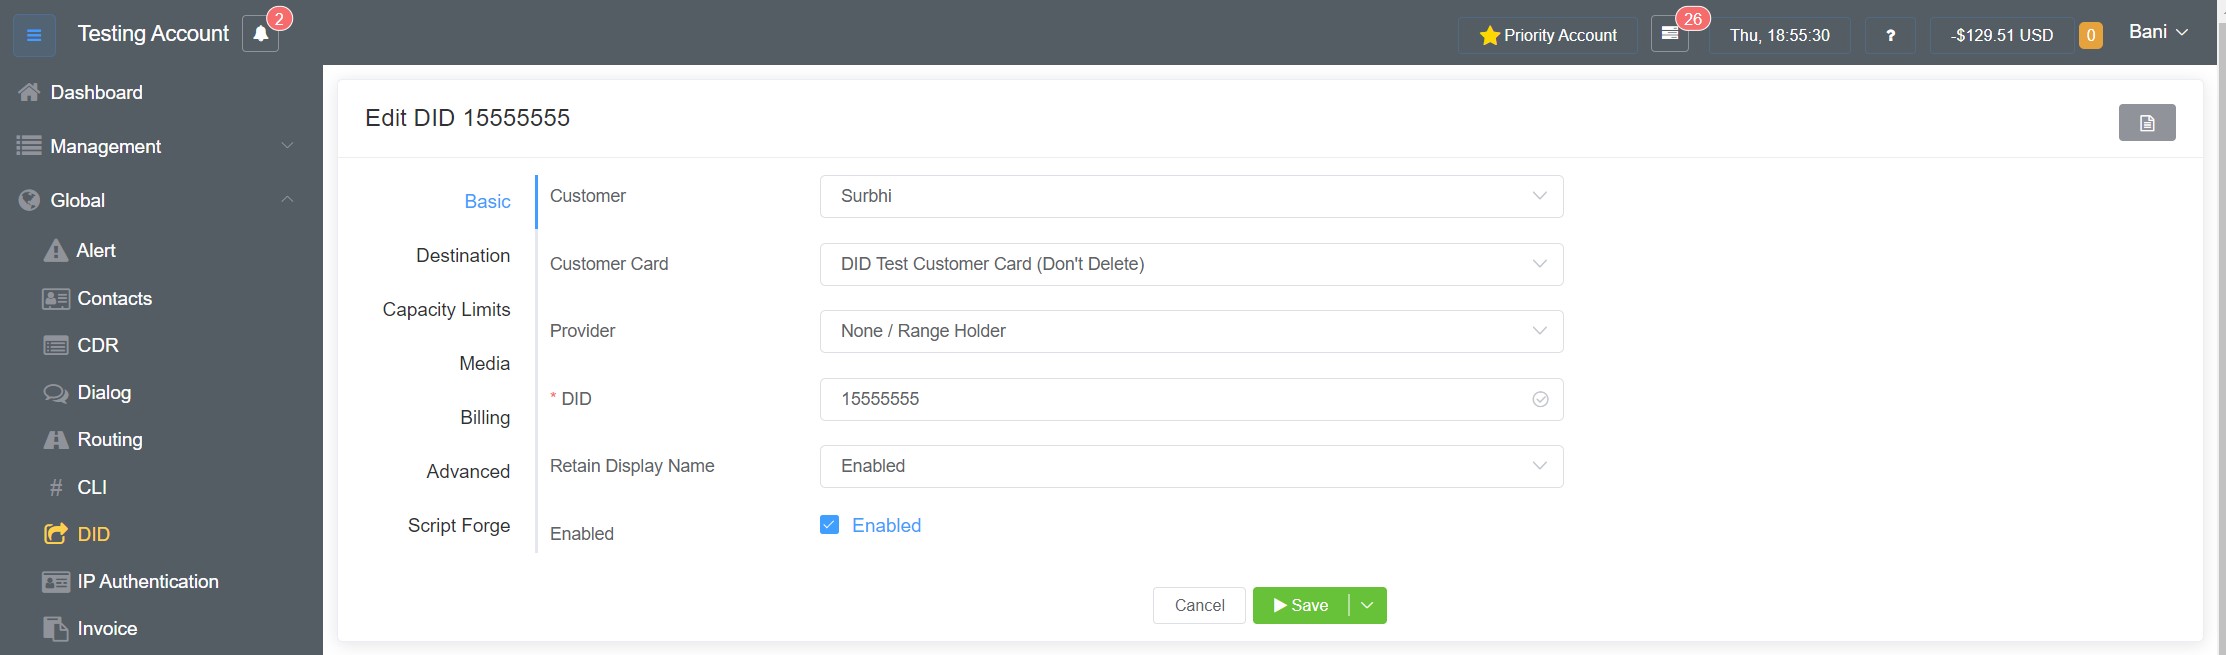
Basic
- Customer: Assign the number to the customer.
- Customer Card: Select the required billing (see Customer Rate Cards for configuration).
- Provider: Select the Carrier required for routing.
- Provider Card: Select from Carrier Cards assigned to that Carrier (see Provider Rate Cards for configuration).
- DID: Enter the specific number.
- Retain Display Name: If Enabled, it displays the Name in the FROM field of the SIP INVITE.
- Enabled: Enable or Disable the DID.
Info
Make sure when you select the Customer Rate Card or Provider Rate Card for creating the DID, the Advanced settings in Provider Rate Card or Advanced settings in Customer Rate Card the Direction field should be Origination.
Destination
Select the destination to deliver incoming calls for the DID:
- URI: Set the Destination DID (number or extension) and IP to forward calls to a specific SIP URI (Session Initiation Protocol, Uniform Resource Identifier).
- External: To send the call back out to the internet(public network) through a different carrier. Use a prefix (defined in Customer Routing ) to select the outbound route, then the number to send the call to.
- Internal: Send internally to an extension, a Class5 feature, or even to another customer.
- Circuit Test: Enables users to verify the integrity and performance of call routing. By pointing a Direct Inward Dialing (DID) number back to the Circuit Test system, users can evaluate critical metrics such as MOS, DTMF, and Caller ID consistency. This process ensures that the purchased routes meet expected standards.
- ConneXML: The incoming call is routed to a ConneXML script, which defines the subsequent call behavior.
How it works?
graph TD
    A[Call Initiated through Carrier] --> B[Call Enters through Assigned DID]
    B --> C[System Identifies Call as Part of Circuit Test]
    C --> D[Call Redirected back to Circuit Test System]
    D --> E[System Evaluates and Logs Key Quality Parameters]
Capacity Limits
Set the maximum number of INBOUND concurrent calls in Channels, and Calls Per Second (CPS) in Flow Speed.
It Defines channel restrictions for inbound calls. This feature also controls the rate at which calls enter the system.
Media
For more details on these fields, see Media in Customer Routing.
-
RTP Proxy Mode: If relaxed is chosen and a connection through our service fails, we will attempt to send the call out to your carrier direct. This will expose your customer IP address to your carrier and vice versa.
Strict- This will enforce the proxy engagement.Relaxed- This will make every effort to connect to the RTP proxy; if it can't, the calls will connect directly. -
RTP Media Proxy: The recommended RTP Media Proxy server is the Closest (Elastic) Server. The following options allow you to set the RTP media server for this route for this customer:
Direct RTP (no proxy)- Bypass ConnexCS, so media flows directly between the customer and carrier.Zone (recommended)- Select any of the regional servers. -
Call Recording: Its an optional feature for compliance and quality monitoring. Select the % of calls to record for this customer:
- Disabled- never record calls
- 1% Sampling
- 5% Sampling
- 25% Sampling
- 50% Sampling
- Enabled (Always On)
-
Timeout: Set various options to help with call timeout for missed BYEs.
-
Max Duration: Set the maximum amount of time (in seconds) to allow the call to exist before it's terminated, typically in case of a missed BYE.
-
Transcoding: Enter the number of channels allowed for transcoding. This is a limited option. The best use case is for customers in low-bandwidth areas that want to use G.729. If you don't have enough transcoding capacity, calls might start failing.
-
Flags: Enable this option if you want to remove STIR/SHAKEN information from an inbound call before forwarding it to the destination.
-
RTP Codec: This fields allows you to have more specific control over the Codecs you choose for your system. After the selection you can assign various Permissions to the Codecs you select.
-
Types of Permissions include:
- Except: This permission allows you to block all the codecs apart from the ones in the Whitelist. Codecs that weren't included in the carrier's initial codec list won't be taken into consideration.
- Offer: Offer also blocks the codecs apart from the ones in the whitelist and provides flexibility to change the order of the codecs in the list as well. Thus, the first codec in the list is treated as the primary codec (at the output) even if it was the last codec in the list.
- Consume: Identical to mask but enables the transcoding engine even if no other transcoding related options are given.
- Transcode: Allows the addition of codecs in the offered codec list even if the codecs weren't included in the original list of codecs. Here, transcoding engine will be engaged meaning behind-the-scenes translation process is happening to ensure communication.
You can only add those codecs which are supported by your device for both encoding and decoding process.
One limitation of using this option is that it will strip-off all the unsupported codecs. Note that using this option doesn't necessarily always engage the transcoding engine. If all codecs given in the transcode list were present in the original list of offered codecs, then no transcoding will be done.
When you use this permission it enables you to mark/modify the Ptime. - Strip: This permission allows you to remove the selected codecs or RTP Payload types from the SDP. Codecs removed using this option behaves as if they never existed in the SDP.
Strip Transcode Explanation G729A Opus G729A is unavailable for transcoding - Mask: This option allows you to filter-out the selected codec from the output. Mask works well in combination with Transcode option. For example,
Input/Offering side Mask Transcode Output/Outgoing Offer Explanation G729A G729A Opus Opus Transcoding happens between G729A and Opus but output is Opus, G729A is filtered out from outgoing offer G729A Opus G729A and Opus Transcoding happens between G729A and Opus but outputs are both Opus and G729A since G729A wasn't filtered out - Accept: This option is similar to Strip and Mask but it isn't removed from the codecs offered list. When you select this option, the selected codec is offered to the remote peer (output/outgoing offer), if the remote peer rejects the offered (incoming) codec it will be used for transcoding and is accepted by the input/offering side. In short, Accept permission allows your device to use codecs offered by the remote peer even if they weren't your initial choice.
Input/Offering side Accept Transcode Output/Outgoing Offer Explanation G729A G729A Opus Reject Transcoding still happens between G729A and Opus -
Ptime(ms): This value determines the length of time each box (RTP packet) can hold. A higher ptime means each packet carries a longer chunk of audio/video data (bigger box), while a lower ptime means shorter chunks (smaller boxes).
-
Billing
Select a predefined Package to determine costs and billing. This will deduct Frequency Match and Setup Cost from the account's package.
For each Package there is an associated Minimum Days the package is valid for. If some packages you don't have pre-defined days, you can mention the days you wish to use a particular package.
Advanced
- Stir Shaken Min Attest: It enables the selection of STIR/SHAKEN attestation levels for validating incoming calls. Users can configure the system to permit only calls that meet specific attestation standards. The available validation levels are as follows:
- A: Permits only calls with attestation level A, the highest level of trust. Calls with attestation levels B or C will be blocked.
- A + B: Restricts incoming calls to only those with attestation levels A or B. Calls with attestation level C will be blocked.
- A + B + C: Allows calls with any attestation level (A, B, or C) to pass through.
Note
In all cases, calls without attestation will also be blocked.
-
Tags: Tags allow users to categorize DIDs for reference (e.g., High Capacity, Failure). Add these for informational purposes.
-
P-Asserted-ID: Either
Removethe P-Asserted-ID so it doesn't reach the customer, or leave itDefaultto preserve it. -
Block Source Type: You can select and block the calls to various destinations (carriers) like Mobile, Fixed, Paging, etc. Click here to know about Destination Type Lookup & Fallback Logic — USA and International.
-
Spam Scout Scoring: It blocks Spam calls based on the CLIs. You can either Block All, Allow All, Block Most Spam, or Block Least Spam.
-
IP Quality Score (IPQS): IP Quality Score (IPQS) blocks calls based on CLIs. It prevents CLIs with a specific spam score that you've selected from passing through the system. For more information on IPQS, click here.
Warning
The IPQS feature requires a paid subscription. To enable this feature navigate to Setup Settings Account and enable this feature. Check Pricing here.
You can set a Max Daily Quantity for your customer's lookups. This restricts them to using only the specific number you allocate, ensuring controlled usage.
-
Flags: Configuration options used to enable or disable specific call processing behaviors or rules.
Strip Stir Shaken: Removes STIR/SHAKEN headers received from downstream before forwarding the call upstream.Random: When this option is enabled, calls will be distributed randomly across the configured DID destinations.
Script Forge
Run a custom script on calls to the DID to perform actions such as routing based on the time of day or if specific users or numbers are active.
Use ScriptForge for Dynamic Call Management.
- Script Forge: Select the script you wish to run for the DID.
- Timeout: Select the time for how long your script should.
- Timeout Action: You can specify the timeout action if some issue occurs while the script runs. You can specify the action as: [sip response code] [sip message], example: 200 OK.
- Vars TOML: This is a data storage mechanism for configuration, similar to INI files. It allows you to create advanced customization to set values, etc, for Script Forge to reference later.
Bulk Upload
For batches of DIDs, you can use Bulk Upload to add multiple DIDs at one time using a CSV (comma-separated values) file.
During the upload process, it's then mapped to the correct values in Control Panel.
You can perform this for an individual Customer (Management Customer [Customer Name] DID) or Globally (Global DID).
CSV files ONLY
Use only a CSV file to upload DID numbers. If you upload a regular spreadsheet or another file, the Control Panel becomes unresponsive.
You must log out and log in to use the Control Panel.
Step 1: Create the CSV
- In Microsoft Excel, open a new workbook and save it as a CSV (Comma delimited) file.
- In the first row, add the names of the input fields as column headers like Customer column or DID column.
- The next step is to map the created columns into the system.
- To map the columns, follow the listed steps: 4.1 Mapping is initiated by right-clicking the second row and selecting the "Set Start Row" option from the menu. You will see the first row highlighted in Blue. 4.2 After that, click on each column separately, choose the 'Map column' option, and select the options from the drop-down list to map that column. 4.3 From the second row on, add the values of the input fields, one row per DID.
Tips for creating the CSV file
Steps taken to ensure that you can perform the next steps effortlessly:
-
The CSV file must contain only one sheet.
-
Include various fields as you can when creating your columns to leverage the benefits of the bulk upload feature.
-
Note the number of first and last rows, as these will be the range (minimum and maximum) values in Step 2.
-
Input fields that correlate to drop-down lists: The entered value must match an existing entry (the Control Panel doesn't create values from drop-down lists on-the-fly). For example, "Retain Display Name" only accepts Enabled or Disabled; and rejects any other value.
-
Input fields that are pre-created objects (for example, customer names and customer card names). You can enter "dummy" values because you must associate the corresponding cell with the input value with the actual value (name of the pre-defined object) before you upload the DID numbers to the server.
-
Input fields that use numerical or free-text values: Enter the permissible range of values.
-
Input fields that accept values on-the-fly (for example, tags): Enter any meaningful value.
-
Don't include input fields such as checkboxes. You must manually select or clear a checkbox after you upload the DID number to the server.
-
Don't include a DID number that already exists on the Control Panel. The entered DID Bulk Upload will fail if Control Panel finds at least one identical DID number.
Step 2: Upload the CSV to ConnexCS
- Click Bulk Upload.
- Click Upload and select the CSV file (created in the earlier step).
- The DID page displays the values in the CSV file.
- Associate the input fields to the column headers in the CSV file.
- Right-click the top row of data and select "Set Start Row."
- Right-click any value in the DID column and click "Map Column" > "DID."
- If the rest of the input fields match the Control Panel column headers, then you can upload the DID numbers to the server. If not, you should map the rest of the columns. To map, right-click and then select the corresponding headers in the "Map Column."
- (Optional) If you want to change a value in a column that represents a drop-down list, click the cell and enter an different value in the drop-down list.
- (Optional) If you want to associate an input value in a column that represents a pre-created object, such as the name of a customer, right-click the cell and click Map Column > [name of the input field].
- (Optional) If you want to change a value in a column that accepts free-text or numerical values, click the cell and enter a different value in the drop-down list.
- (Optional) Change values for all cells in the columns that represent pre-created objects, drop-down lists, or accept free-text or numerical values, to reduce your operational time to fine-tune the DID numbers' input fields manually, one-by-one, later.
- Click Upload to Server, confirm the pop-up.
- At this point, the DIDs and associated values get uploaded to the server. If there are any duplicate DIDs in the system, the entire operation will fail. The Control Panel doesn't have the ability to show which DID is the duplicate, so you will need to review the DIDs independently.
See Script Forge for more information.
Range Holders
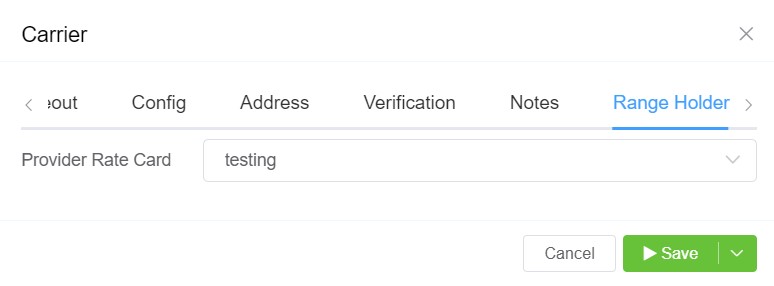
Following are the steps to configure the Range Holder cards.
- We create a new Carrier which is basically a Range Holder. This is a pseudo-carrier. This carrier (Range Holder) isn't going to send any calls and we need not provide it with any Authentication.
- Next, we build a Provider Rate Card for the Range Holder.
- Under the Provider Rate Card we've Tier 1 Interconnect and Tier 2 Interconnect for different providers.
- Then you go to the Carrier click on Edit and then click on Range Holder and select Provider Rate Card and click on
Save. This gives them access to the whole range of numbers.
- Then go to Management Global DID.
- Select the number.
- In Basic select your Customer.
- From the Provider drop-down select None/Range Holder and the Provider Rate card disappears.
- Click on
Saveand you can see the updated card.