Tags
Document Metadata
Category: Routing / Tag-Based Templates & Configuration
Audience: Administrators, Engineers, Support Team
Difficulty: Intermediate
Time Required: Approximately 30–45 minutes
Prerequisites: Active ConnexCS account with management permissions; understanding of customer and routing configuration workflows.
Related Topics: Alerts, Routing Strategy
Next Steps: Create a tag (via
Management → Tags), apply it to one or more customers, then assign routing strategies, alerts or CLI rules that reference the tag — enabling consistent configuration across all tagged customers.Management Tags
It's a dynamic label which links Routes, Alerts, CLI rules to customers by automatically applying tagged configuration when the same tag is assigned to a customer.
With the help of tags, you may generate global Alerts, Routing, and CLI information. Following the creation of the Tags, you can tag your clients in the Alert, Routing, or CLI Strategy.
By using tags, you may create an Alert, Routing or CLI Strategy for each specific customer with less time and effort.
You may apply the tags to as many customers you wish.Management Customer Tags
- You can go to Management Customer Config Tags.
- Click on the dropdown next to Tags and assign it to your customer.
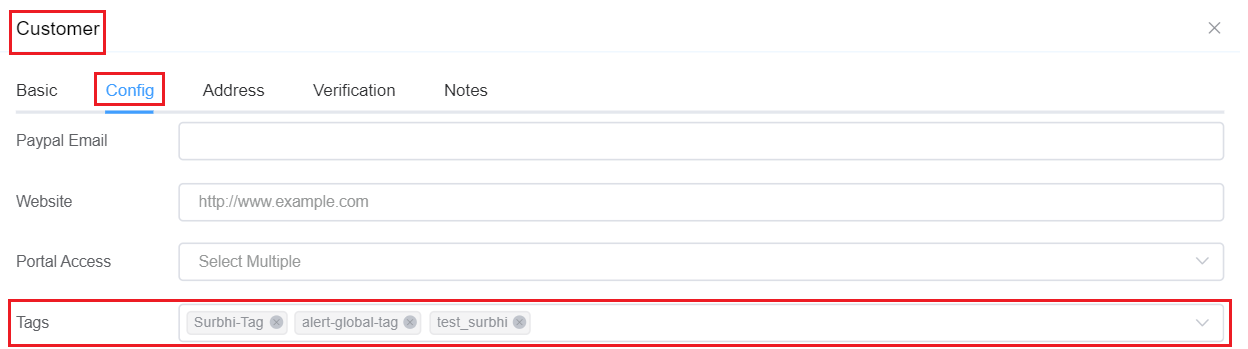
Tags help reduce the time and effort required in creating an Alert or Routing Strategy for each individual customer. Alerts will be sent to all the emails that are added to the contact of that customer.
You can create a general alert or routing strategy and apply it to as many customers as you want.
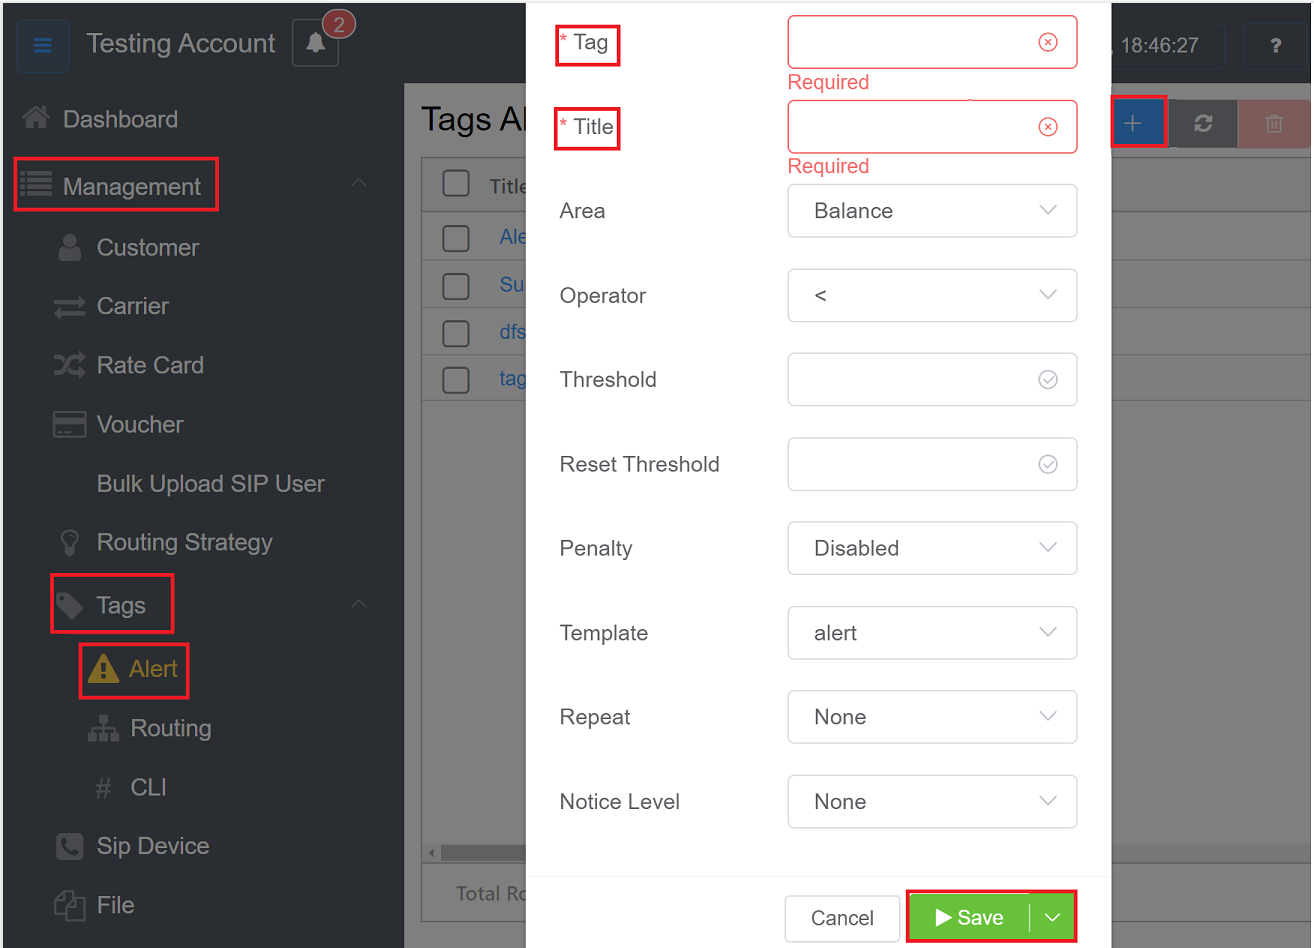
Alerts
Use Alerts to notify customers when specific occurrences take place. Additionally, it deactivates accounts automatically when certain thresholds are reached.
Create an Alert
- Navigate to Management Tags Alert.
- Click on the blue
+button on the top-right. - In the Tag field, mention the name of the tag. It's a required field.
- Give the Title to your tag in the title field. It's a mandatory field.
- Form the Area drop-down select the field you wish to create the alert for.
- The Operator tests whether a numeric value is greater than, less than, or equal to the value defined in the Threshold below. The Attached business values will determine the amount of weight placed on each alert. For example, "=" means "is equal to."
- Threshold is the triggering value in the alert sequence. How your system responds to the value depends on the operator used, but the alert itself will trigger whenever the governing conditions are true.
- Reset Threshold is s numeric value that works with the threshold to prevent alerts from triggering continuously and accidentally, which is necessary for values that fluctuate. The purpose is two-fold: to allow the threshold function to have a range type instead of a concrete number; and to provide the alert system with automation when a system returns to usual on its own.
- Penalty: The alert will Disable the Customer or Carrier for the selected duration of time.
- Template will populate the sent Alert. (See Setup Config Templates for details.)
- Repeat: How often to resend the Alert.
- Form the Notice Level dropdown you can either select the alert status as None, Warning, and Error.
- Click
Save, and it creates a new alert.
Info
Whenever you select the Area as Change from menu, there are 2 options in Table Change, SIP User and Switch (you can either SIP User or Switch or you can select both.). An alert will be issued and sent to the customer's email address that there has been a change recorded in the IP list if you make any changes to the IP Authentication field after saving the settings, such as changing the IP Address etc.
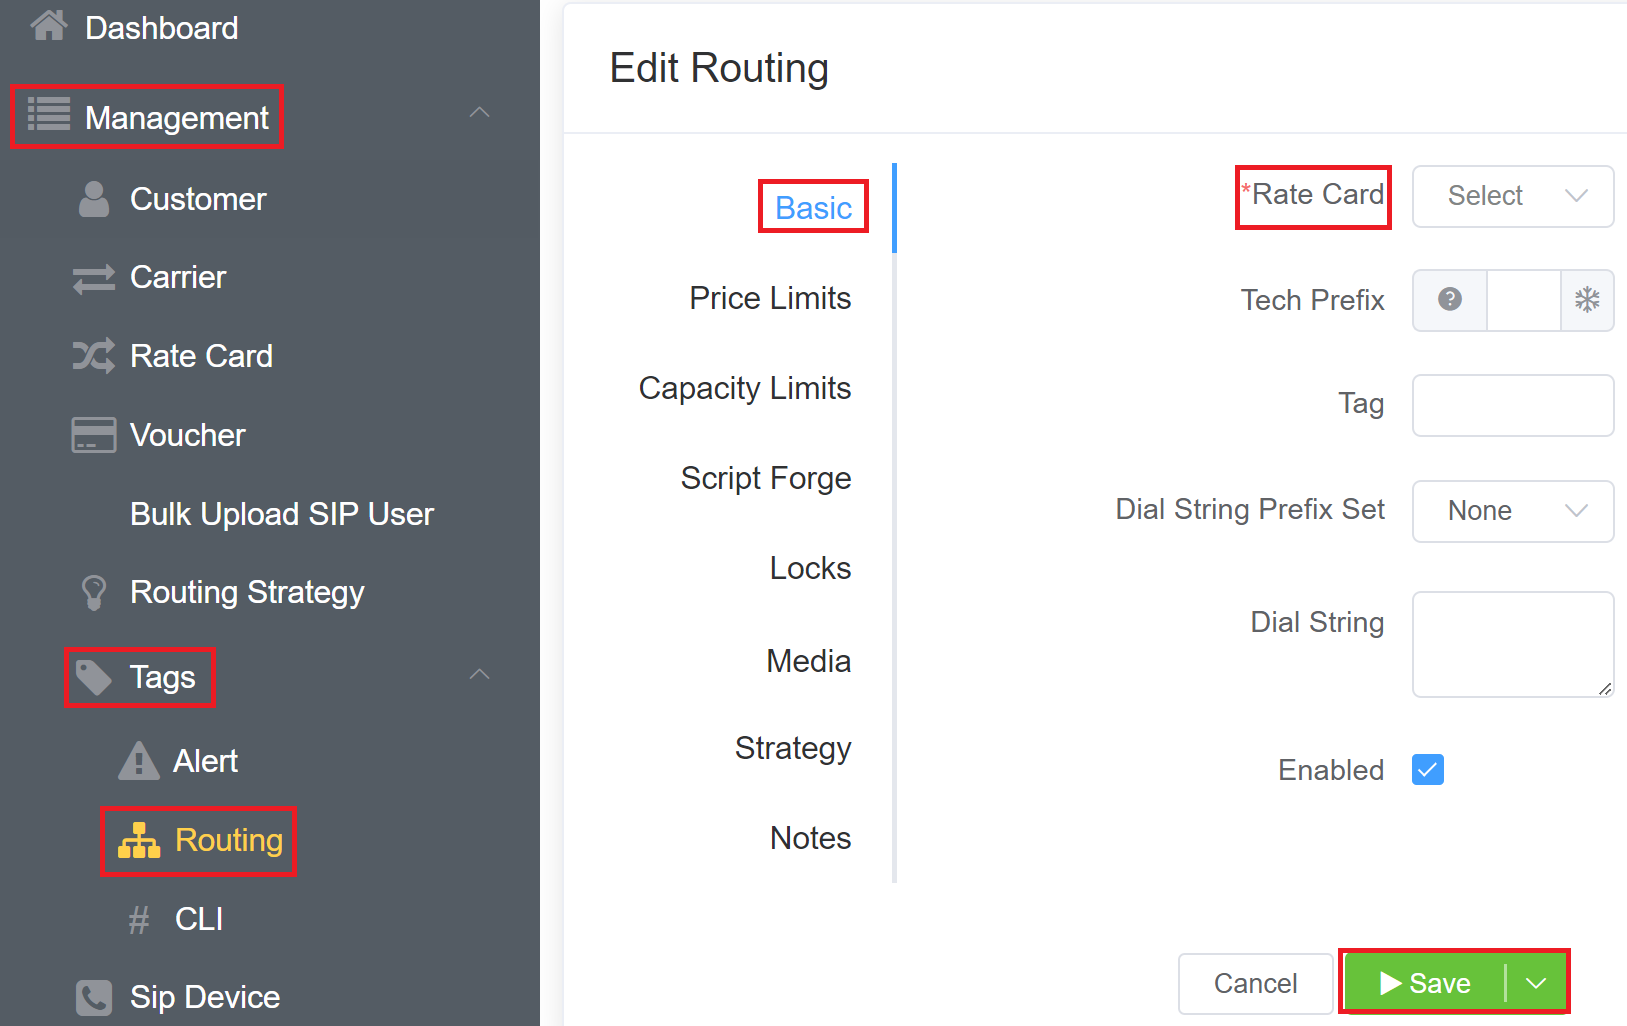
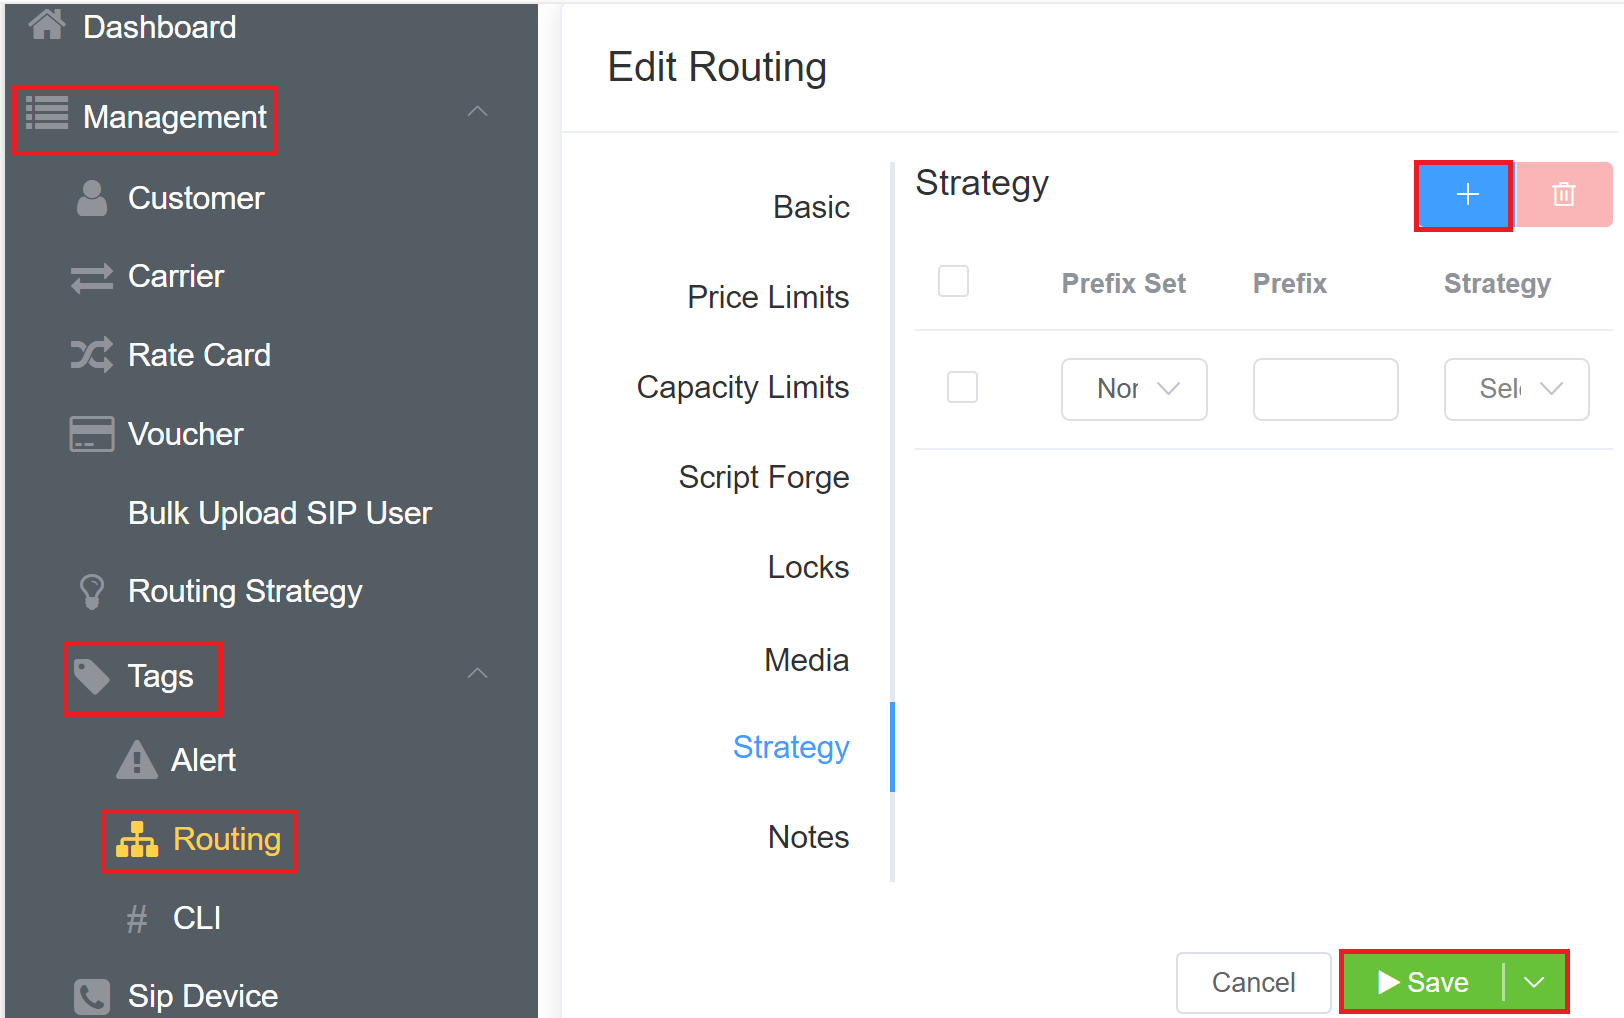
Routing
Routing Tag helps you strategize the Routing options for your customer. You can customize Routing options and assign the created tag for individual or group of customers.
Create Routing Strategy Tag
- Navigate to Management Tags Routing.
- Click on the blue
+button on the top-right.
Basic Field
- Rate Card: Also known as Tariff, this allows you to select the rate card used on a customer's account. You can handle these calls in the following three ways:
- Internal: Send a call to the ConnexCS Class5 (Voice Mail, Interactive Voice Response (IVR), etc.). If selected, the "Auto" option becomes available, which will generate dial strings from all possible internal extensions.
- Extension: (uses SIP users in Customer Auth configured SIP Users) Send a call to a Session Initiation Protocol (SIP) Authenticated user on the account.
- To Carriers: Choose a carrier to send the call to a location outside of the ConnexCS system.
- Tech Prefix: This lets you distinguish a route from an inbound party. When several customers share the same IP address, each customer needs an individual Tech Prefix so the switch can route calls correctly. It enables service providers to differentiate between several rate cards.
- Tag: You can apply any tags here.
- Dial String Prefix Set: Helpful for commonly used sets of prefixes. Rather than entering a complete list of prefixes for the UK, for example, you can create a predefined Prefix Set (defined under Setup Advanced Prefix Set) and then select it here for appropriate customers.
- Dial String: Only allows a dialled number to pass through if it matches the defined dial string (or "dial pattern"). (If you customer enters nothing, it matches everything and attempts to send all calls).
- Check Enabled to make the fields active.
Price Limits
-
Capped Rate and Provider Capped Rate: Set the maximum cost of a call. Calls that exceed the set rate won't get connected. For example, for customers with flat rate accounts, which allows to dial all UK numbers but premium numbers, you would set the Provider Capped Rate at 0.01, so any call that the provider might charge over that amount wouldn't get completed.
-
Profit Assurance: When Enabled, only calls that are profitable pass-through; any call that costs more than the retail rate aren't allowed to complete. This is particularly useful for A-Z routes or NPA-NXX rate cards.
When Profit Assurance Fails to Operate
A. Profit Assurance may appear to fail, often due to:
1.Incorrect Billing Configurations:
Billing increments (e.g., 6/6, 30/6, or 60/60) play a significant role in profitability. A mismatch between the billing increments of your carrier and customer rates can lead to unexpected losses.
For example: If you buy at 30/6 and sell at 6/6, you lose money on shorter-duration calls because of rounding discrepancies.
2.Profit Assurance Enabled but Losses Persist:
Even with Profit Assurance enabled, losses may occur due to:
- Specific call durations where rounding favors the carrier.
- Variability in customer usage patterns that do not align with your billing increment assumptions.
3.Misunderstanding Call Connection Logic:
Profit Assurance does not retroactively check call profitability during ongoing calls. If the buy rate is temporarily higher than the sell rate due to duration or rounding, calls may still connect.
B. Diagnosing the Issue
Step 1: Analyze Breakout Reports
Use the Breakout Report to identify calls with negative margins:
-
Navigate to Management Reports Breakout Report.
-
Filter by destination, carrier, or time period to pinpoint unprofitable calls.
Step 2: Compare Billing Increments
Verify the billing increments set for your carrier and customer:
-
Carrier increments define how you are charged (e.g., 30/6).
-
Customer increments define how you bill your customers (e.g., 6/6).
-
Mismatched increments often lead to losses, especially on shorter calls.
Step 3: Review Sell and Buy Rates:
Ensure that your sell rates are consistently higher than your buy rates:
-
Check rate sheets for discrepancies.
-
Adjust rates to maintain a positive margin.
C. Resolving the Issue
a. Adjust Configuration:
-
Align carrier and customer billing increments to minimize rounding discrepancies.
-
Update rate sheets to ensure sell rates always exceed buy rates.
b. Enable Profit Assurance (if not already enabled):
- This will block calls where the sell rate is lower than the buy rate.
c. Identify and Address specific calls causing losses using the Breakout Report:
- Analyze their durations and verify if the billing increments contributed to the issue.
-
Block Connect Cost: Block any call that has a connection fee.
-
FTC DNC Report ANI Block (USA): When Enabled, ConnexCS will take a copy of FTC data (using the FCC's Do Not Call (DNC) Reported Calls Data API) and add it to the system. We can then block callers from known spammer CLI / ANI's.
-
DNO: Click here to know more about it.
-
Stir Shaken Min Attest: It enables the selection of STIR/SHAKEN attestation levels for validating incoming calls. Users can configure the system to permit only calls that meet specific attestation standards. The available validation levels are as follows:
- A: Permits only calls with attestation level A, the highest level of trust. Calls with attestation levels B or C will be blocked.
- A + B: Restricts incoming calls to only those with attestation levels A or B. Calls with attestation level C will be blocked.
- A + B + C: Allows calls with any attestation level (A, B, or C) to pass through.
Note
In all cases, calls without attestation will also be blocked.
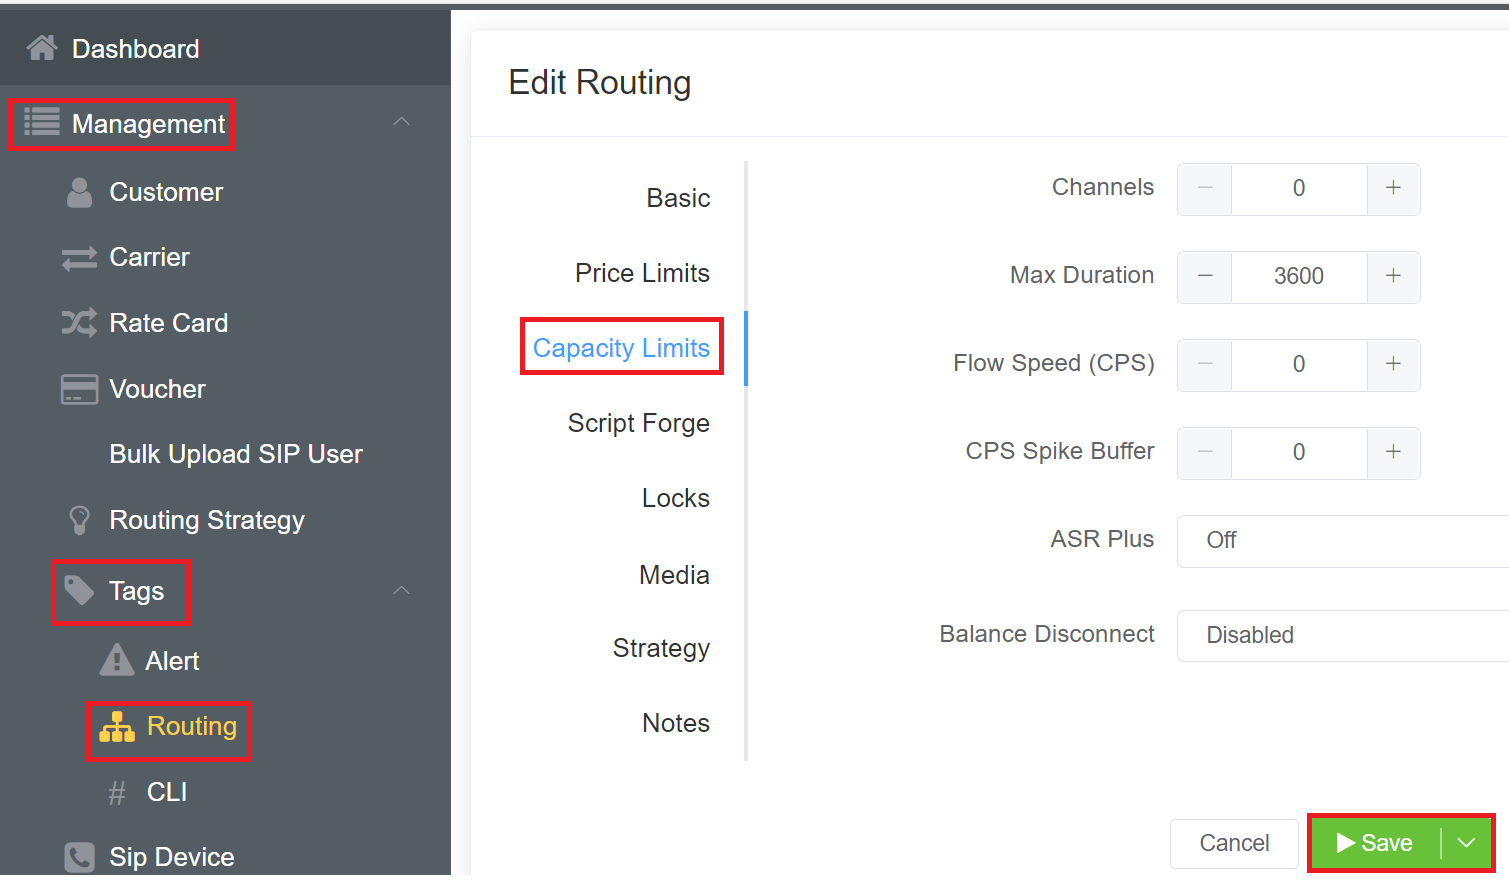
Capacity Limits
- Channels: Set the maximum number of channels/live calls allowed for this route.
- Max Duration: Set the maximum amount of time (in seconds) that the call gets to exist before getting terminated, typically for the case of a missed
BYE.
Call Timeouts
A VoIP call is stateful, even though its protocol is stateless. This means that both the sides should be informed on finishing of the call. They do this with a BYE message. If the BYE message goes missing, the call will continue forever.
Max Duration is a method for setting up Missing BYE Protection. Another approach is to use a SIP Ping to determine when the connection has timed out. This sends a SIP packet to the remote end of the conversation every 30 seconds. This checks to see if the other side is still aware of an ongoing conversation. If it does'nt receive a response or informed that the conversation is not active, it disconnects the call.
RTP Time-out: This is another way to check for an active call based on whether audio is passing. If there is no audio passing for a pre-set interval, our Real-time Transport Protocol (RTP) array will notify the switch and instruct it to end the call. This won't work if RTP Mode is set to direct.
Asterisk pings
Asterisk doesn't have SIP Ping (OPTIONS) enabled by default. If your customer / carrier is using Asterisk, you may need to disable this if they don't have it enabled on their side, as calls will typically disconnect after 30 seconds.
3.Flow Speed (CPS): Limits the calls per second. You should set this for each customer card assigned to the customer account.
4.CPS Spike Buffer: Limit a spike of calls by spreading them over a longer period of time. This essentially manages a large volume of calls over a short period of time. Once the buffer limit reaches its threshold, the calls per second kicks in, distributing the spike of calls.
CPS Buffering
CPS Buffering: Used to manage large volumes of calls over a short period of time. This process maximises saturation and increases call completion within a given CPS restriction. It does this by removing spikes and borrowing capacity from future seconds.
If incoming traffic exceeds your pre-set CPS, it holds the call for one second and then tries again. You can increase the second count in the CPS Spike Buffer field.
Changing the CPS Buffering value only affects calls that exceed the CPS. The delay will show as increased PDD on the call, each second the system will emit a 100 Trying (High CPS, Buffering) response to show the status/progress of the call.
5.ASR Plus assists capacity management by helping you define how to handle connections for known failed numbers. For information on the ASR Plus options, see ASR Plus Details here.
6.Balance Disconnect this feature checks the balance every 60 seconds. It will disconnect the call when the balance plus the debit limit is below $0.
Note
Balance Disconnect only takes into account the completed calls; it excludes any active calls.
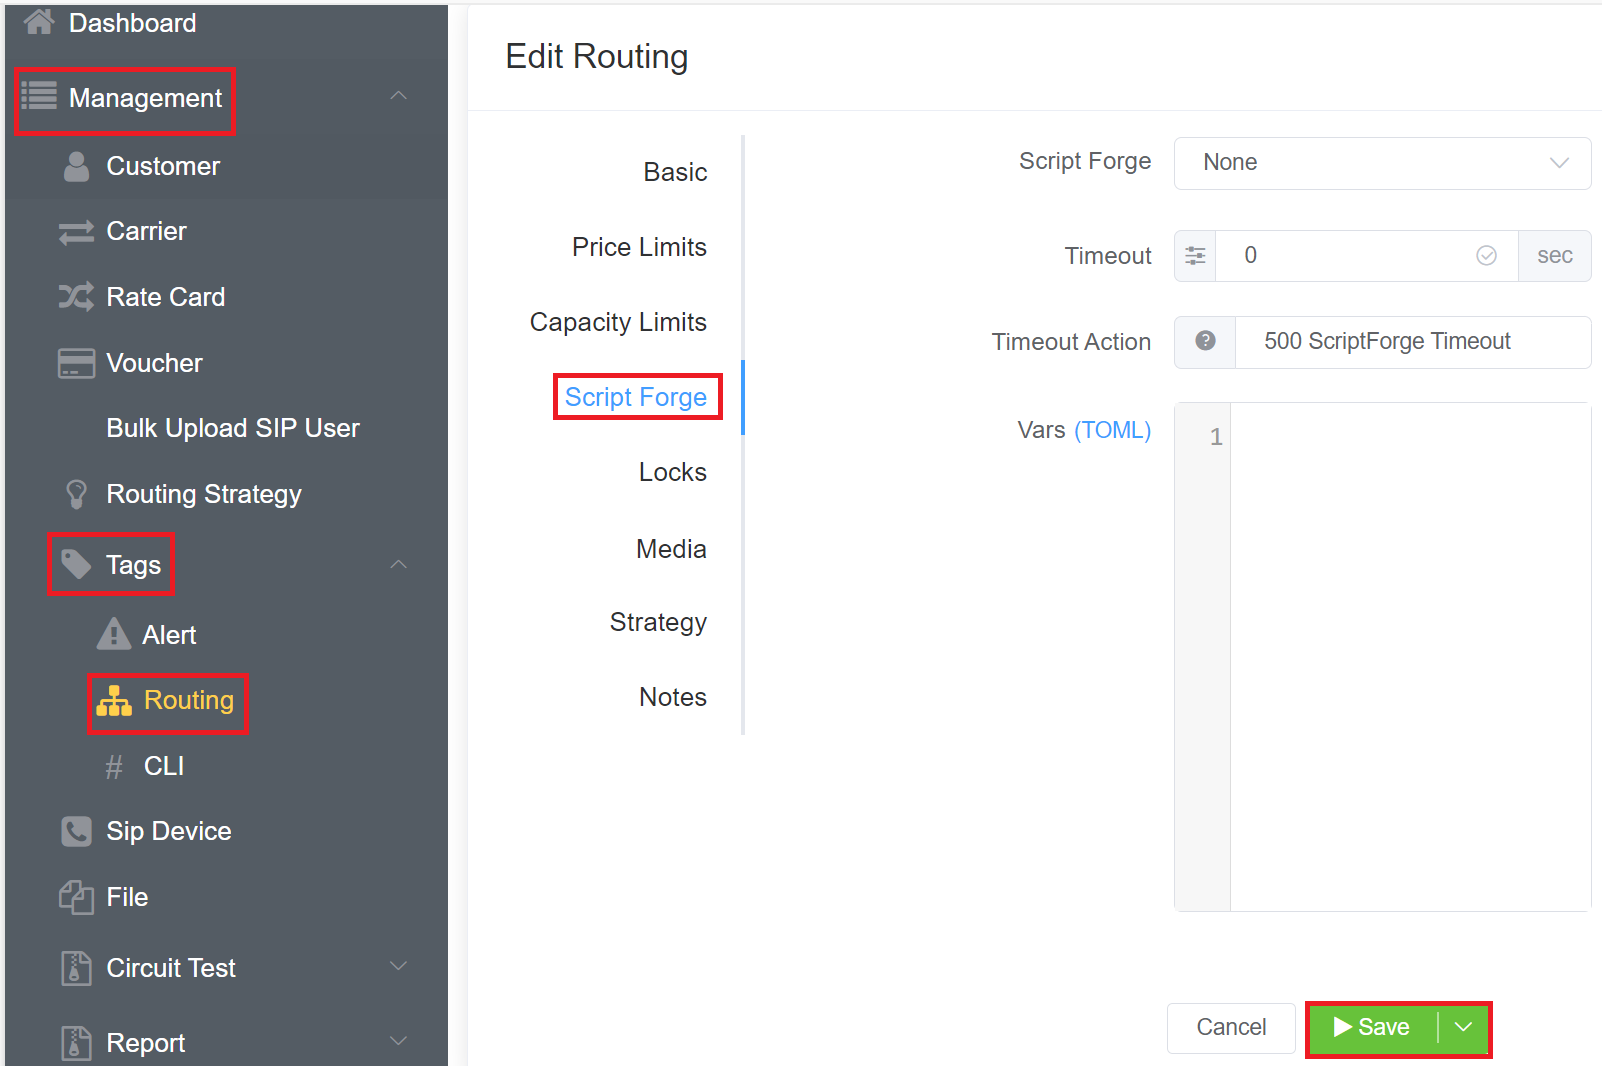
ScriptForge
- ScriptForge: Set a custom JavaScript to run from within the ConnexCS platform in-line with the call. Some example operations could be checking a Do Not Call list or forcing a CLI. For more information about setup and operation, see the ScriptForge page.
- Timeout: Set how long the script may run.
- Timeout Action: This option lets you decide the action when the timeout occurs.
- VARS (TOML): Select the variables you want pass into the ScriptForge script.
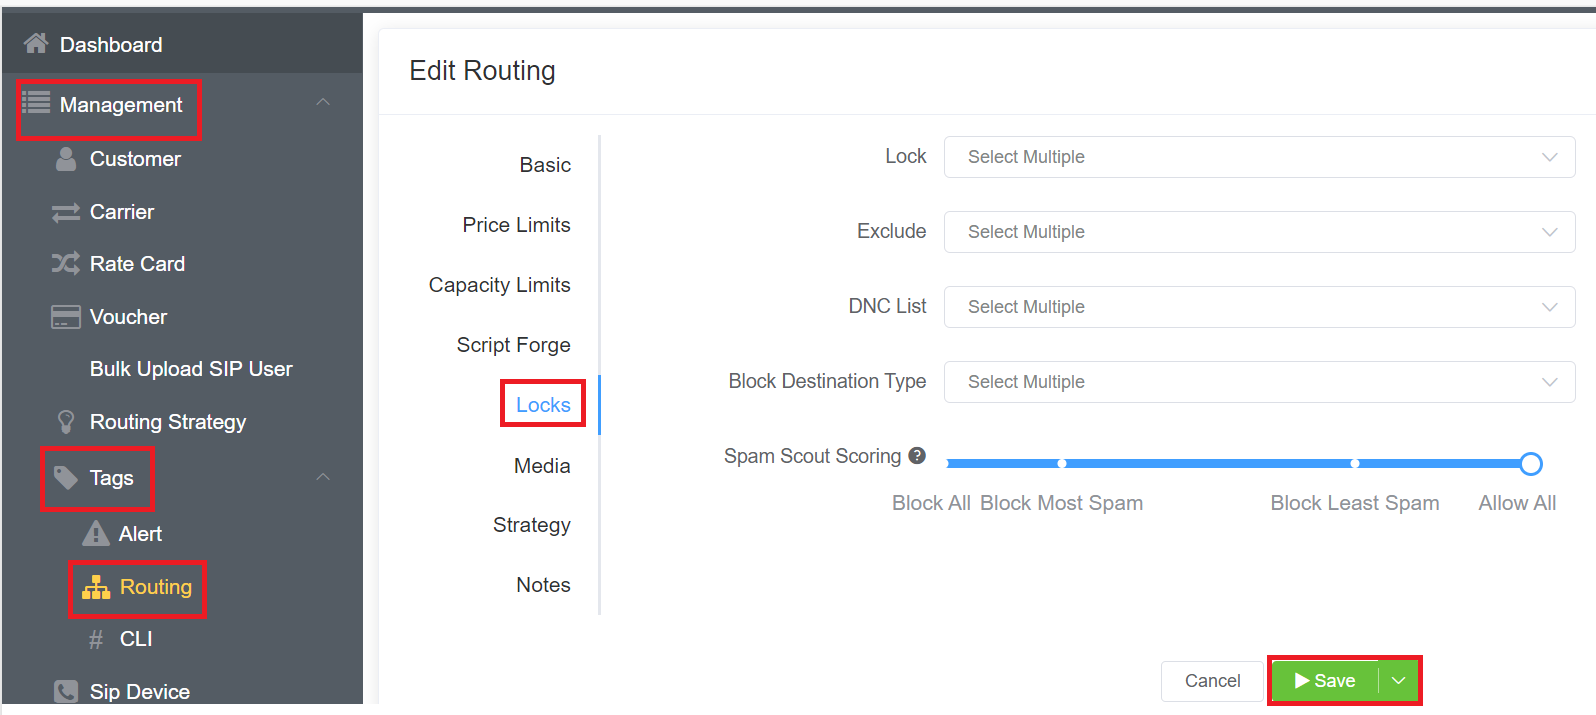
Locks
Used for troubleshooting, you can remove carriers from a route and run a quick test.
- Lock (Allow): One or more rate cards from the list of available providers.
- Exclude (Deny): Exclude access to one or more rate cards in the list of available providers.
- DNC (Do Not Call) List: The customer won't be able to able to dial the numbers in the specified DNC list. You can add the list of numbers in the Database.
- Block Destination Type: You can select and block the calls to various destinations (carriers) like Mobile, Fixed, Paging, etc. Click here to know about Destination Type Lookup & Fallback Logic — USA and International.
- Spam Scout Scoring: It blocks Spam calls based on the CLIs. You can either Block All, Allow All, Block Most Spam, or Block Least Spam.
Exclude Use Case
If a customer reports an issue with a carrier or route, you can come here and set the carrier / route to Exclude and Save, then come back and remove it, and do a Delay and Save for a later date.
6.Flags:
- TCPA Litigator DNC: Enabling this flag blocks outbound calls to known TCPA Litigators.
-
On Net Call Routing: Enabling this flag determines if a call should be routed internally between customers to DID's.
Call Routing Process
    graph LR
    A[Customer A makes a call using the route with the ON NET CALLING flag] --> B{Syatem checks the dialed number and compares it against DIDs added to the account across all customers}
    B -- Yes: If the dialed number matches any DID in the account--> C{Route call internally to the matching DID}
    B -- No: If the dialed number doesnt match any DID in the account--> D{Route call externally via carrier as configured}
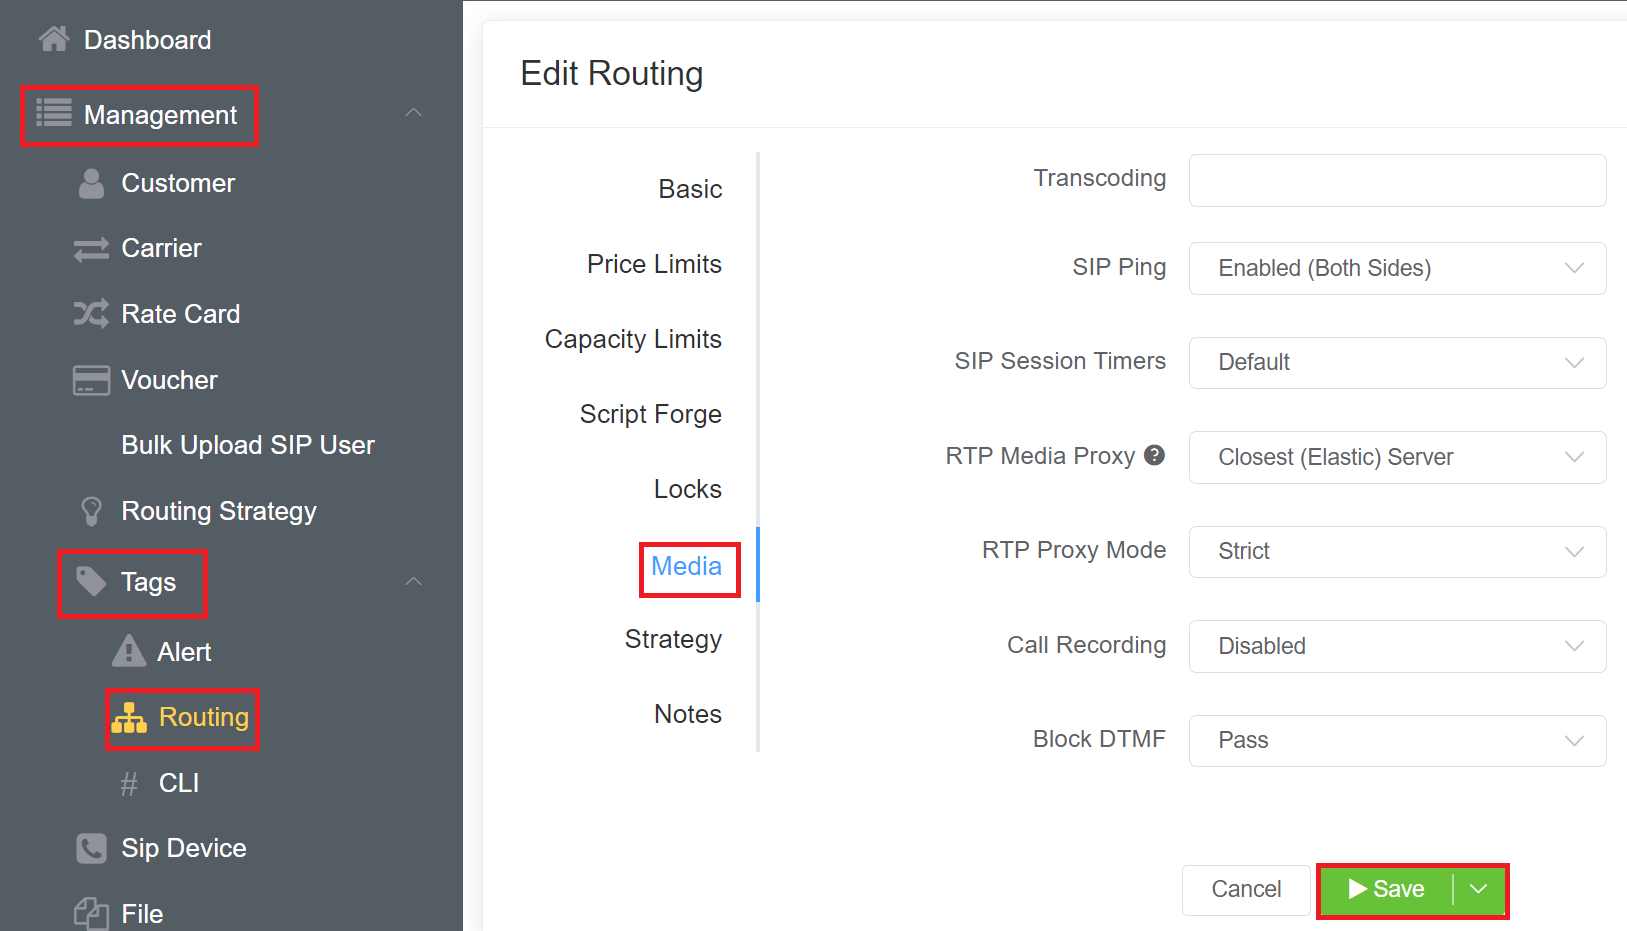
Media
- Transcoding: Enter the number of channels allowed for transcoding. This is a limited option. The best use case is for customers in low-bandwidth areas that want to use G.729. Be aware that if you don't have enough transcoding capacity, calls will fail.
-
SIP Ping: Send regular pings to ensure both sides of a call are still up.
Enabledis the recommended setting.Option Result Disabled No SIP pings will be sent Enabled Both Sides SIP pings sent in both directions Enabled (Downstream Only) SIP Pings sent to the location where the call originated Enabled (Upstream Only) SIP Pings sent towards where the call is TO (terminated) -
SIP Session Timer (SST): SST is Passive by Default, but Enabled is the recommended setting. When enabled, SST ensures there is no ghost or long-duration calls get billed when one or both sides have hung up. A timer activates when the call starts and refreshes the call every X number of seconds by sending a RE-INVITE. SST has surpassed SIP Ping Timeout as the best way to prevent long-duration calls. Note that any SST shorter than sixty (60) seconds gets rejected.
SST Option Result Default Passive SST, No headers gets changed and no SST gets engaged, all RE-INVITES will propagate through the system enables Enabled Both ConnexCS will send SIP Session Timers to both legs of the call Enabled (Upstream) ConnexCS will use SST with the carrier Enabled (Downstream) ConnexCS will use SST with the customer Suggest Session-Expire headers and Min-SE gets added to packets sent to the carrier encouraging the use of SST Disabled All timerheaders are removed -
RTP Media Proxy: This defaults to Auto, but selecting a zone (by continent) is the current recommendation. The following options allow you to set where RTP media server for this route for this customer:
Direct RTP (no proxy)- Bypass ConnexCS, so media flows directly between the customer and carrier. If the customer is using a firewall or other NAT device incorrectly, then media may not flow between the carrier and the customer. Using this setting also means that if there are audio issues, the issue can't be ConnexCS. Since it isn't likely to be the carrier, the issue would typically exist on the customer's end.Zone- Choose any of the regional servers, but it's recommended that you select a location close to a provider or your customer. Temporarily selecting a different region to route media traffic can be helpful in diagnosing call problems.
The recommended RTP Media Proxy servers are the Closest (To ConnexCS) Server or the Closest (Elastic) Server.
5.RTP Proxy Mode: If a connection via our service fails and you have selected relaxed, it will automatically fail over to the backup.
Strict- This will enforce the proxy engagement. If the proxy can't engage with the call, the call won't get established.
Free accounts are limited to how many RTP Proxy channels get enabled, this may prevent calls from connecting if you have more channels than our free accounts allow you to have.
Relaxed- This will make the best efforts to engage the RTP Proxy; if it can't get engaged because of either network errors, or because you don't have enough RTP capacity, the calls will connect directly.
When should I use RTP Proxy?
Use an RTP Proxy if you don't want your customers to know your providers.
When should I avoid using an RTP Proxy?
You have other equipment in your SIP set-up that will act as a Media Relay or you want to run a test to see if audio problems are related to the ConnexCS switch.
RTP Proxy distinctions
When a call gets established between the customer and the provider, audio can be setup in one of two ways:
| With RTP Proxy | Without RTP Proxy | |
|---|---|---|
| Audio Path | Indirect | Direct |
| Audio Quality | Excellent | Unbeatable |
| Latency | Low | Lowest |
| Information Leakage | No | Yes |
- While it's doubtful that any information will get logged in the customer / providers switch when the audio gets engaged, it's possible for an engineer to learn this information from a SIP trace, PCAP, or by looking at transit locations. DTMF Detection ONLY works when RTP Proxy mode gets enabled.
6.Call Recording: This allows you to record and store calls, which are then found in:
-
Logging
-
Management : Customer [Customer Name] CDR
-
Management : File Recording
An extra charge per recorded call gets added to existing fees or charges, so choose carefully how many calls to record:
Disabled- no calls get recorded
Sampling- Choose from a 1%, 5%, 25%, or 50% sample of your calls (e.g: 1% will record 1 of every 100 calls, 25% will record 25 of every 100 calls, etc.).
Enabled (Always On)- Record all calls.
The Call Recording setting is disabled
You need to enable the feature first on the account in Setup Settings Packages before it gets enabled here for individual customers.
7.Block DTMF: This option allows you to either pass or block DTMF through your calls.
Make sure your carrier supports the DTMF feature.
Strategy
For advanced routing, click to select a Prefix Set and assign a Routing Strategy. This gives you greater control over how routes get selected for a given customer.
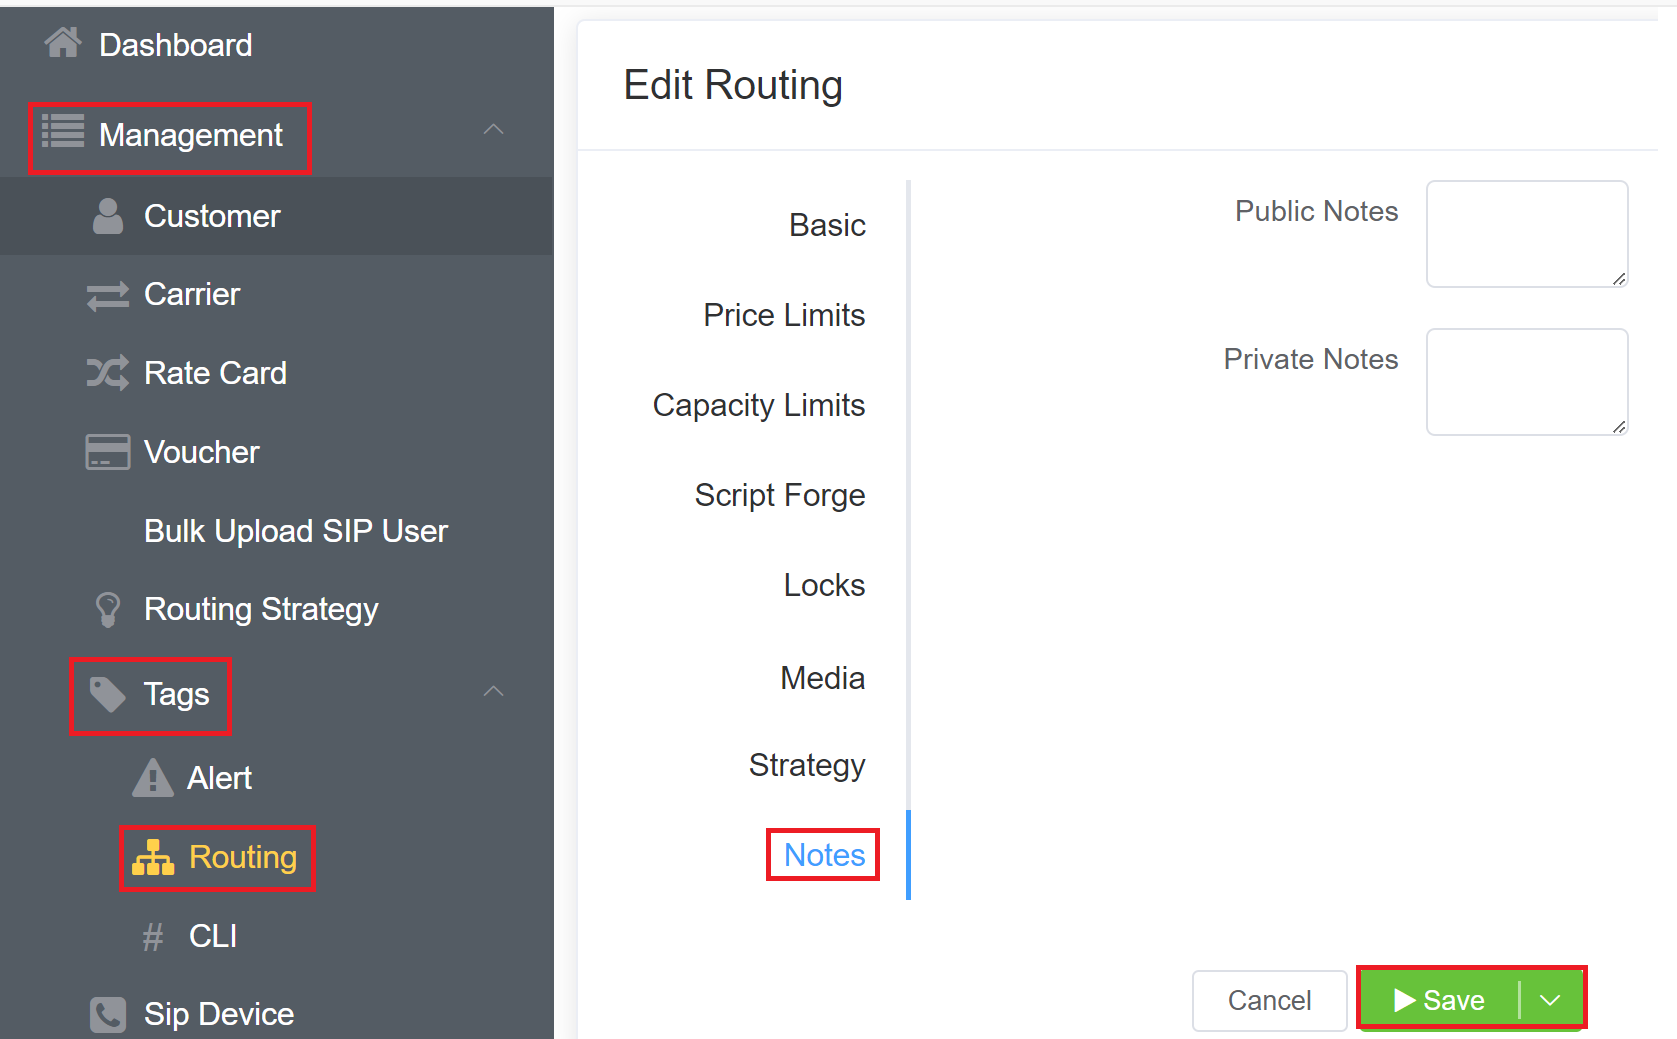
Notes
- Public Notes: Notes entered here get displayed on the Customer Portal when logged in.
- Private Notes: These will get displayed to the customer in the Control Panel.
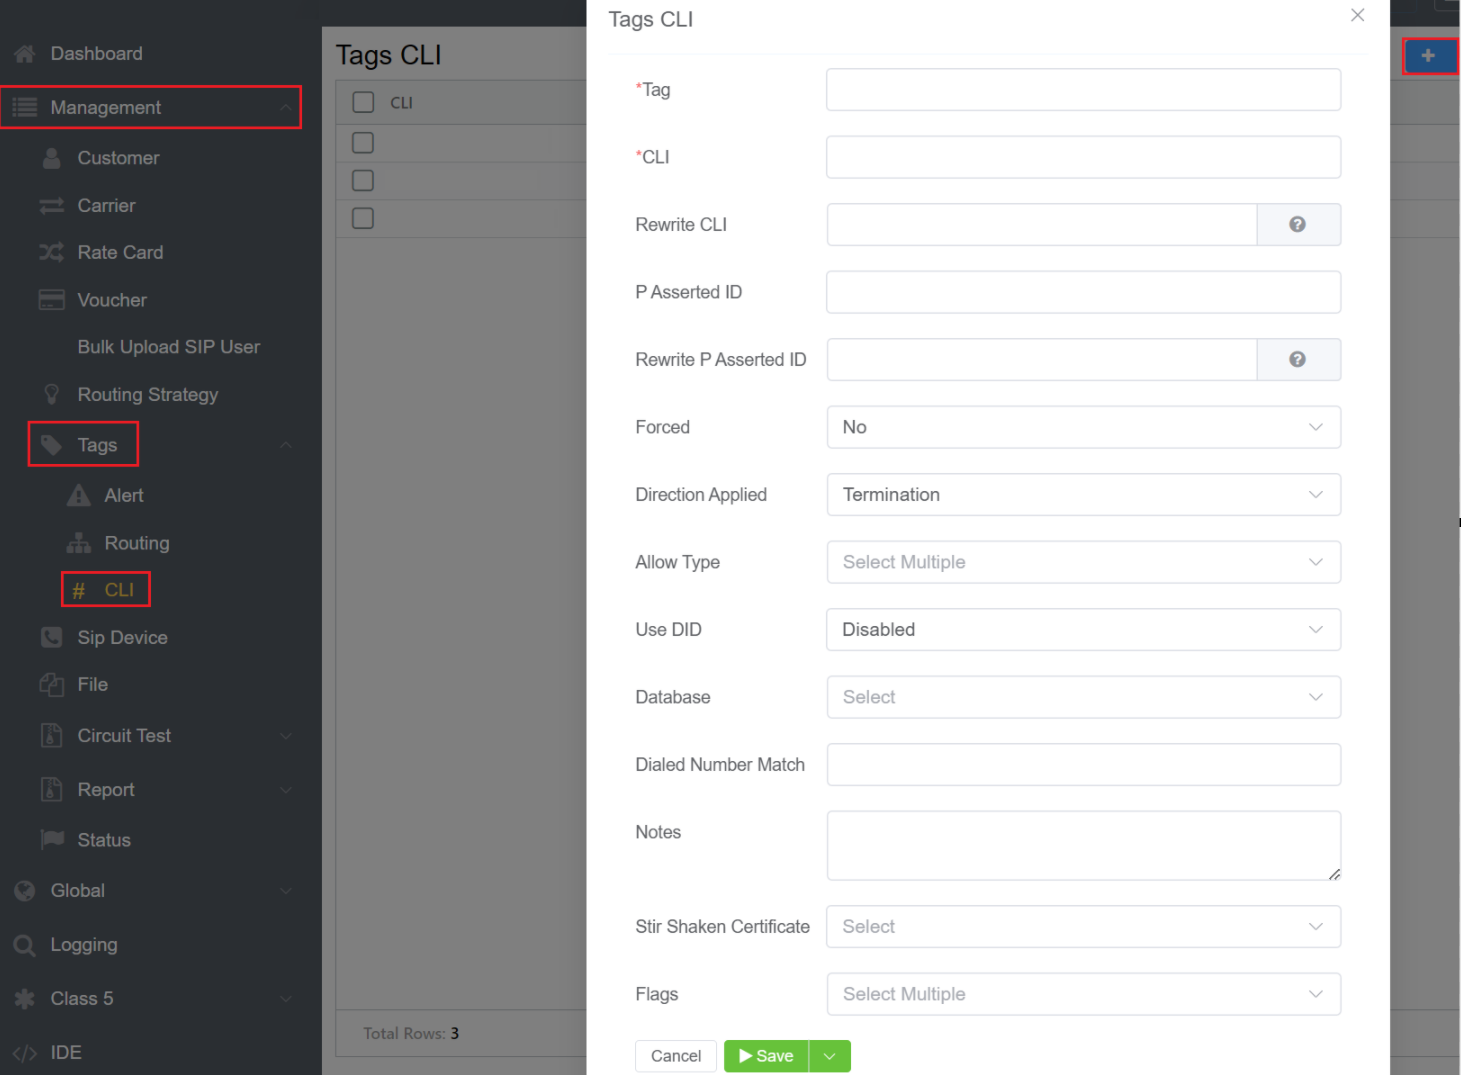
CLI Tag
You can apply the created CLI Tags to various customers.
Create a CLI Tag
- Navigate to Management Tags CLI.
- Click on the blue
+button on the top-right. - Mention the Tag name here. It's a mandatory field.
- CLI: To allow the required CLIs, enter the required number or a regular expression (to match and replace). It's a required field.
- Rewrite CLI: A CLI can be rewritten. For example, you can add
123456789in the CLI box and then rewrite by adding987654321in the rewrite CLI box. (For more advanced CLI manipulation, see Advanced CLI Match & Manipulation below). - Pre-Asserted-ID (PAID): To allow the required PAID, enter the required number or a regular expression to match or replace.
-
Rewrite P-Asserted-ID: This is a SIP Header almost same as the FROM header but classified as a private, or network-level identifier. Telephone companies use it to identify call originators. As it's stripped at the call server, the client end-points only see the FROM field. This is helpful when callers obscure their CLI / FROM information, as the network level still requires origination details. The P-Asserted-ID manipulation uses the same syntax as the Replace CLI.
P-Asserted-ID Use Case
If you wanted to allow all calls but assign a specific number (such as the Main Billable number for the business), you would set CLI as ".*" and then enter the desired P-Asserted ID. All calls will then have this number as the P-Asserted-ID.
-
Forced: Enabling this will allow a call if there are no other matching CLIs in the system. This will also replace the CLI that's presented with the CLI entered here.
Example
Create a permitted list of CLIs, then select Forced on the CLI to use if none of the others in the permitted list match. (Best practice is to have one unique Forced CLI.)
-
Direction Applied: Select either Termination for calls a customer makes out or Origination (also refers to DIDs) for inbound calls made to our customers.
Example
Create a permitted list that exclusively allows calls to or from the same country.
-
Allow Type: You can select from various options like Mobile, Paging, VoIP, Satellite etc to allow the CLIs.
-
Use DID: Pull in DIDs from the customer's account to use either as a Filter or as a Replacement.
Example
If Dialled matched number is starting with 1, the CLI routes to 11111.
The CLI can be a Regular Expression also.
-
Database (To add CLI and PAID from a database):
- Upload a list of numbers you choose as CLI or PAID under Developer > Database.
- Go to Customer > Routing > CLI add the same database under database field. Under rewrite PAID field add this database.
Note
Make sure you select the Forced option as Yes.
-
Dialed Number Match: To route to a specific CLI, you dialled match number.
-
Notes: Notes give you information about the CLI.
-
STIR / SHAKEN Certificate: If you apply any STIR / SHAKEN Certificate to a customer's account for calls verification, for example, whether the calls are spam.
- STIR / SHAKEN Attestation: This is the level of a certification you can select from 3 levels
A,B, orC.
- STIR / SHAKEN Attestation: This is the level of a certification you can select from 3 levels
-
Flags:
- Performance CLI Selection: When you select Forced as Yes and select a Database, you get an option to select a flag which is Performance CLI Selection. The Performance CLI Selection chooses the CLI with the best ASR.
- Stir Shaken Required: Choose this option when no certificate is selected.
- Stir Shaken Replace: Choose this option when you wish to apply your Stir-shaken certificate instead of which is already applied (for a call).
17.Click Save to complete the CLI configuration.