Data Suite
Document Metadata
Category: Data Management / Data Suite
Audience: Administrators, Engineers, Data Analysts
Difficulty: Intermediate
Time Required: Approximately 30–60 minutes
Prerequisites: Active ConnexCS account with Data Suite access; familiarity with structured data formats (CSV, JSON), SQL queries, and basic data import/export workflows.
Related Topics: Database (Developers), Customer Portal – Data Management
Next Steps: Log in to the Data Suite module, create or load a Workspace, upload your data (CSV file or remote database), perform bulk edits or remote queries, map the data to target tables (e.g., DID, CLI, Customer), and integrate the data into your reporting or workflow pipelines.
ConnexCS's Data Management Suite helps you manage, organize, and optimize your data throughout its lifecycle.
Our suite includes software solutions for data collection, processing, and analysis.
It will enable your businesses to handle large amounts of structured and unstructured data efficiently, ensuring that data is accessible, accurate, and secure.
What our Data Suite offers?
- Data Management
- Bulk Upload
- Data Analyses
- Remote Query
Steps to use Data Management Suite
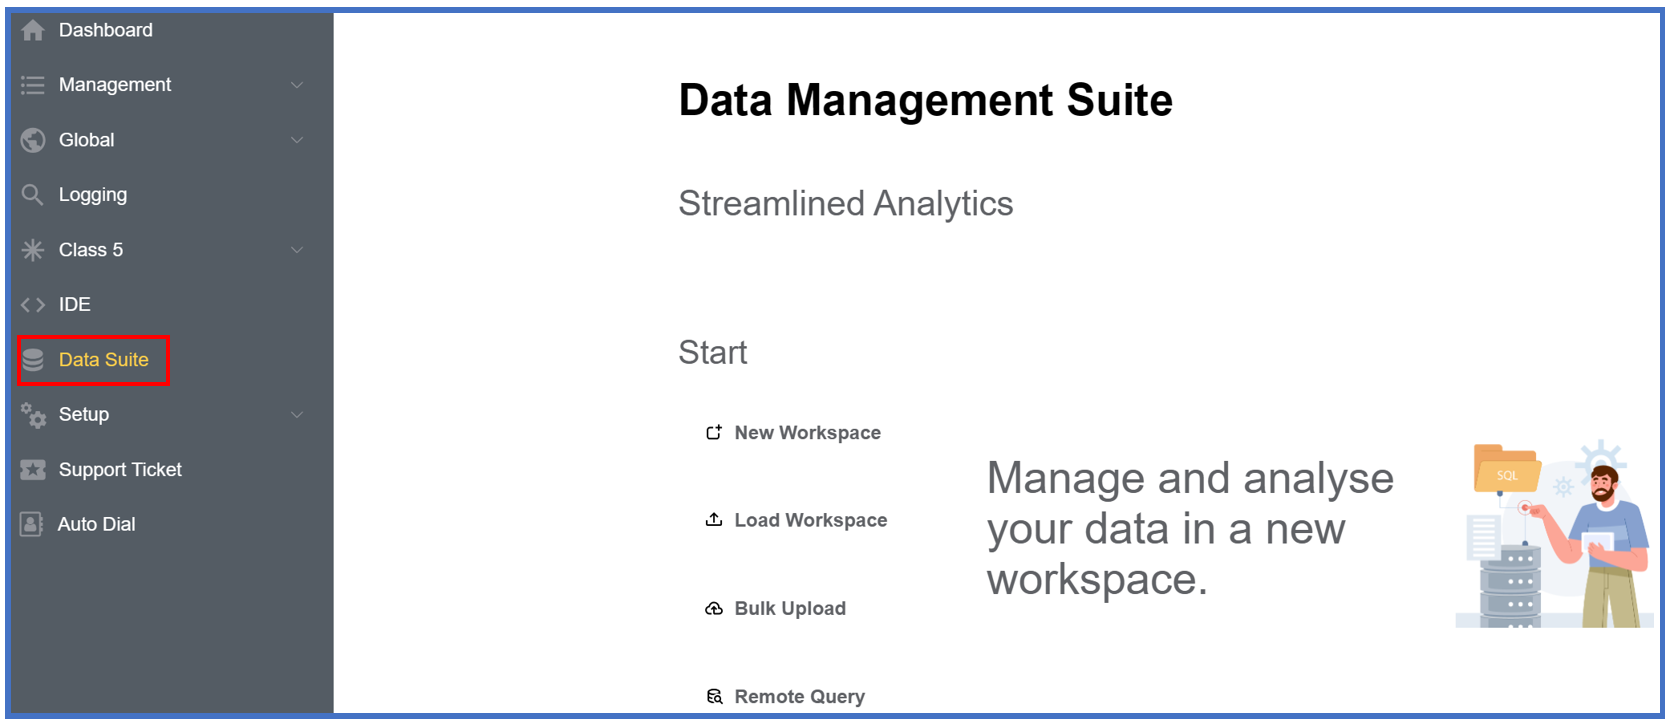
Step 1: Login
Login to the Control Panel and click on Data Suite.
Step 2: Workspace
Four options are available: New Workspace, Load Workspace, Bulk Upload and Remote Query.
- New Workspace: Allows you to manage and analyse your data in a new workspace.
- Load Workspace: Loads your existing workspace and allows you to continue where your last left.
- Bulk Upload: Uploads a huge chunk of data to a remote table.
- Remote Query: Allows directly querying remote tables.
Important Note
Upload the workspace ONLY in the .json format in Load Workspace.
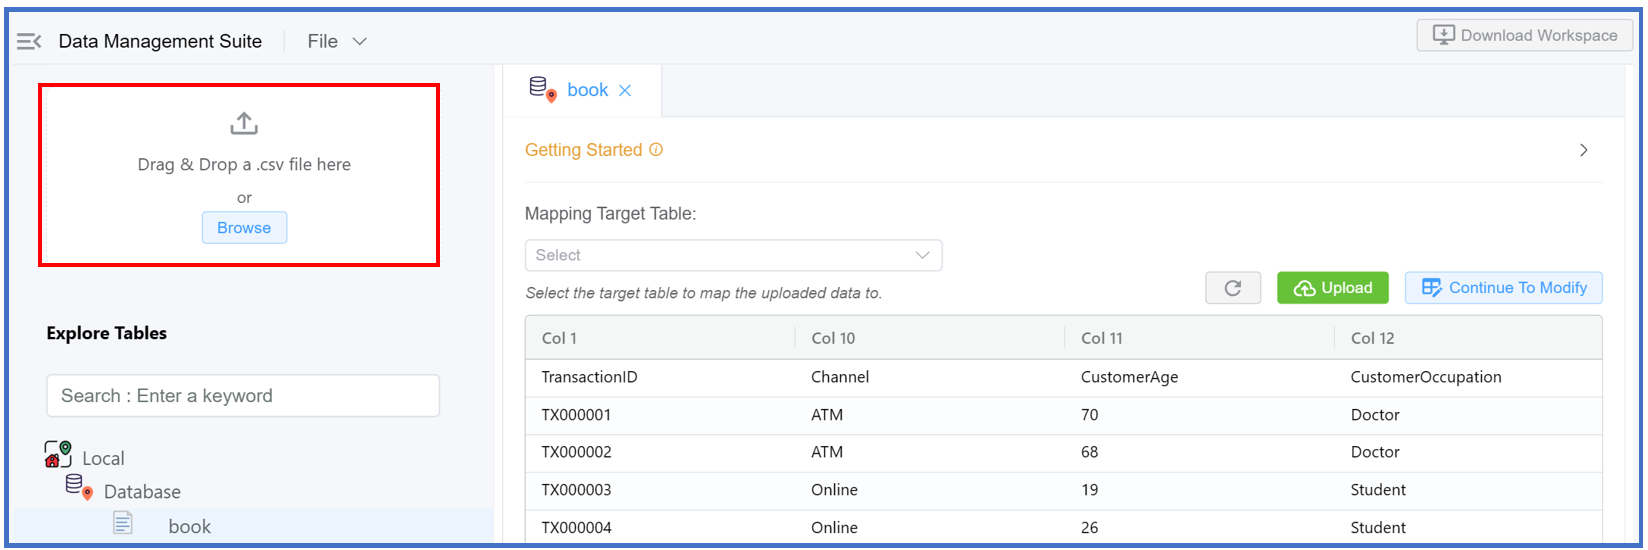
Step 3: Upload Data
Upload Data (New Workspace, Load Workspace, Bulk Upload): You can load your data using the following methods:
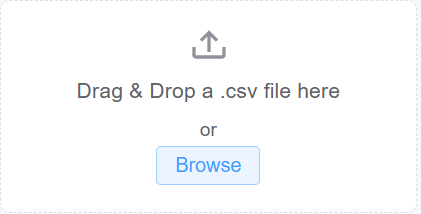
Drag & Drop a .csv file or Browse
- Drop a file or click to "Browse" upload the
.csvfile. A window will appear as shown below.
Upload data from Local or Remote Databases
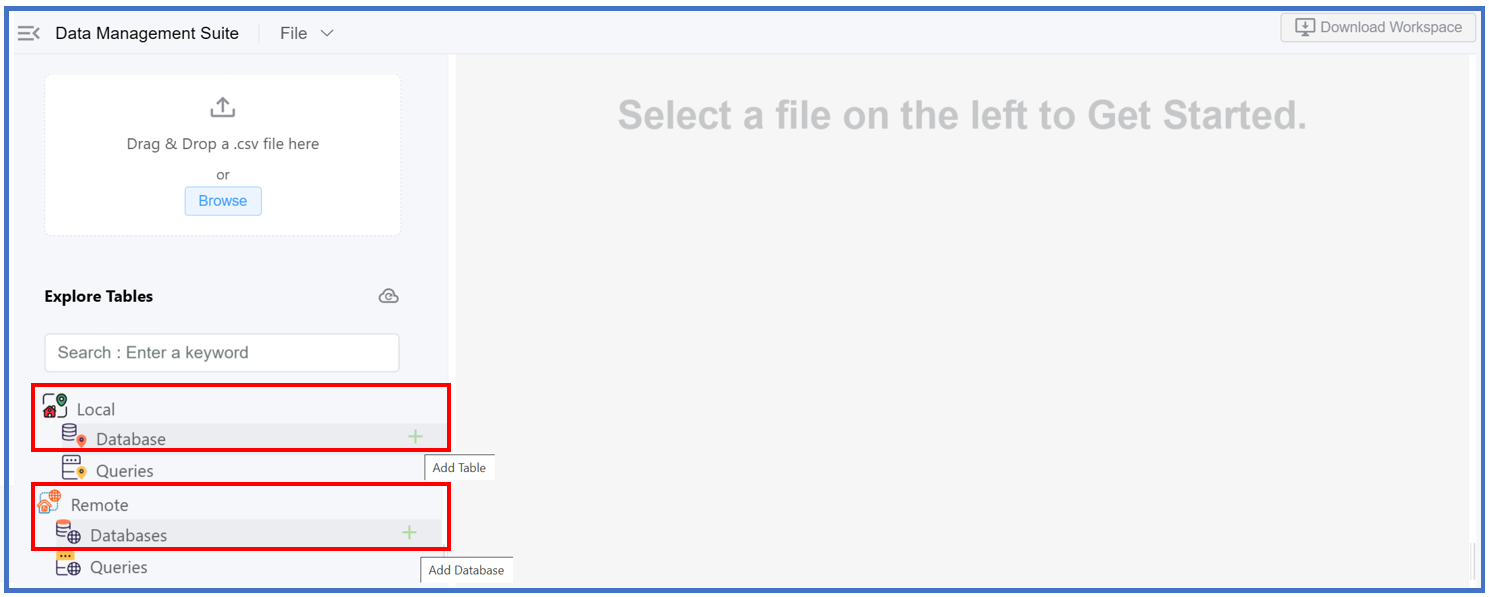
-
Upload from Local Database
- Click the
+icon, which functions as the Add Table button, within the Database section. - An Import Local Table window will pop up with the following 3 options:
- Import Data via File: This is same as "Drag & Drop a
.csvfile orBrowse". .
. - Uploading via URL: Enter the URL in the CSV format and hit the
Uploadbutton.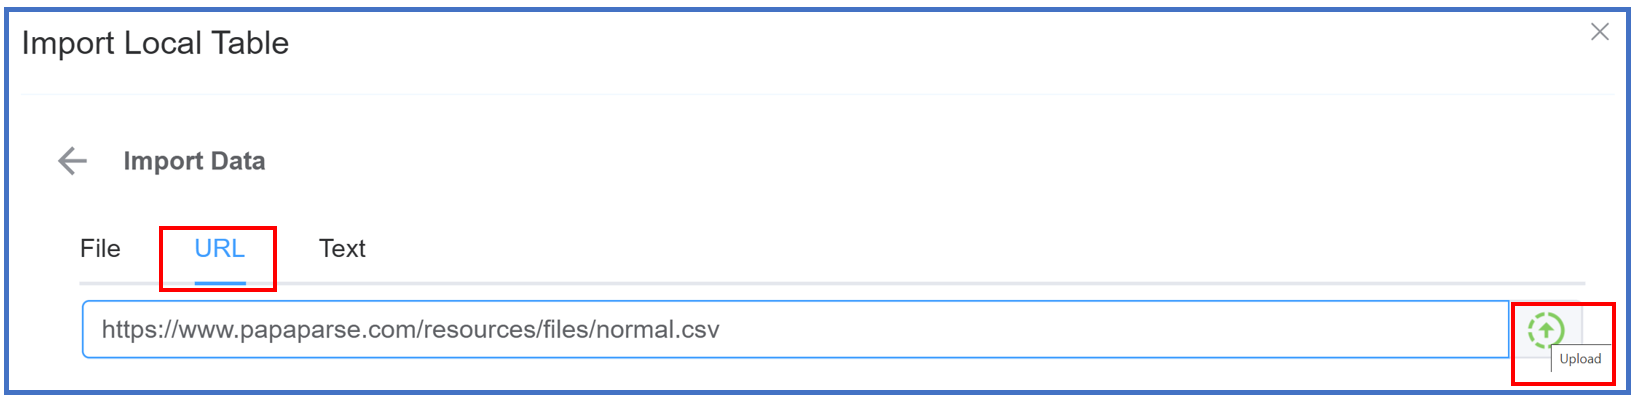 After clicking
 Uploada window will appear as shown below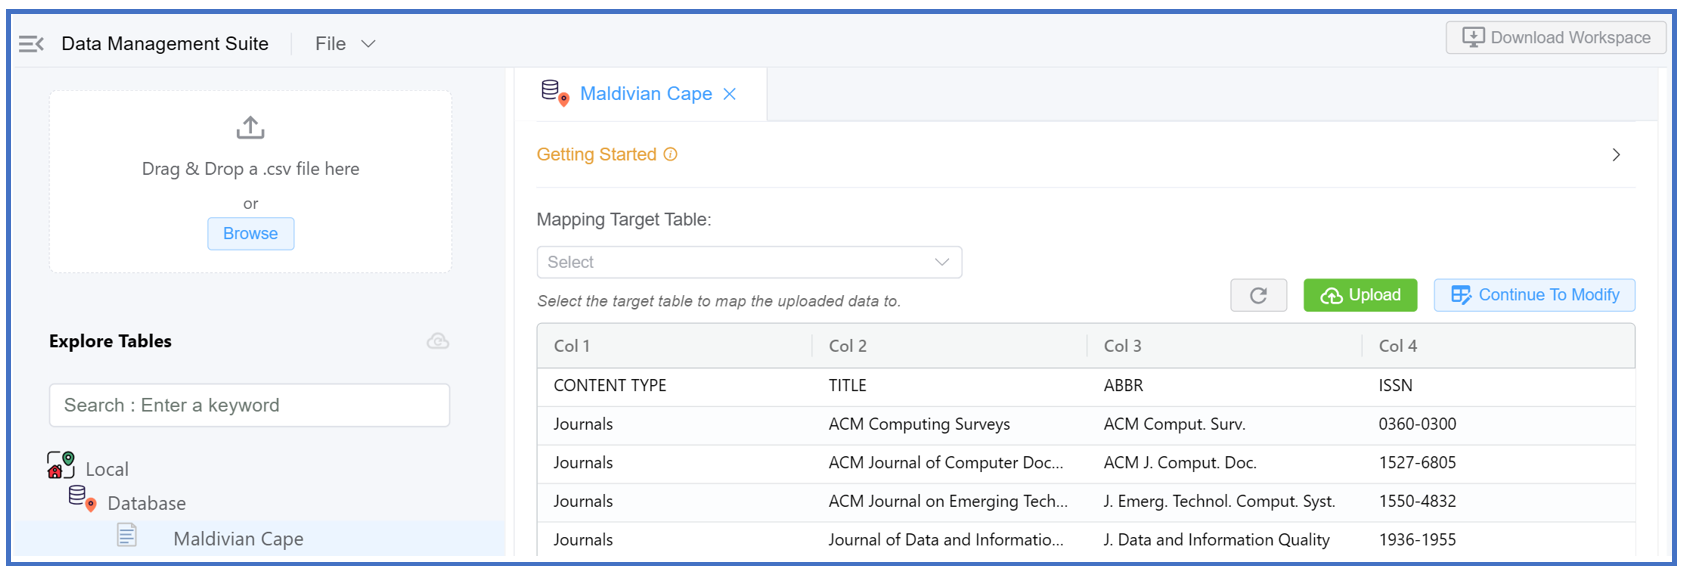
-
Uploading via Text:
-
Enter the text in the following format:
Column 1,Column 2,Column 3,Column 4
1-1,1-2,1-3,1-4
2-1,2-2,2-3,2-4
3-1,3-2,3-3,3-4
4,5,6,7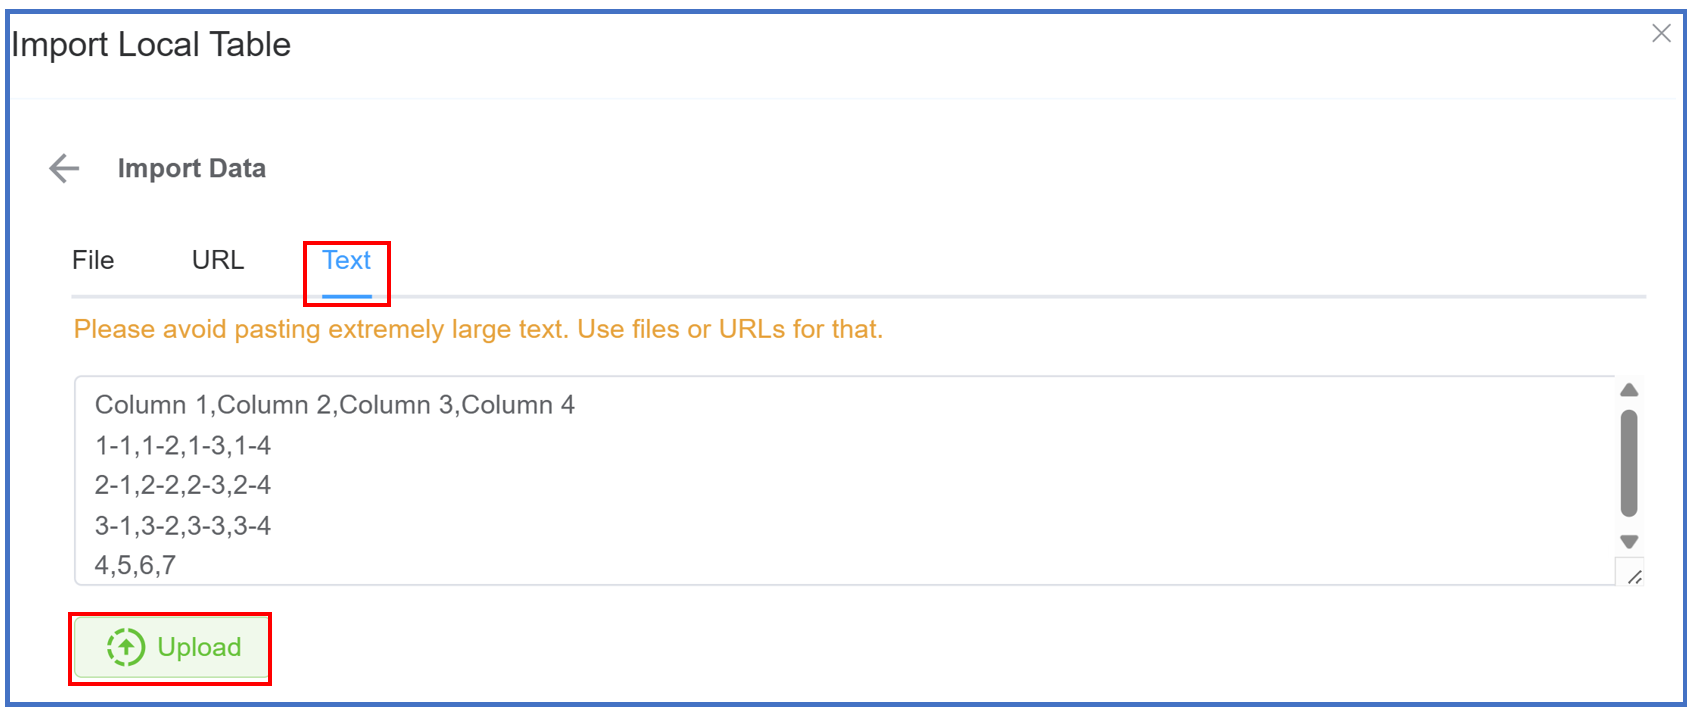
-
Click on
Upload. A window will appear as shown below.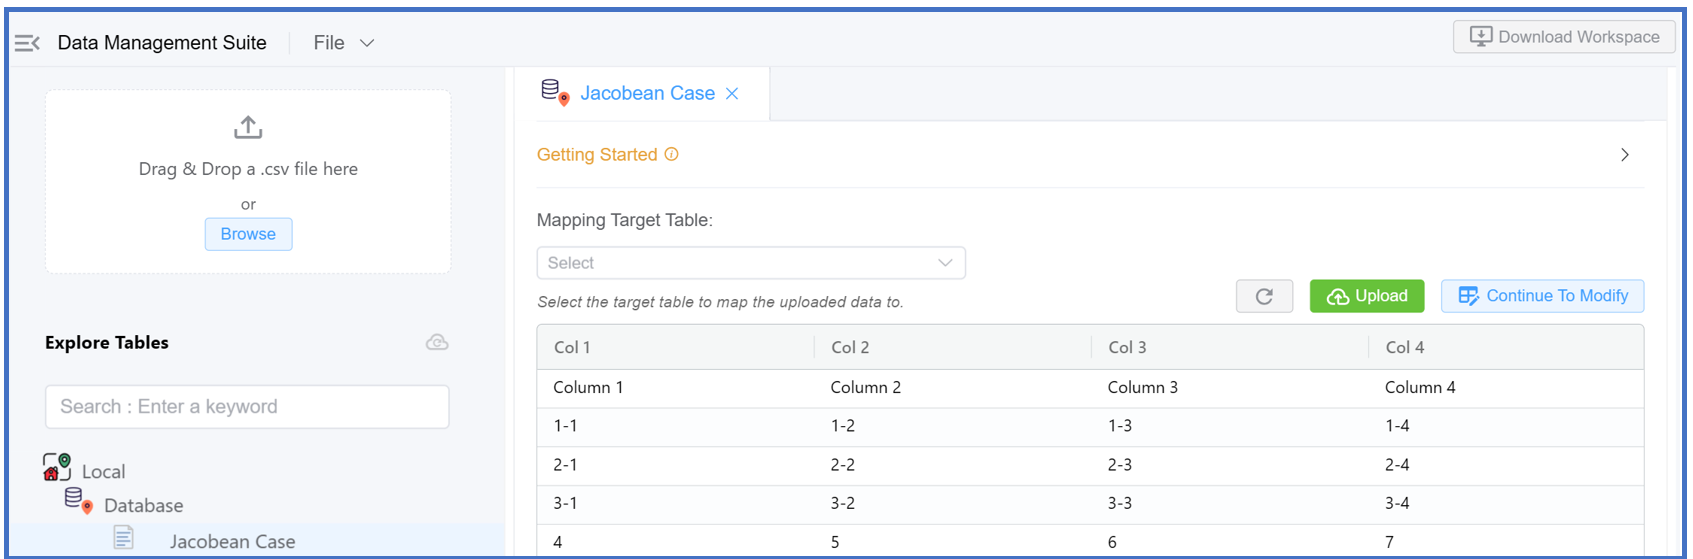
-
- Import Data via File: This is same as "Drag & Drop a
- Click the
-
Upload to Remote Database
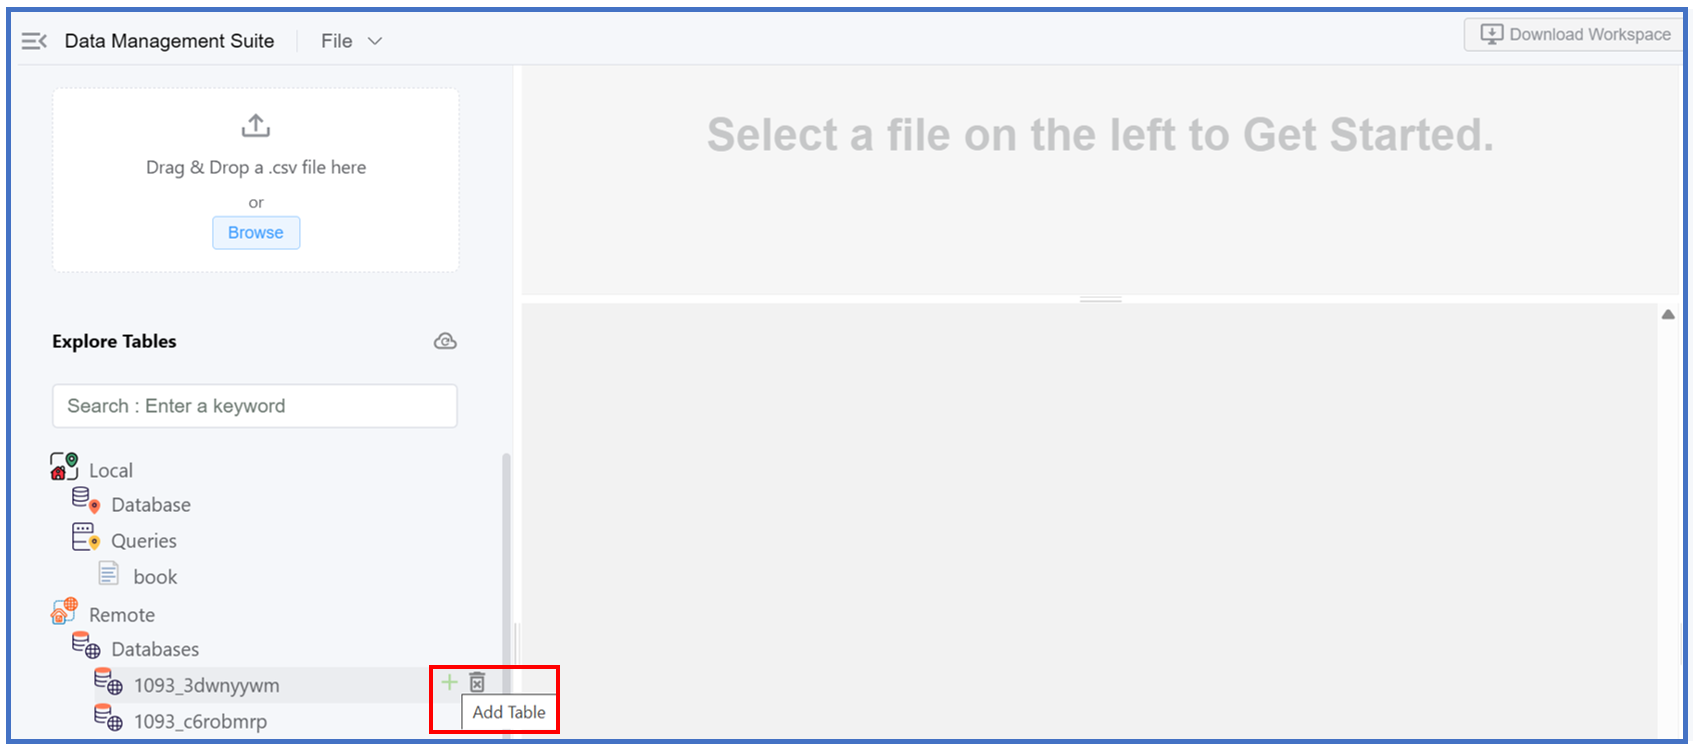
- Click the
+icon, which functions as the Add Database button, within the Database section. - After adding a remote database, you can create a table within it.
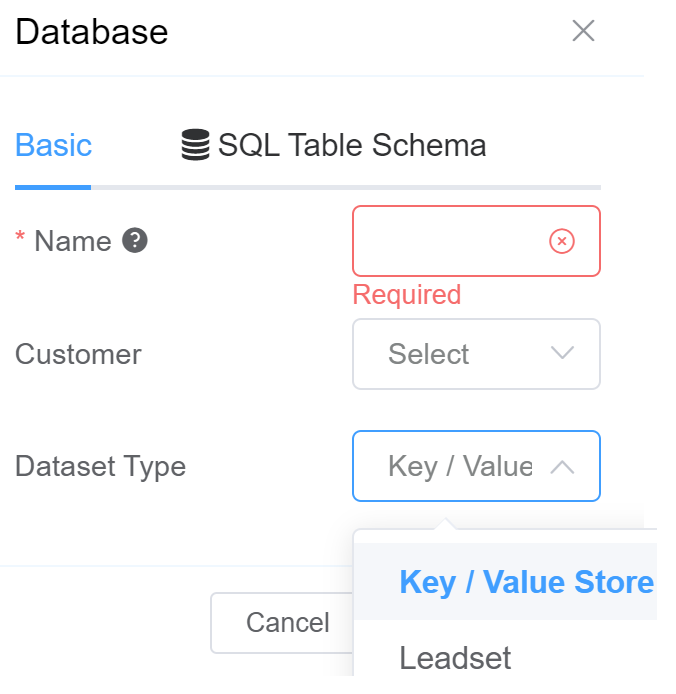
-
Under the Basic Tab:
- Write the Name of the database you wish to create.
- Select the Customer you want to create the database for under the Basic Tab.
-
Select from the Dataset Type which are the preset data storage options. The two options are:
- Key / Value - Contains a basic Key / Value Storage.
- Lead Set - Contains the most common fields when using a data store for customer / campaign data which you can use with dialers.
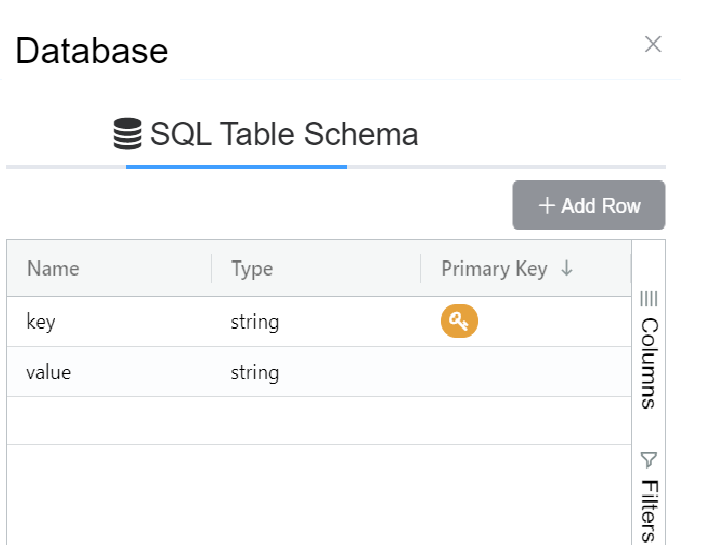
-
Next to the Basic Tab is the SQL Table Schema. This allows you to add additional fields apart from the Leadset. You can also select it's Type like integer, string, double, float etc.
-
Click on
Saveto finally create the table.
- Click the
Step 4: Edit Data/Modify Data
1.File
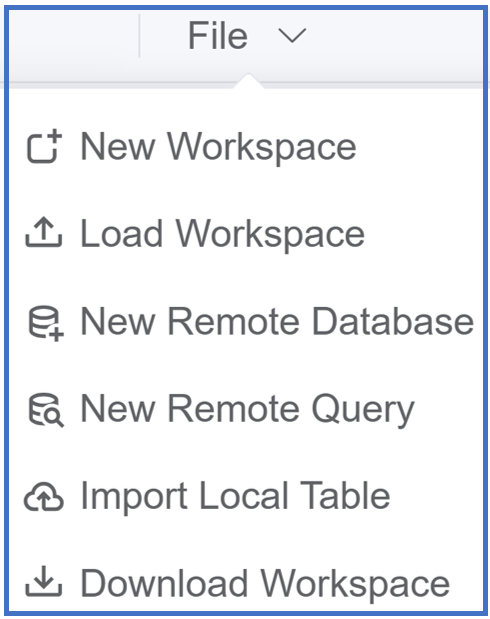
- New Workspace: Add a new workspace.
- Load Workspace: Upload a new workspace to an existing workspace.
- New Remote Database: Database hosted on a remote server, accessible over a network for multi-user or application interaction.
- New Remote Query: Executes a database query on a remote server, enabling data retrieval or manipulation over a network.
- New Query: Start a new SQL query.
- Load Query: Apply a previously defined SQL query.
- Import Local Table: allows you to transfer a table from a local database or file into the system. Click here to know more.
- Download Workspace: Allows you to download the workspace in the
jsonformat.
2.Drag & Drop a .csv file here or Browse:
3.Explore Tables:
-
Local:
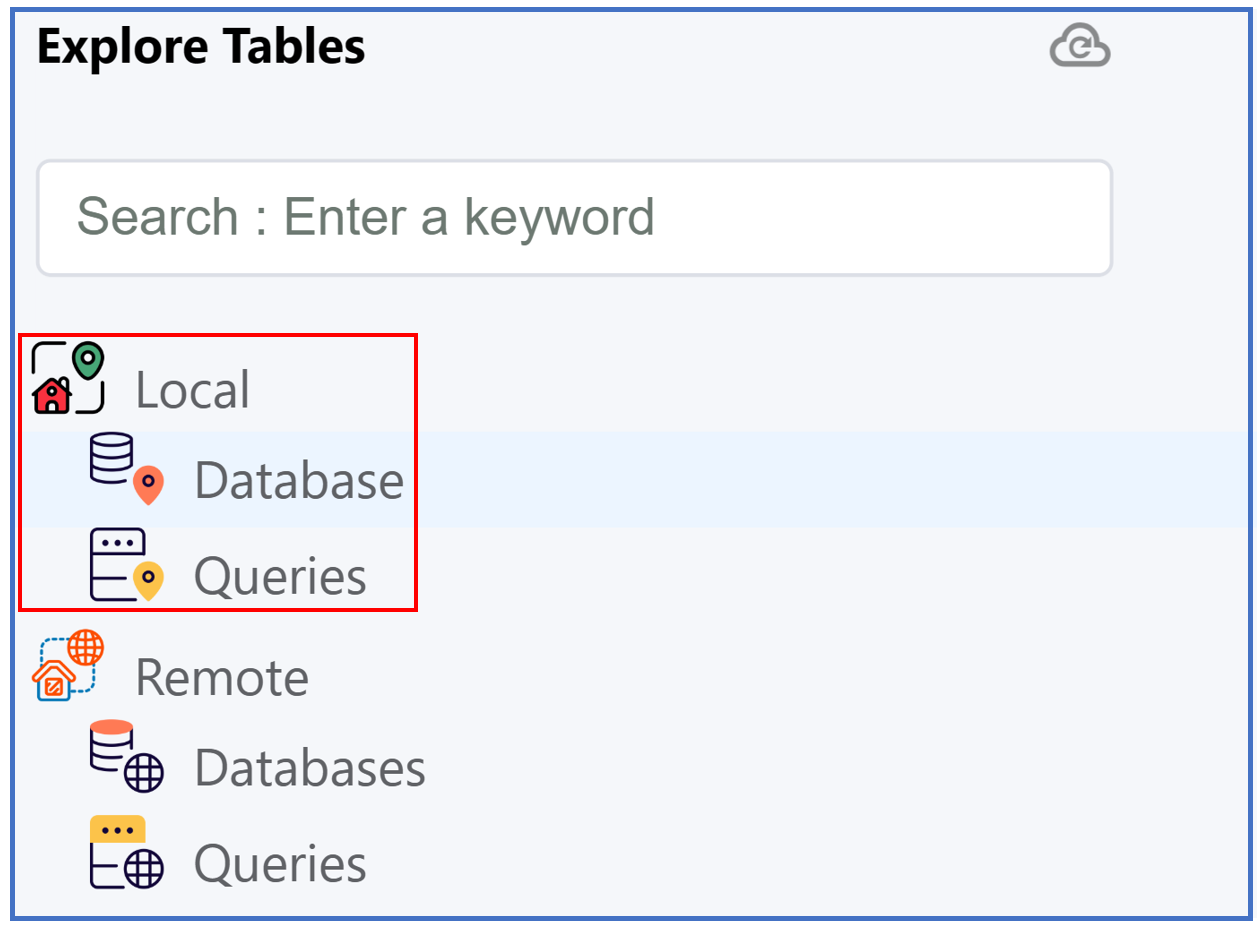
-
Database: Add a new table to an existing workspace. Click here to know more..
-
Map Table Columns: Refers to the process of aligning or linking columns from one table to another, ensuring data consistency and accurate integration. This is essential when importing, migrating, or syncing data between different databases or systems. A window will appear as follows.
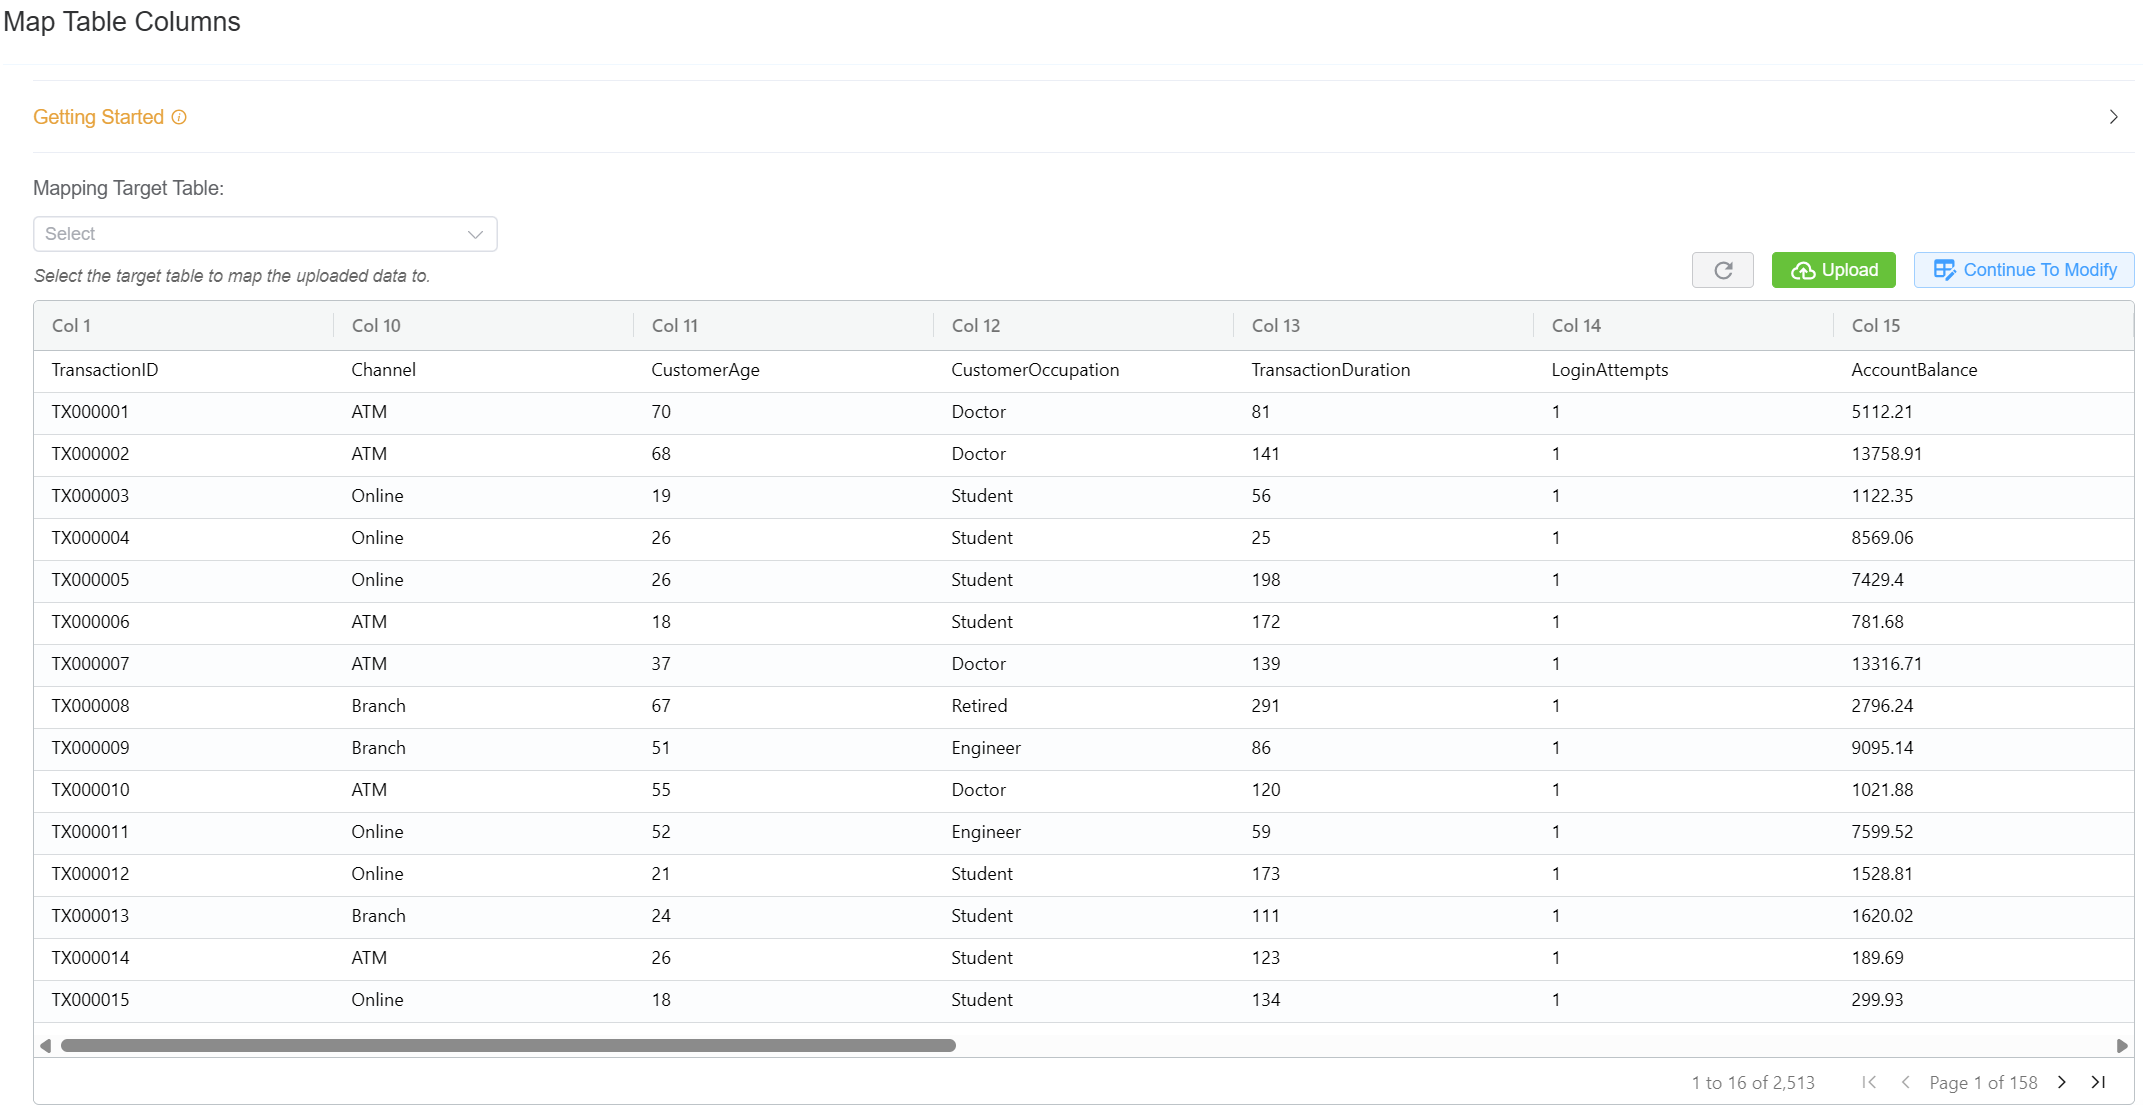
- Mapping Target Table: You can select the destination (CLI, Contact, Customer, DID, SIP User Auth) to upload the selected data.
- Refresh any changed or modified entries inside the table.
- Upload saves the table entries or modified table entries to the server.
- Continue To Modify: Allows to edit/modify the table values via queries.
You can now edit the entries inside the table itself.
-
-
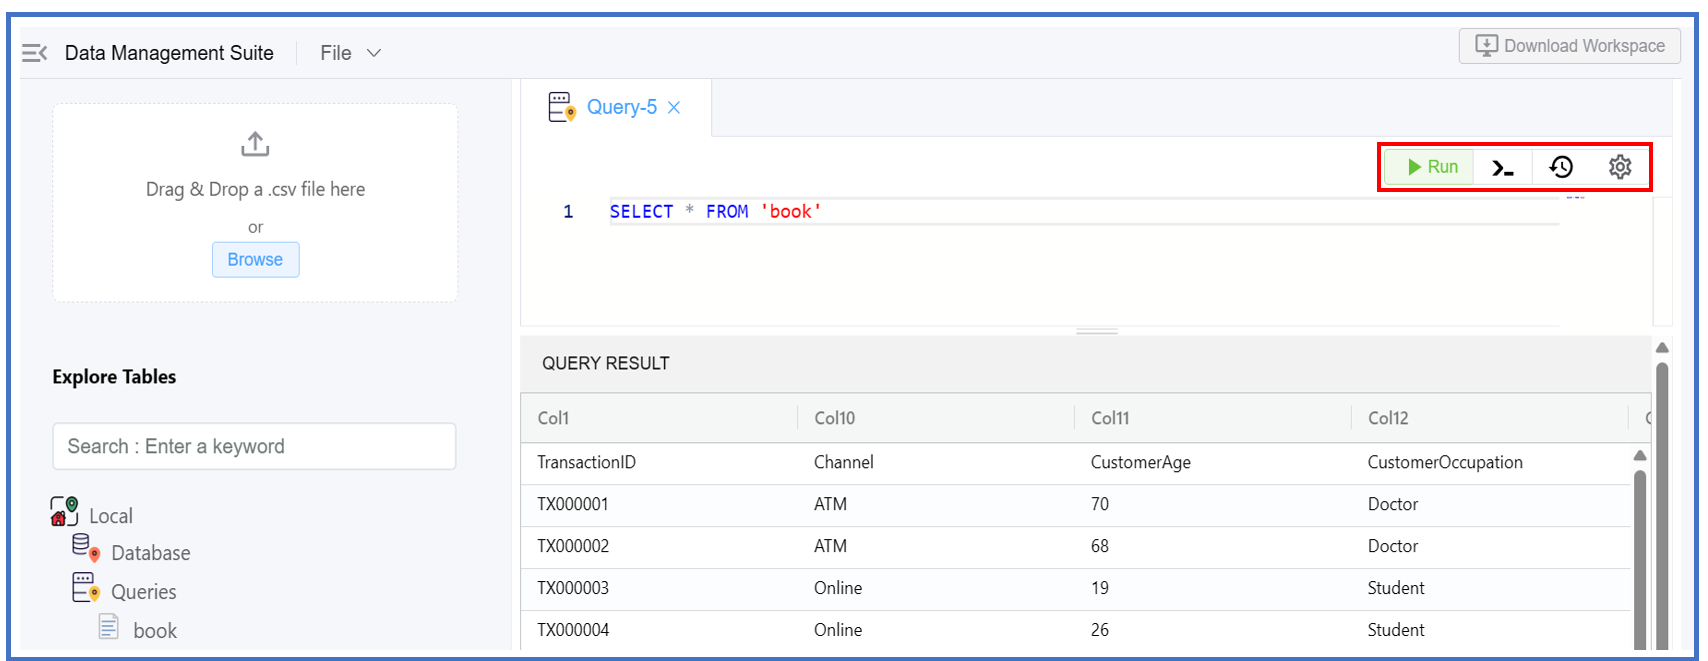
Queries:
- Click the
+icon, which functions as the Add Query button, within the Queries section. A window will appear as follows: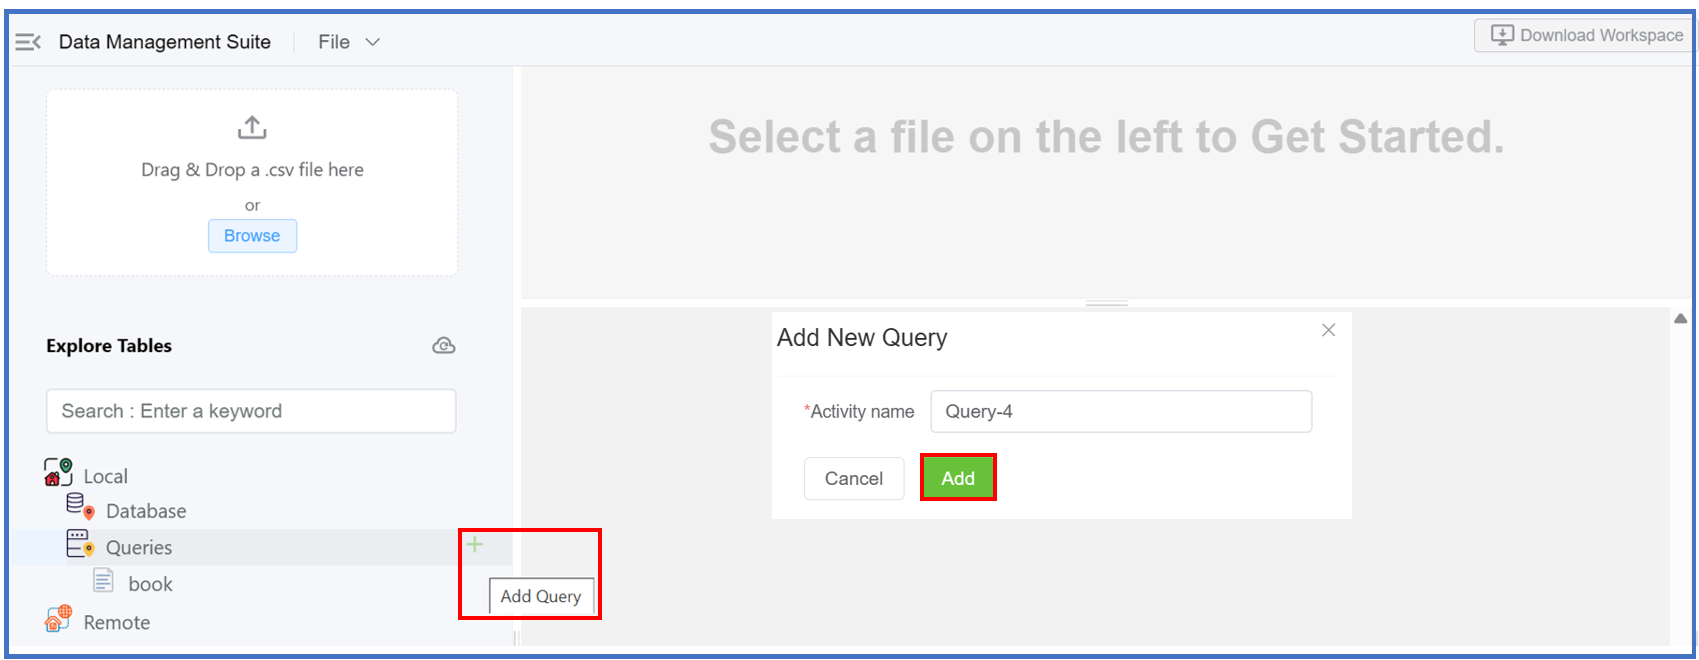
- Click
Add. - A Query Editor window will appear. It's an interface where you can write, edit, and execute queries against a database or data source. It's typically part of a larger data management or analytics platform, and it allows you to interact with data by writing commands in query languages.
- Click the
-
Other options:
- Run: Allows you to execute the query.
- Toggle Console: Allows you to open or close the console window.
-
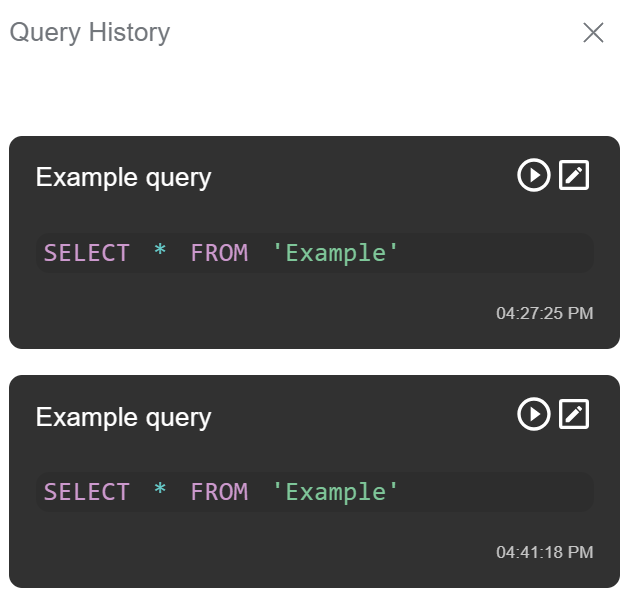
Query History: It allows you to view log or record of previously executed queries.
-
Settings:
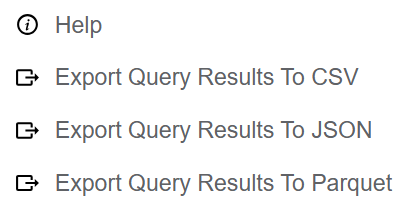
- Help: Directs you to our documentation website.
- Export Query Results to CSV
- Export Query Results to JSON
- Export Query Results to Parquet
-
-
Remote:
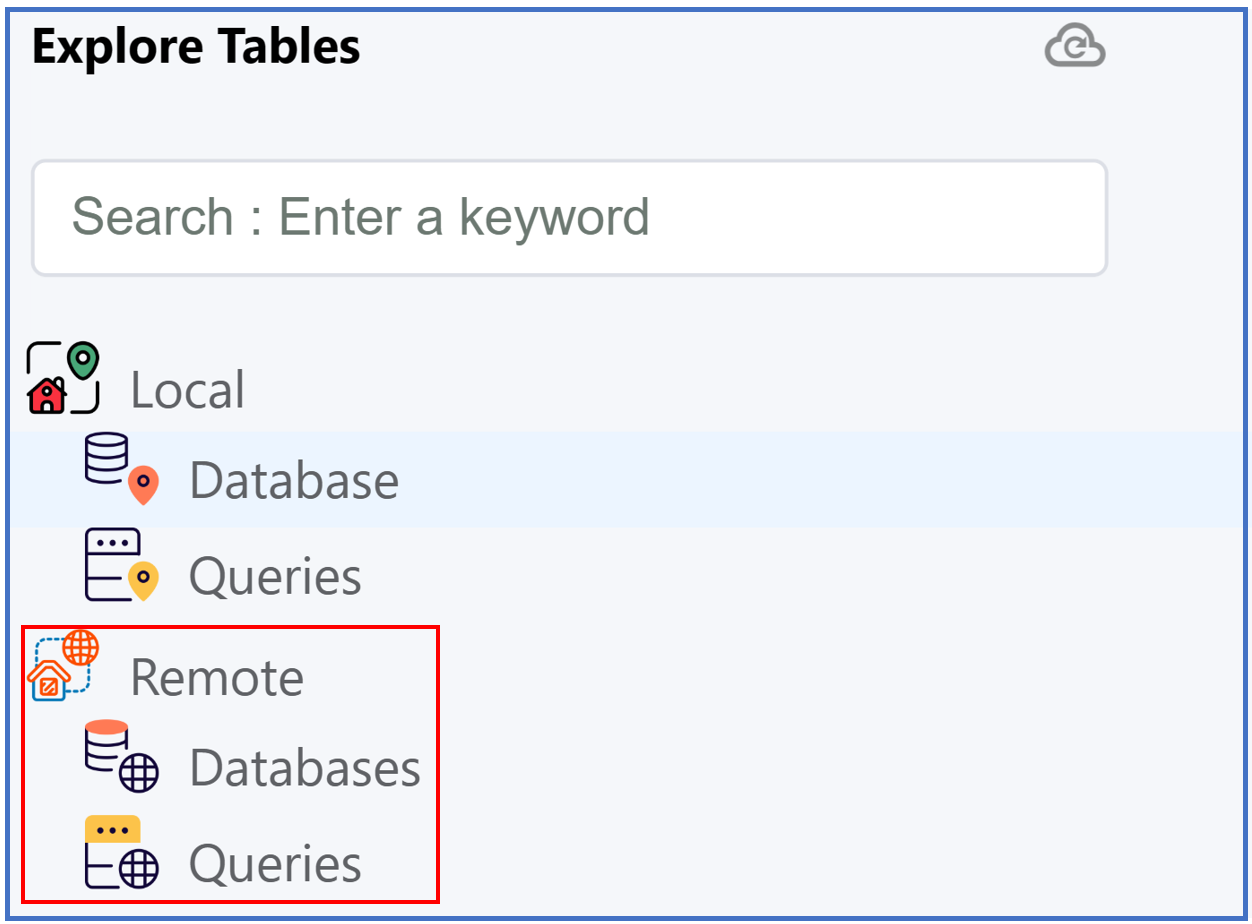
- Databases: Add a new table to an existing database. Click here to know more.
- Queries:
- Click the
+icon, which functions as the Add Query button, within the Queries section. A window will appear as follows: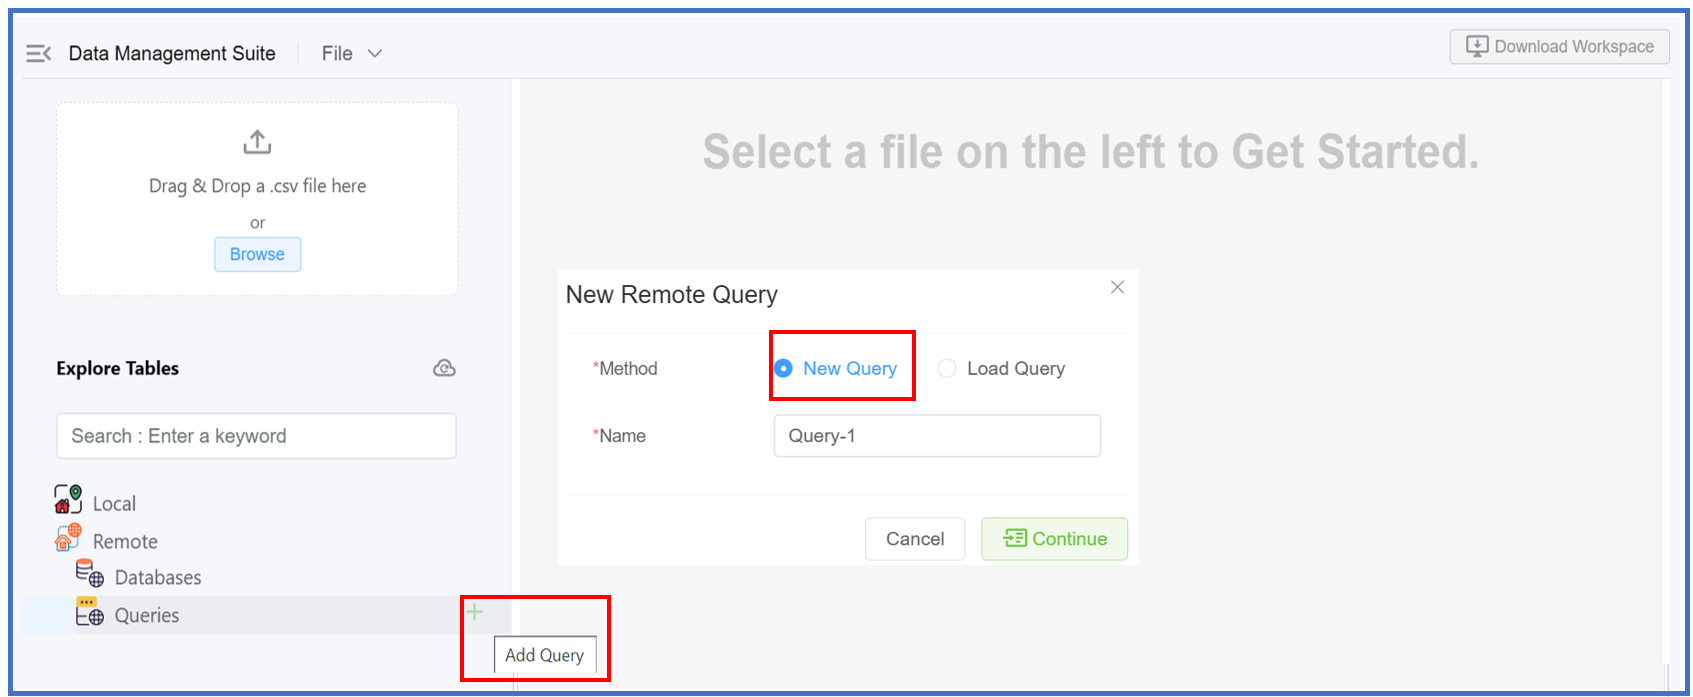
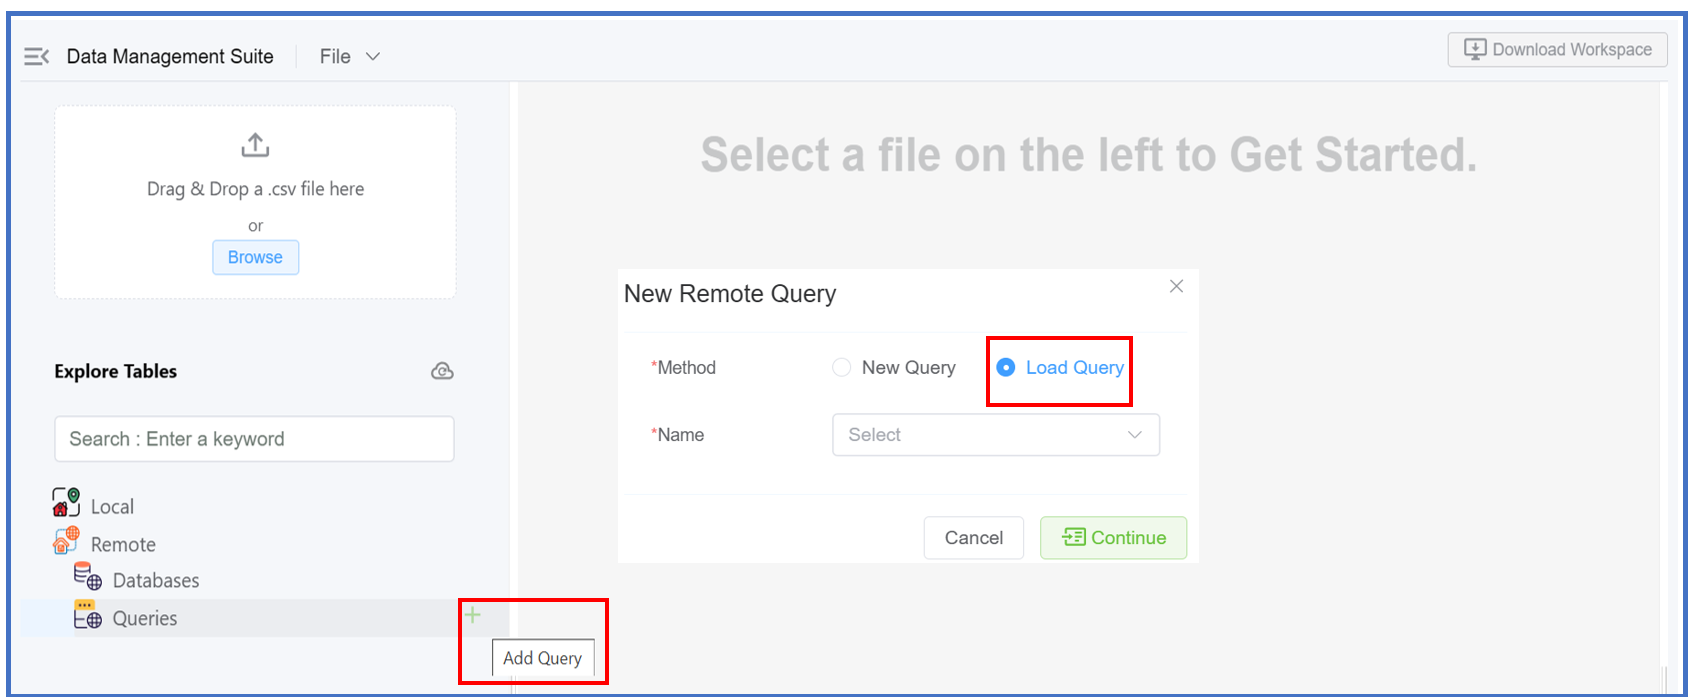
- Select
New QueryorLoad Query. - New Query will open a Query Editor. The rest remains the same as covered under Local Queries.
- Load Query will open an existing query in the system in the Query Editor.
- Click the
Bulk Upload
1.Upload your data via File, URL or by entering the Text.
- Import Data via File: This is same as "Drag & Drop a
.csvfile orBrowse".. - Uploading via URL: Enter the URL in the CSV format and hit the
Uploadbutton. After clicking Uploada window will appear as shown below -
Uploading via Text:
-
Enter the text in the following format:
Column 1,Column 2,Column 3,Column 4
1-1,1-2,1-3,1-4
2-1,2-2,2-3,2-4
3-1,3-2,3-3,3-4
4,5,6,7
-
Click on
Upload. A window will appear as shown below.
-
-
Map Table Columns: Refers to the process of aligning or linking columns from one table to another, ensuring data consistency and accurate integration. This is essential when importing, migrating, or syncing data between different databases or systems. A window will appear as follows.
- Mapping Target Table: You can select the destination (CLI, Contact, Customer, DID, SIP User Auth) to upload the selected data.
- Refresh any changed or modified entries inside the table.
- Upload saves the table entries or modified table entries to the server.
- Continue To Modify: Allows to edit/modify the table values via queries.
You can now edit the entries inside the table itself.
Query Examples
| Query Name | Query Syntax | Output |
|---|---|---|
| Select | SELECT * FROM 'Example' |
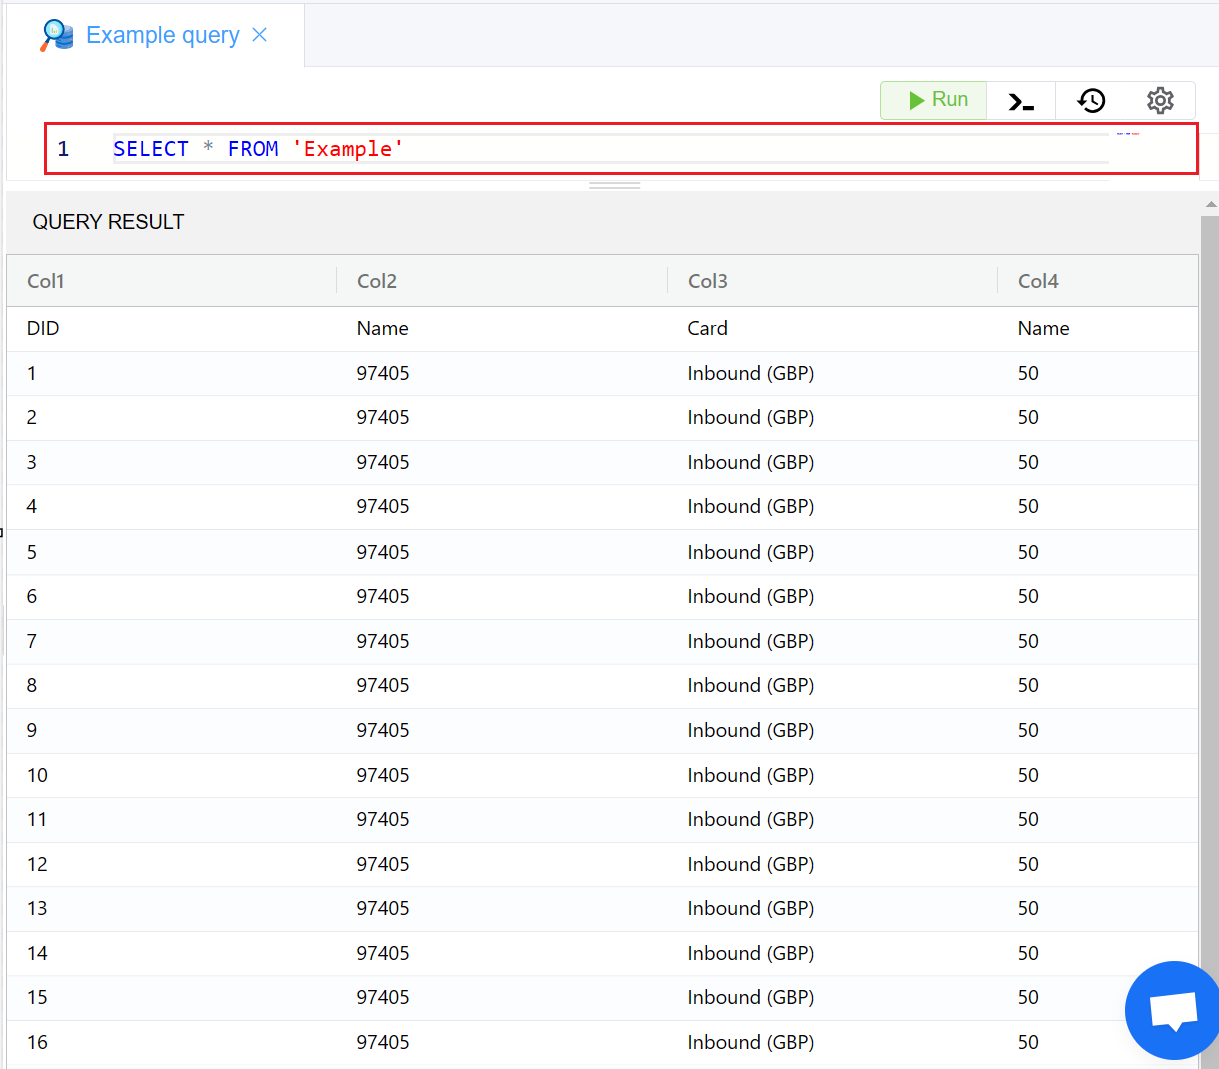 |
| Update | UPDATE 'Example' SET Col2 = '4' WHERE Col2 = '97405' |
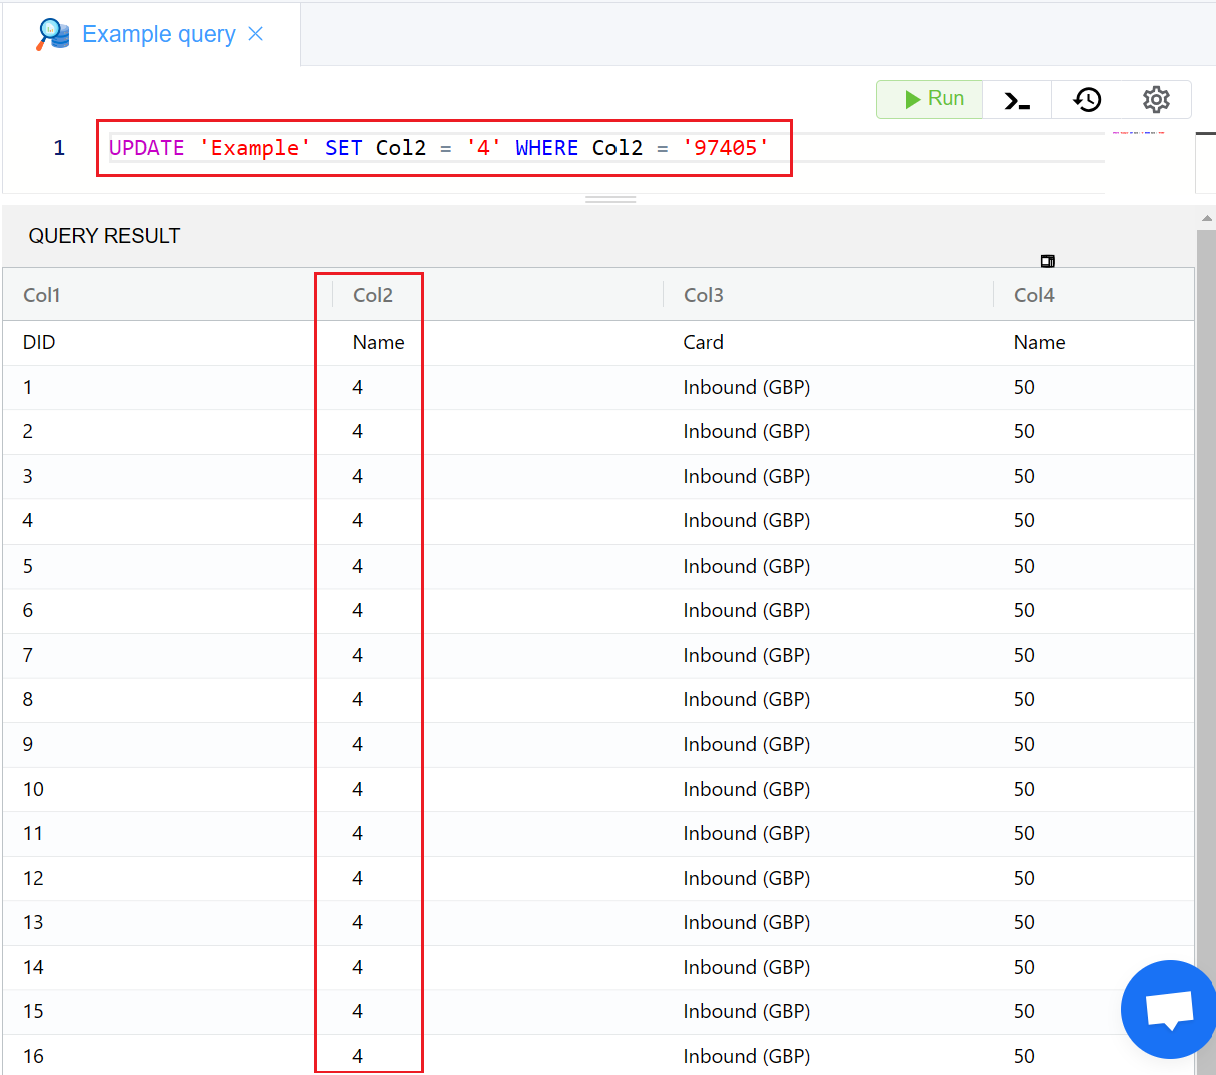 |
| Delete | DELETE FROM 'Example' WHERE Col2 = '4' |
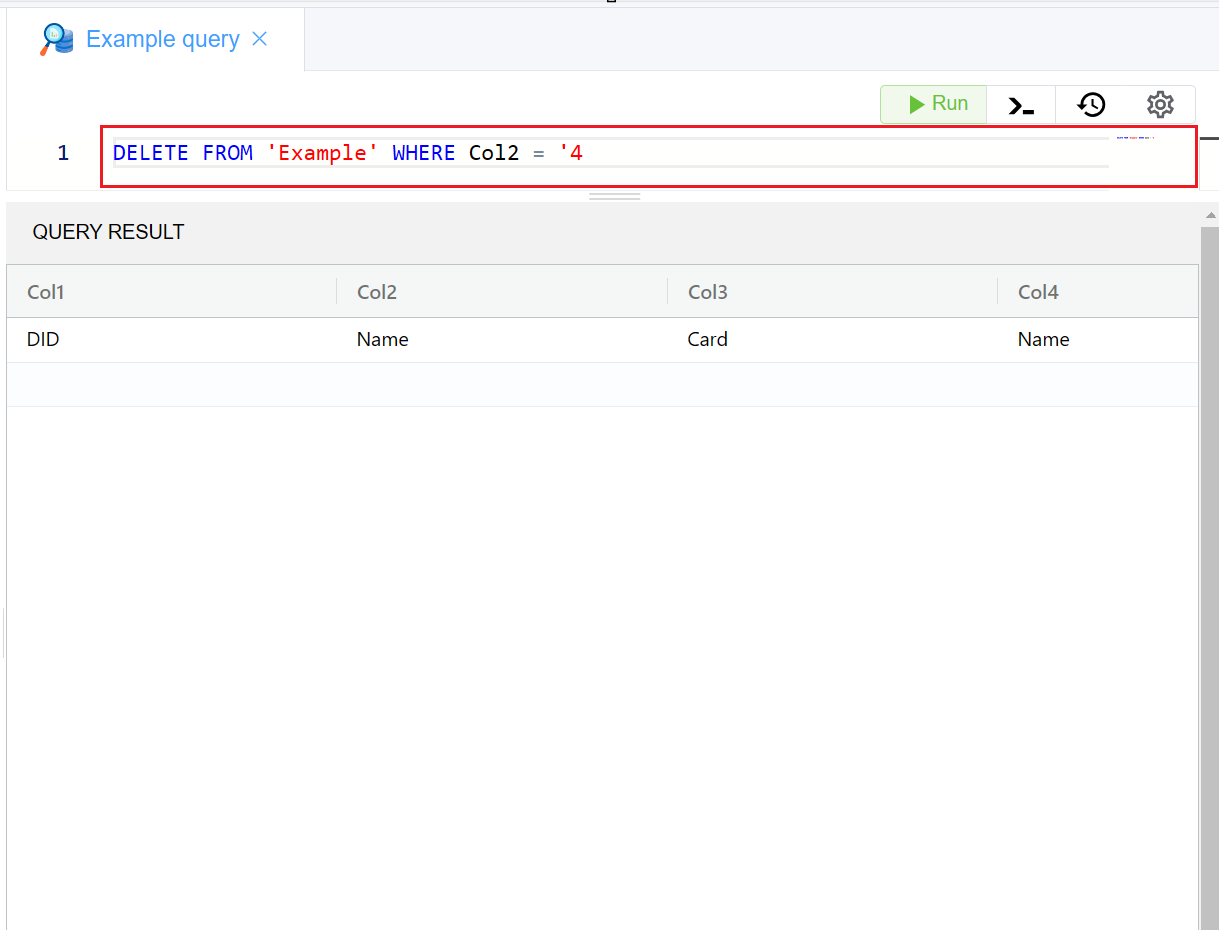 |
Remote Query
Upload your data follow the steps mentioned in Step 3
A remote query is a request that you send to a database server to fetch or process information directly on the server. Instead of doing the work (like filtering or calculating data) on your own computer or app (the "client"), you let the powerful server handle it. Once the server finishes, it sends you back only the results you need.
When you click on Remote Query, it will open a New Query under Workspace page Remote New Query.