Autonomous Calling
Document Metadata
Category: Setup / Application Store & App Deployment
Audience: Administrators, Support Team, Product Team, Customer Administrators, End Customers
Difficulty: Beginner
Time Required: Approximately 10–15 minutes for installation, configuration, and initial setup; additional time depends on the number of contacts and calling requirements.
Prerequisites: An active ConnexCS account with access to Setup and App Store; permission to install applications; an active Customer account; a configured Class 4 Outbound Server and Class 5 PBX Server; a valid endpoint and CLI; and a list of destination phone numbers in international format.
Related Topics: App Store, Class 4, Class 5, Customer Management, Outbound Routing, Endpoint Configuration
Next Steps: Install Autonomous Calling, configure the customer and server details, add the destination numbers, and start the autonomous calling process. Monitor call progress and review the status of individual contacts.
Overview
The Autonomous Calling application is a bulk outbound dialler integrated into the ConnexCS platform. It allows users to initiate outbound calls automatically using a list of phone numbers.
The application connects to the configured Class 5 PBX Server and Class 4 Outbound Server to process outbound calls. Users can upload or enter multiple destination numbers, configure the number of concurrent calls, and start the calling process from a dedicated interface within the ConnexCS Control Panel.
The application provides a centralized interface to manage the calling process, including adding phone numbers, refreshing call statuses, resetting statuses, clearing contacts, and monitoring call progress.
Why Use Autonomous Calling?
Autonomous Calling simplifies bulk outbound calling by automating the process of initiating calls to multiple destinations.
It helps users:
- Initiate outbound calls to multiple phone numbers without manually dialling each number.
- Configure the customer, PBX server, outbound server, endpoint, and CLI.
- Control the number of simultaneous calls.
- Monitor the progress of outbound calls through real-time status indicators.
- Manage contact lists and individual call statuses.
- Track completed, failed, pending, and stopped calls through a centralized interface.
Key Features
- Bulk Outbound Dialling: Initiate calls automatically using a list of destination phone numbers.
- Custom Configuration: Configure customer, Class 5 PBX Server, Class 4 Outbound Server, CLI, and endpoint details.
- Concurrent Call Management: Specify the maximum number of calls that can run simultaneously.
- Contact Management: Add multiple phone numbers to the calling list.
- Call Status Monitoring: Monitor the total number of contacts and their individual calling statuses.
- Call Timeout Configuration: Define the duration, in seconds, for a call attempt.
- Status Write Retries: Configure the number of retry attempts for writing call status updates.
- Live Session Management: Configure how long a closed or crashed browser tab retains its live session before another tab can take over.
Benefits
- Reduces manual effort involved in bulk outbound calling.
- Provides centralized management of outbound calling configurations.
- Improves operational efficiency through automated call initiation.
- Allows administrators to control concurrent calling capacity.
- Provides visibility into calling progress and individual contact statuses.
- Simplifies the management of large contact lists.
Steps to Install and Use the App
Installation
-
Navigate to Setup App Store Anvil Store Marketplace, locate Autonomous Calling, and click
Install.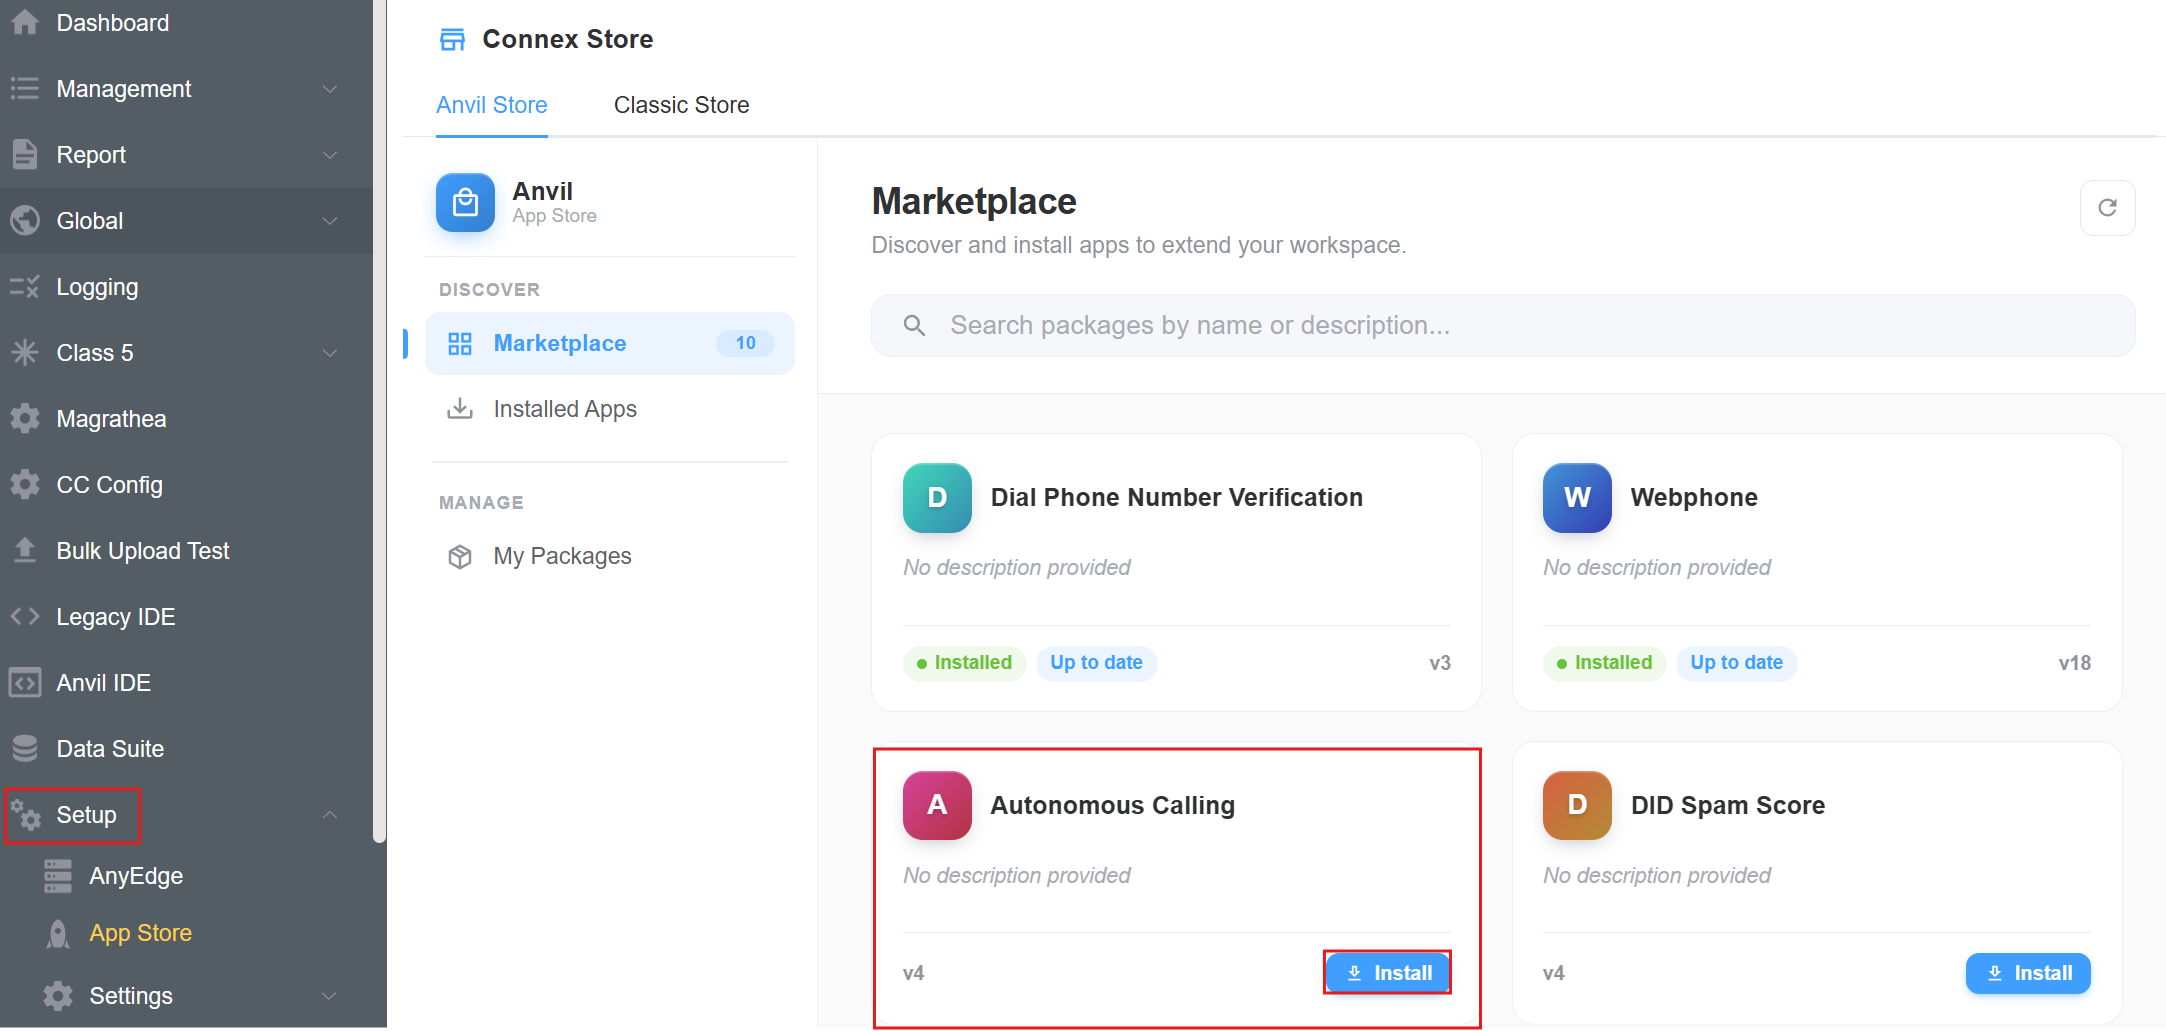
-
An installation confirmation window will appear. Review the application name and version, then click
Installagain to confirm.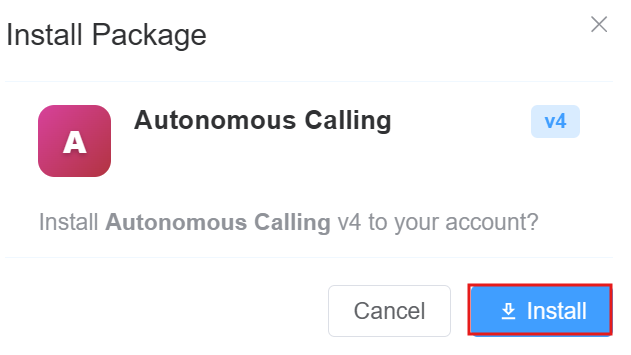
-
Once installed, open the application details page. The Overview tab displays the installation status and package information, including:
- Package slug: Unique application identifier.
- Visibility: Indicates whether the application is Public or restricted.
- Installed version: Version currently installed on the account.
- Latest version: Most recent available application version.
- Created: Date and time when the package was created.
- Updated: Date and time when the package was last updated.
- Installed package ID: Unique identifier of the installed package.
- Package ID: Unique identifier assigned to the application package.
The application status indicates whether the installed version is up to date. 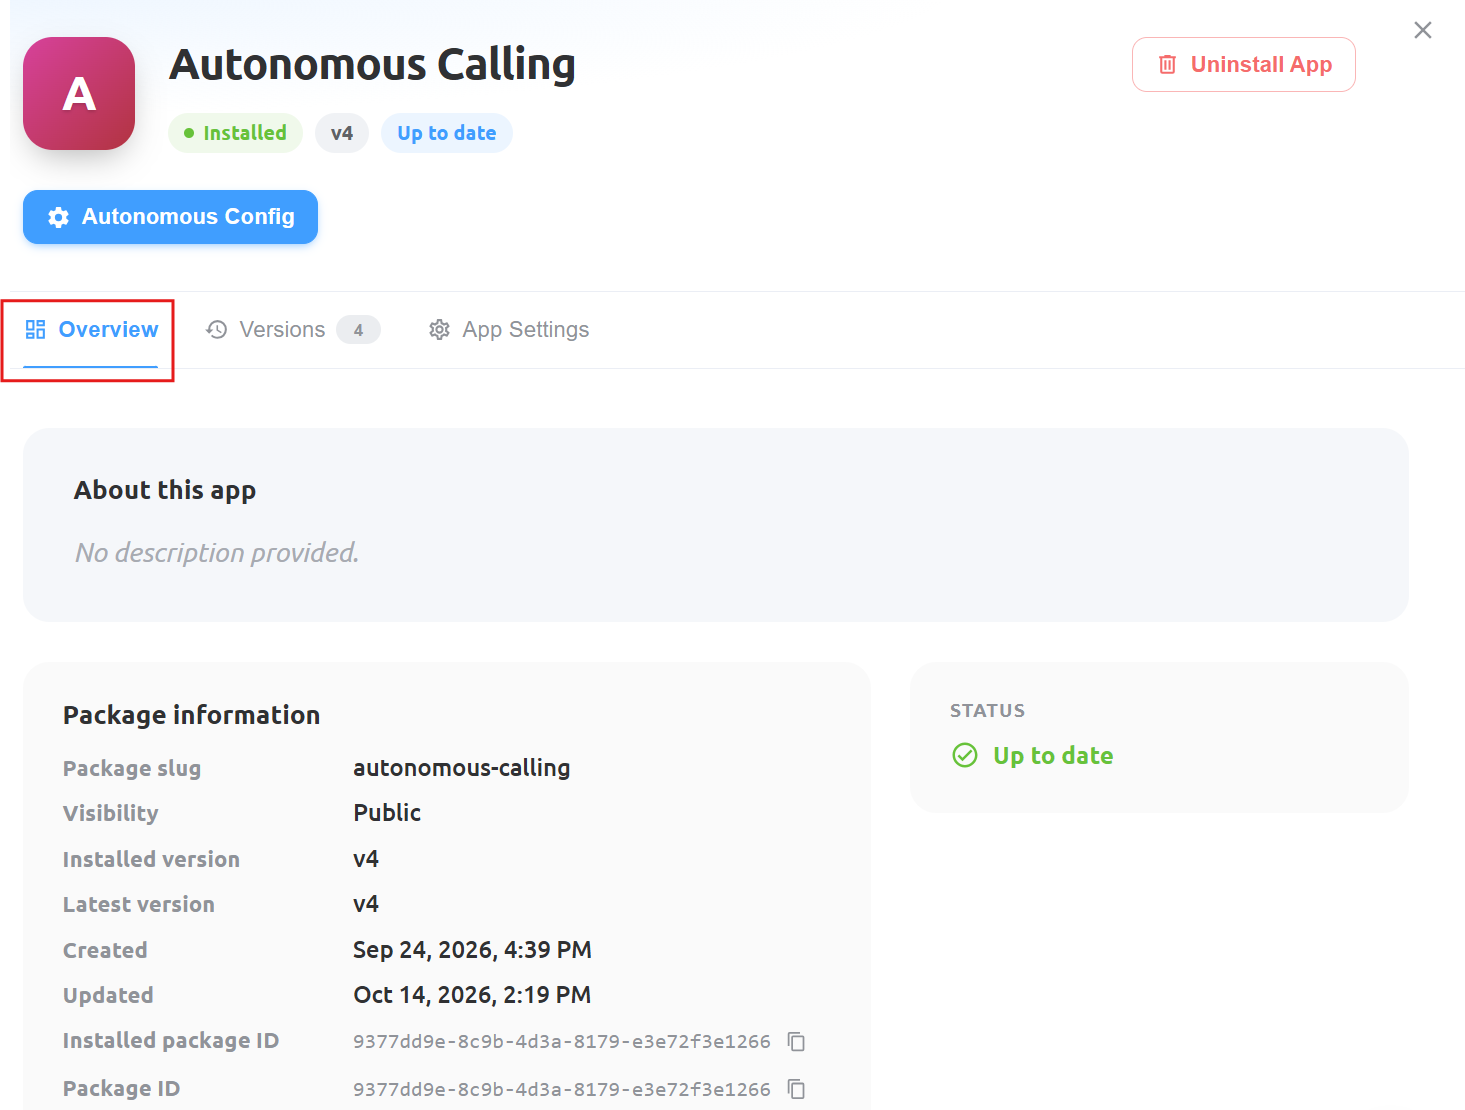
- To review the application's release history, navigate to the
Versionstab. This section displays the available application versions, their approval status, submission date, review information, and release notes, where provided.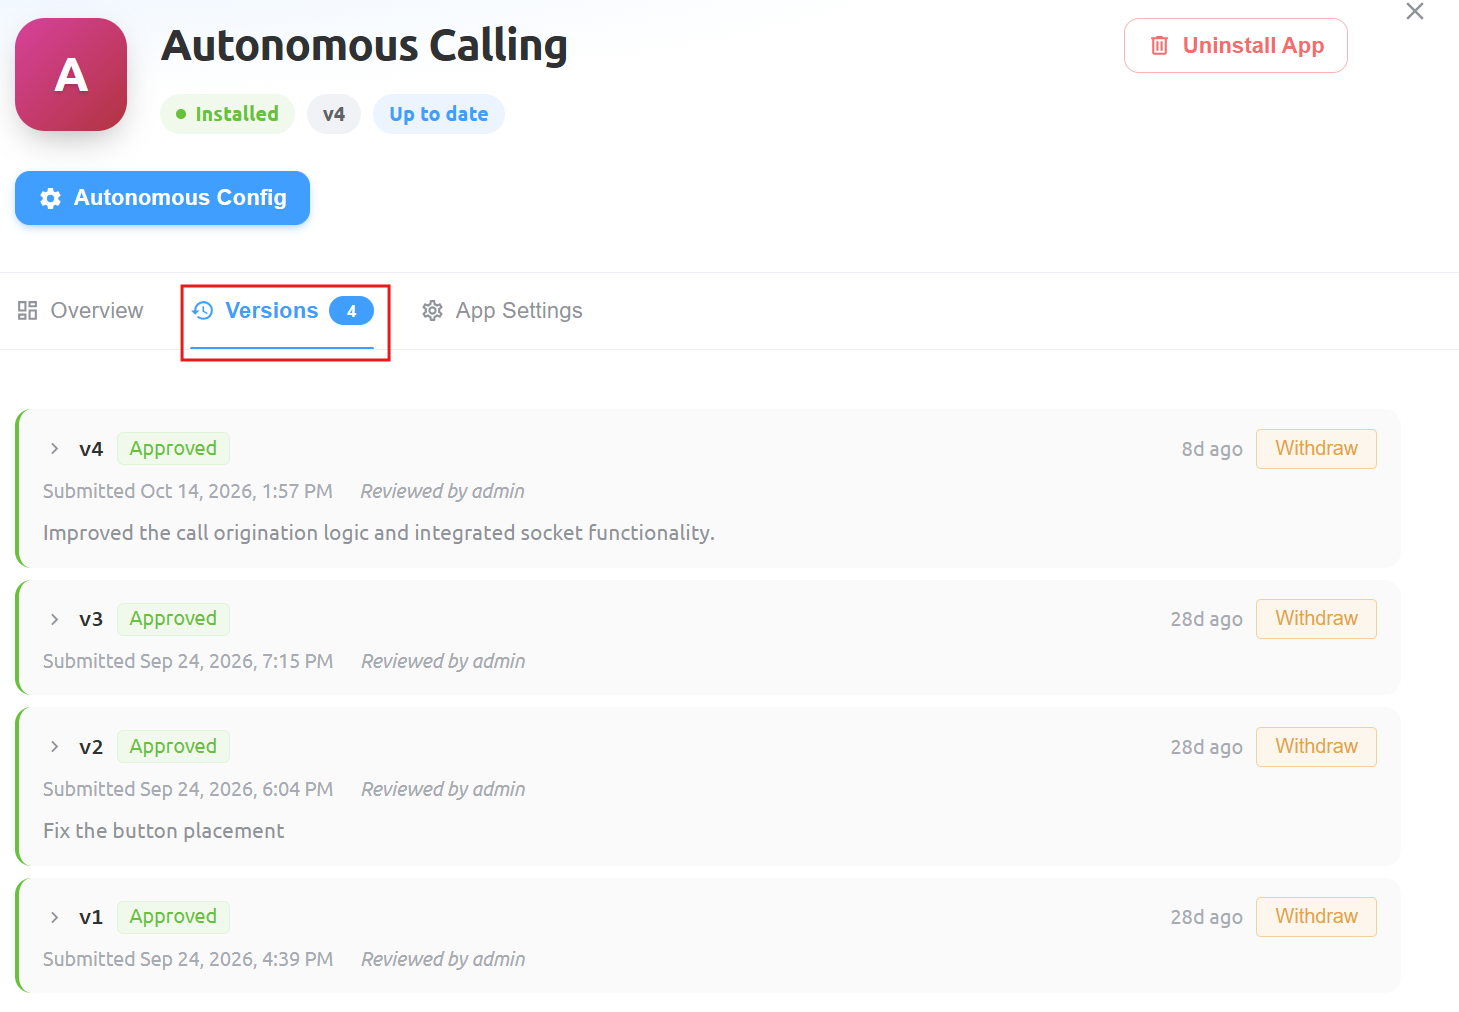
Configure Autonomous Calling
-
Navigate to the application Overview tab and click
Autonomous Config.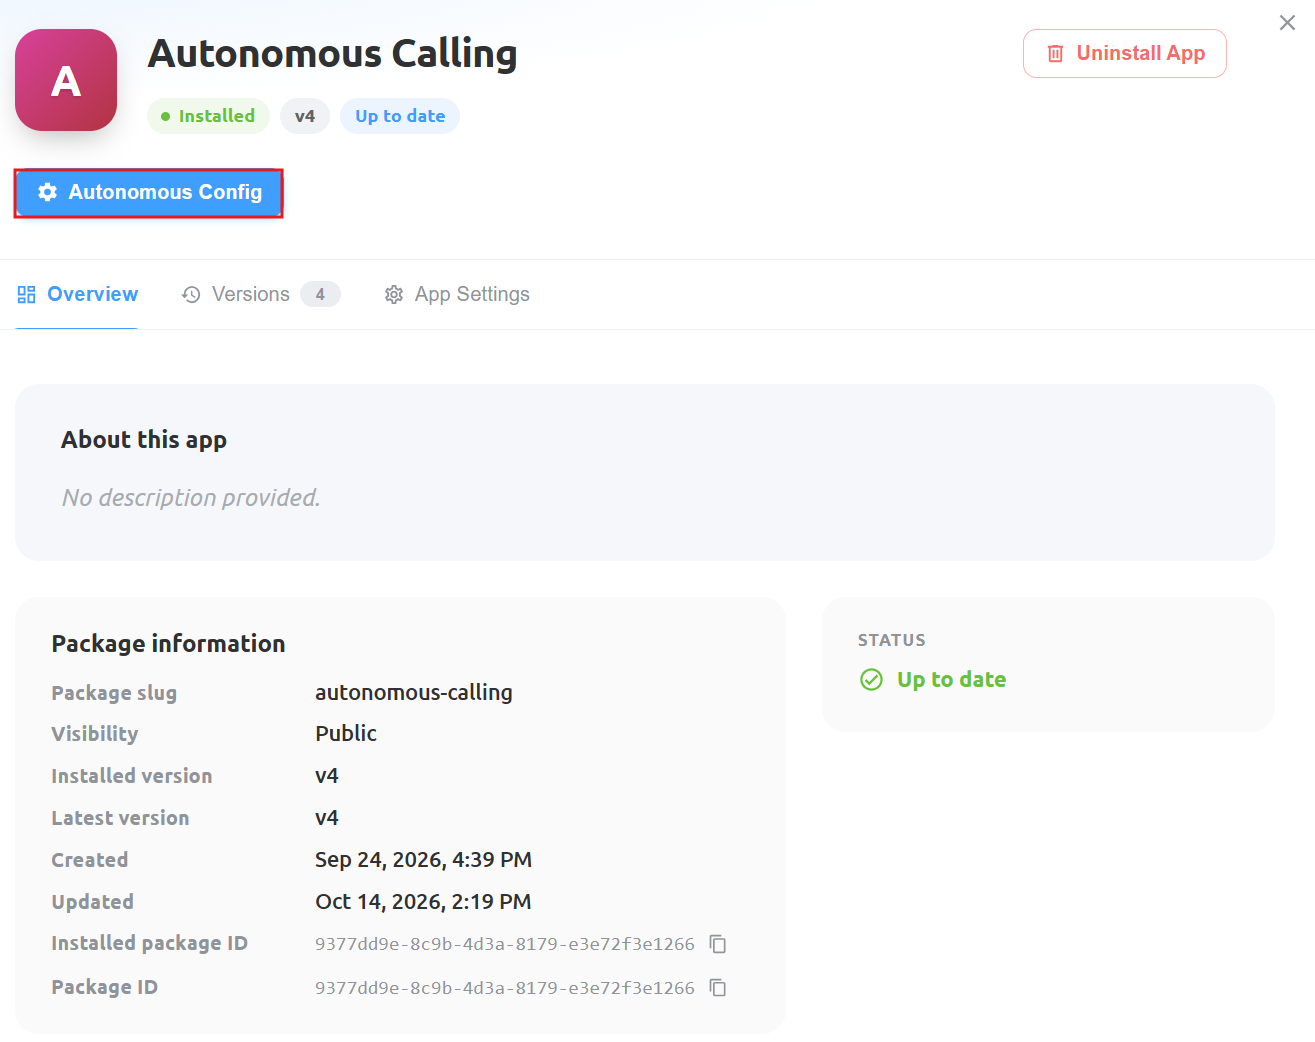
-
The Autonomous Calling configuration window will appear. Enter the following details:
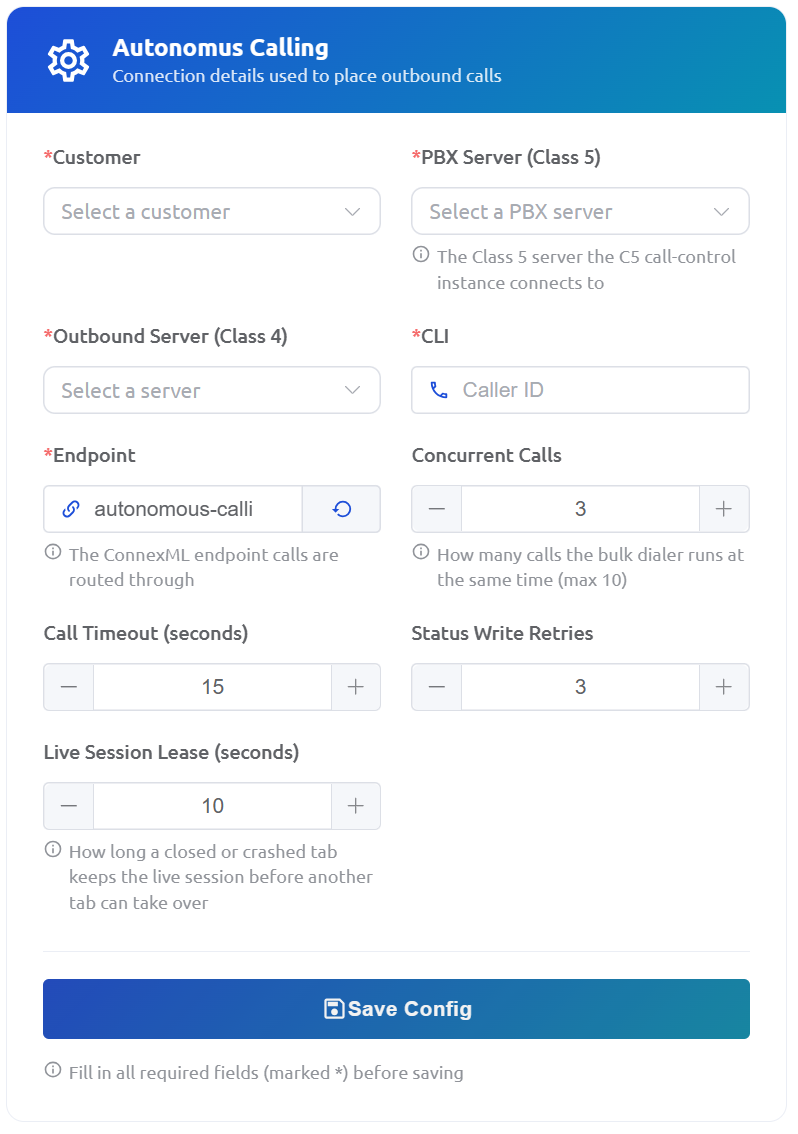
| Field | Description |
|---|---|
| Customer | Select the customer account under which the outbound calls will be initiated. |
| PBX Server (Class 5) | Select the Class 5 PBX Server that the application connects to for call control. |
| Outbound Server (Class 4) | Select the Class 4 Outbound Server through which the outbound calls are routed. |
| CLI | Enter the Caller Line Identification (CLI) that will be presented to the call recipient. |
| Endpoint | Specify the ConnexML endpoint through which the outbound calls are routed. The default endpoint shown is autonomous-calli. |
| Concurrent Calls | Specify how many calls the bulk dialler can run simultaneously. The maximum supported value is 10. The default value shown is 3. |
| Call Timeout (seconds) | Specify the call timeout duration in seconds. The default value shown is 15 seconds. |
| Status Write Retries | Specify the number of retry attempts for writing call status updates. The default value shown is 3. |
| Live Session Lease (seconds) | Specify how long a closed or crashed browser tab retains the live session before another tab can take over. The default value shown is 10 seconds. |
Configuration Notes:
- Fields marked with an asterisk (*) are mandatory.
- The PBX Server (Class 5) field identifies the Class 5 server to which the call-control instance connects.
- The Endpoint field identifies the ConnexML endpoint through which calls are routed.
-
The Concurrent Calls setting controls the number of simultaneous calls and cannot exceed 10.
-
After entering the required configuration details, click
Save Configto save the settings.
Start the Calling Process
- After saving the configuration, refresh the ConnexCS Control Panel. The
Autonomous Callingoption will appear in the left-hand navigation menu.
Click Autonomous Calling to open the bulk outbound dialler interface.
The main interface provides the following controls:
- Set Numbers: Add the destination phone numbers to the calling list.
- Refresh: Refresh the contact list and display the latest available call statuses.
- Reset Status: Reset the statuses of contacts for another calling attempt, where applicable.
- Clear All: Clear all contacts from the calling list.
-
Start Calling: Initiate the autonomous calling process.
Initially, the Contacts section displaysNo contacts yetuntil numbers are added.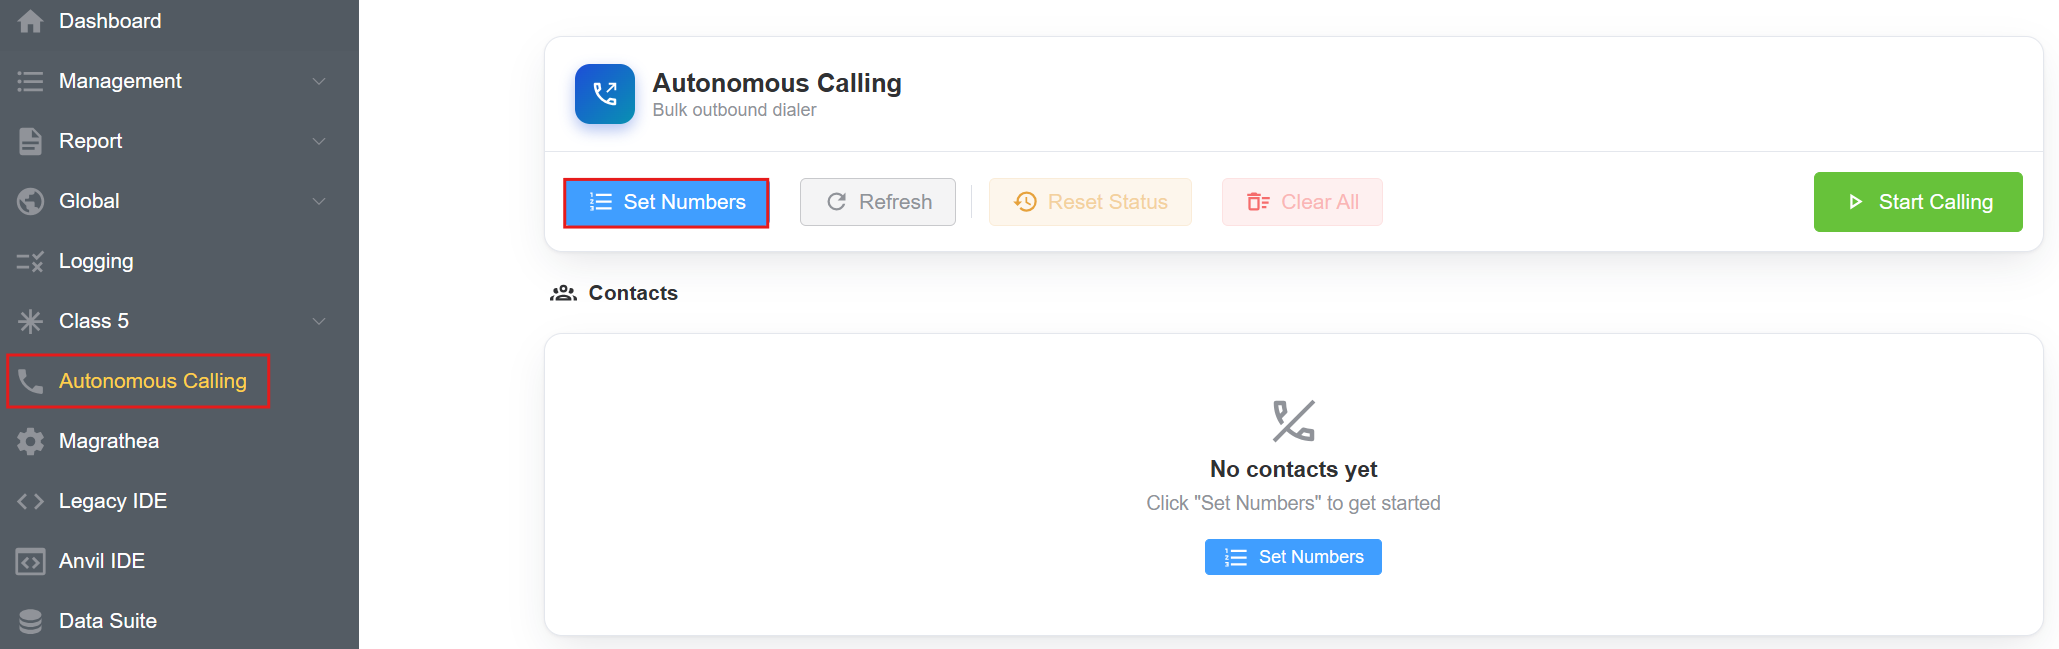
-
Click
Set Numbersto add the destination phone numbers.A Set Numbers window will appear with a text area where you can enter multiple phone numbers.
- Enter each phone number on a separate line.
- Use the complete international phone number format.
- The number counter below the text area displays the number of entries.
Click
Save Numbersto add the numbers to the calling list. Saving the numbers replaces the existing list.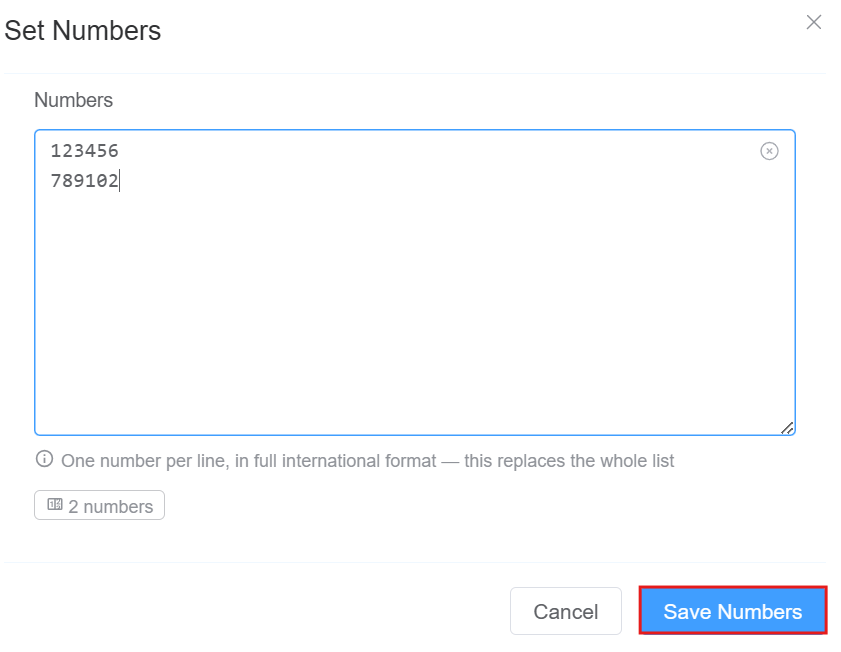
-
Once the numbers are saved, they appear in the Contacts section.
The interface displays the following summary counters:
Counter Description Total Total number of contacts added to the calling list. Pending Number of contacts waiting to be processed for calling. Calling Number of contacts currently being called. Completed Number of contacts whose calling process has been completed. Failed Number of contacts for which the calling attempt has failed. Stopped Number of contacts whose calling process has been stopped. The Contacts table displays the individual entries and their current statuses.
Column Description # Displays the sequential number assigned to each contact. Phone Number Displays the destination phone number added to the calling list. Status Displays the current calling status of the contact, such as Pending, Calling, Completed, Failed, or Stopped. Click
Start Callingto initiate the autonomous outbound calling process.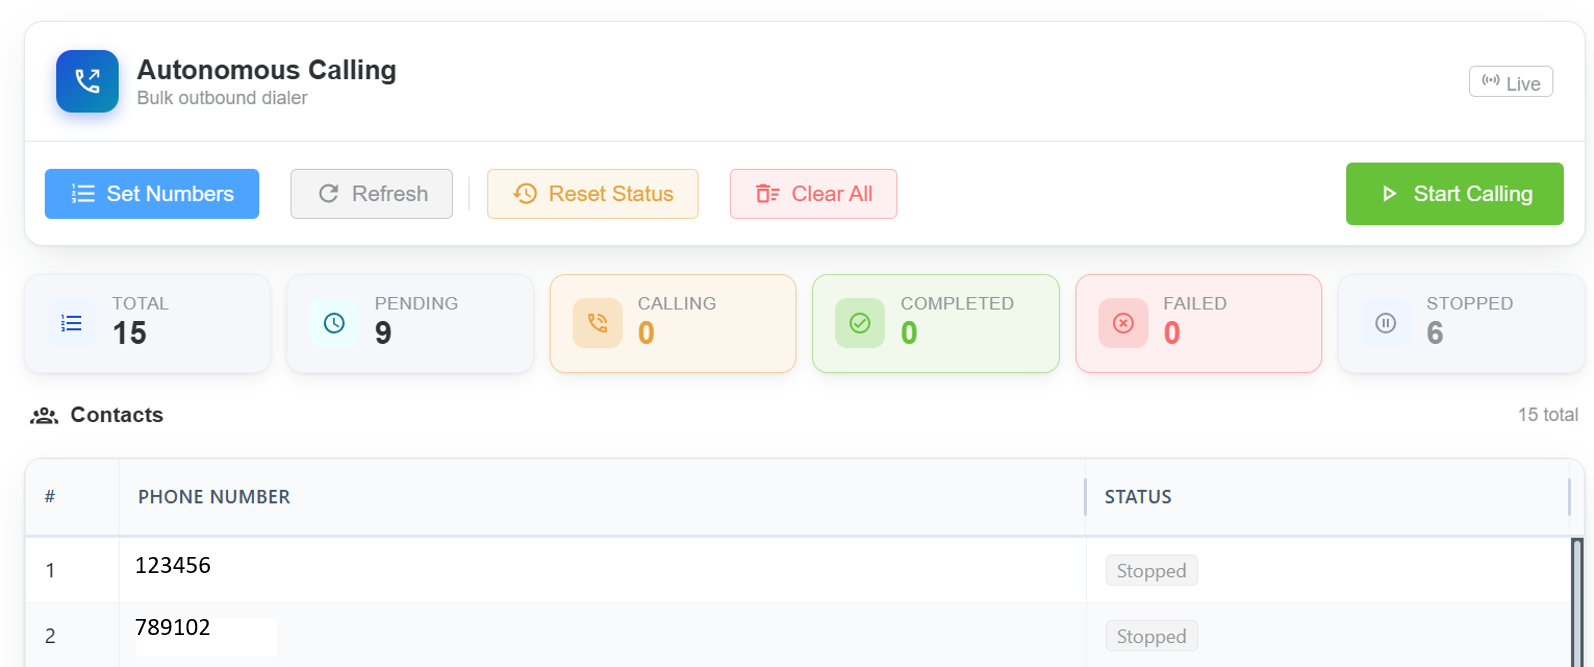
Managing the Calling Process
The Autonomous Calling interface provides additional controls to manage the calling process.
| Control | Description |
|---|---|
| Set Numbers | Opens the number-entry window to add or replace the contact list. |
| Refresh | Refreshes the displayed contact information and statuses. |
| Reset Status | Resets contact statuses to allow another calling attempt, where applicable. |
| Clear All | Removes all contacts from the current calling list. |
| Start Calling | Starts the outbound calling process using the configured settings and contact list. |
Monitoring Call Status
The summary counters provide an overview of the calling process. Users can monitor the number of contacts in each status category and review individual entries in the Contacts table.
The status information helps administrators identify which contacts are waiting to be called, currently being processed, successfully completed, failed, or stopped.
Important Notes
Phone Number Format
- Ensure that all phone numbers are entered in the complete international format, including the country code (for example,
+44for the UK or+1for the US). - When entering multiple phone numbers, list each number on a separate line.
Number List Replacement
Saving a new list through the Set Numbers window replaces the entire existing contact list. Ensure that the required numbers are included before clicking Save Numbers.
Concurrent Calls
The maximum supported concurrent call value is 10. Configure this value according to your calling requirements and available server capacity.
Configuration Requirements
Ensure that the Customer, Class 5 PBX Server, Class 4 Outbound Server, CLI, and Endpoint are correctly configured before starting the calling process.
Troubleshooting
| Issue | Recommended Action |
|---|---|
| Autonomous Calling isn't visible in the portal navigation. | Confirm that the application is installed and review the Assigned Buttons section under App Settings. Refresh the Control Panel after installation. |
| Configuration can't be saved. | Check that all mandatory fields marked with an asterisk (*) have been completed. |
| No contacts appear in the Contacts section. | Click Set Numbers, enter the destination phone numbers, and click Save Numbers. |
| Numbers aren't being processed. | Verify the Customer, Class 5 PBX Server, Class 4 Outbound Server, CLI, and Endpoint configuration. |
| Calls are failing. | Verify the destination numbers, outbound routing configuration, CLI, and server connectivity. |
| Concurrent calling isn't working as expected. | Review the Concurrent Calls configuration and ensure that the value does'nt exceed 10. |
| Call statuses don't appear to be updated. | Click Refresh to retrieve the latest available contact statuses. |