IDE Components
Document Metadata
Category: Development → Anvil → IDE Features
Audience: Developers, Solution Engineers, Administrators, Technical Teams
Difficulty: Intermediate
Time Required: 20–30 minutes
Prerequisites: Access to the ConnexCS Anvil IDE, an Anvil project, and appropriate permissions to develop or manage project resources.
Related Topics: Document Guide — documentation standards, Anvil IDE — getting started, ScriptForge, Query Builder, Anvil Apps, CX Terminal.
Next Steps: Create and execute ScriptForge scripts, and Anvil applications, use the CX Terminal and KV Store, leverage the AI Assistant, configure IDE settings, and explore additional ConnexCS development tools.
Overview
The Anvil IDE provides a complete development environment for building, testing, debugging, and managing applications on the ConnexCS platform.
It combines backend scripting, frontend development, live previews, terminal access, AI assistance, and productivity tools into a single workspace.
From within the IDE, developers can execute ScriptForge scripts, preview Anvil applications, manage domains, use the CX Terminal to run ConnexCS CLI commands and manage the KV Store, inspect logs, interact with the built-in AI Assistant, write SQL with intelligent auto-completion, and customize their development environment through extension settings.
ScriptForge
ScriptForge is ConnexCS's backend scripting system. Scripts live in the backend/ folder and are JavaScript files.
Running a Script
Open a .js script. You will see ▶ Run and ▶ Run with Vars links appear directly above each exported async function in the code (these are called CodeLens actions). You can also use the toolbar buttons at the top of the editor.
- Run — Executes the script's
main()function immediately. The result appears in the Preview panel to the right. - Run with Vars — Opens a dialog where you can enter input variables before running. Useful when your script expects parameters.

Viewing Results (Show ScriptForge Preview)
When a script runs, the Preview panel opens on the right side of the screen. It shows: - Whether the run succeeded or failed - The return value displayed as formatted JSON, plain text, or raw - How long the run took
| Tab | Description |
|---|---|
| Result | Displays the output returned after executing the script or function. If the execution is successful, the result is shown here. If an error occurs, the error message, status code, and related details are displayed to help with troubleshooting |
| Docs | Displays the documentation for the selected function, API, or module. This tab provides reference information such as parameters, return values, and usage details, helping you understand how to use the function correctly |
| JSON | Displays the execution result in raw JSON format, making it easier to inspect the complete response structure for debugging or integration purposes |
| Text | Displays the execution result as plain text for improved readability. This view is useful when you want to review the response without JSON formatting |
| Raw | Displays the unprocessed response exactly as returned by the server or runtime, including all original formatting and data |
| Copy | Copies the currently displayed output to the clipboard, allowing you to paste it into another application or share it with others |

Console Logs
While a script runs, any console.log() calls appear in the CX Logs panel at the bottom. Logs are structured — objects, arrays, maps, and other types are displayed in a tree you can expand. You can:
- Filter logs by level (info, warn, error) or search by text
- Pause and clear the log output
- Switch between logs from different scripts

Domains
Overview
Domains let a developer attach a custom hostname to a project so it is reachable at a specific web address — for example test.cnx.page — instead of only an internal or default address.
Each domain is bound to a chosen project build and ScriptForge runtime version, so it is possible to serve a stable build on one domain while other builds continue to be developed.
Where to Find It
The Domains panel is located in the Explorer sidebar.
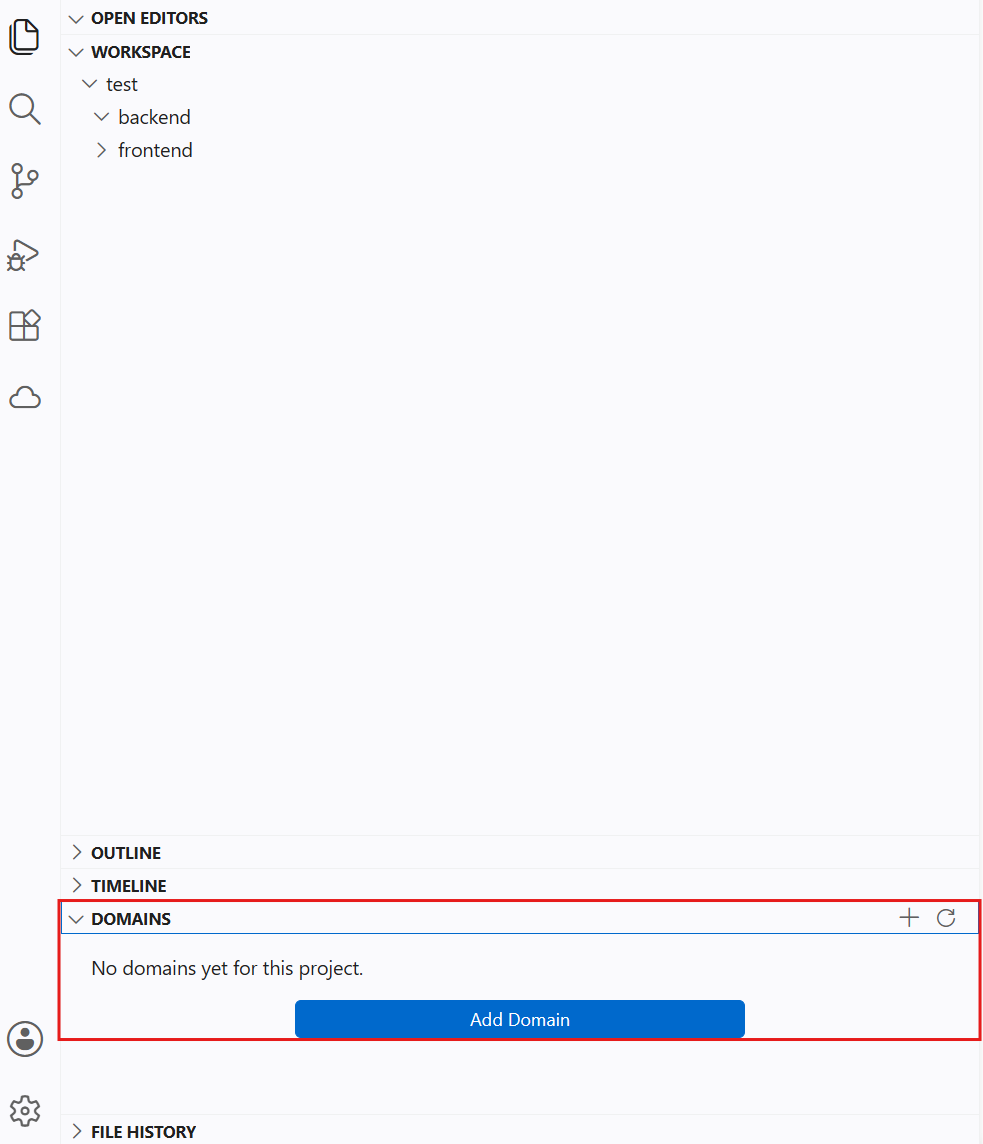
- Expand the Domains section to see all domains currently configured for the project.
- If none exist yet, the panel shows "No domains yet for this project."
- An Add Domain button at the bottom of the panel opens the New Domain editor tab.
Creating a Domain
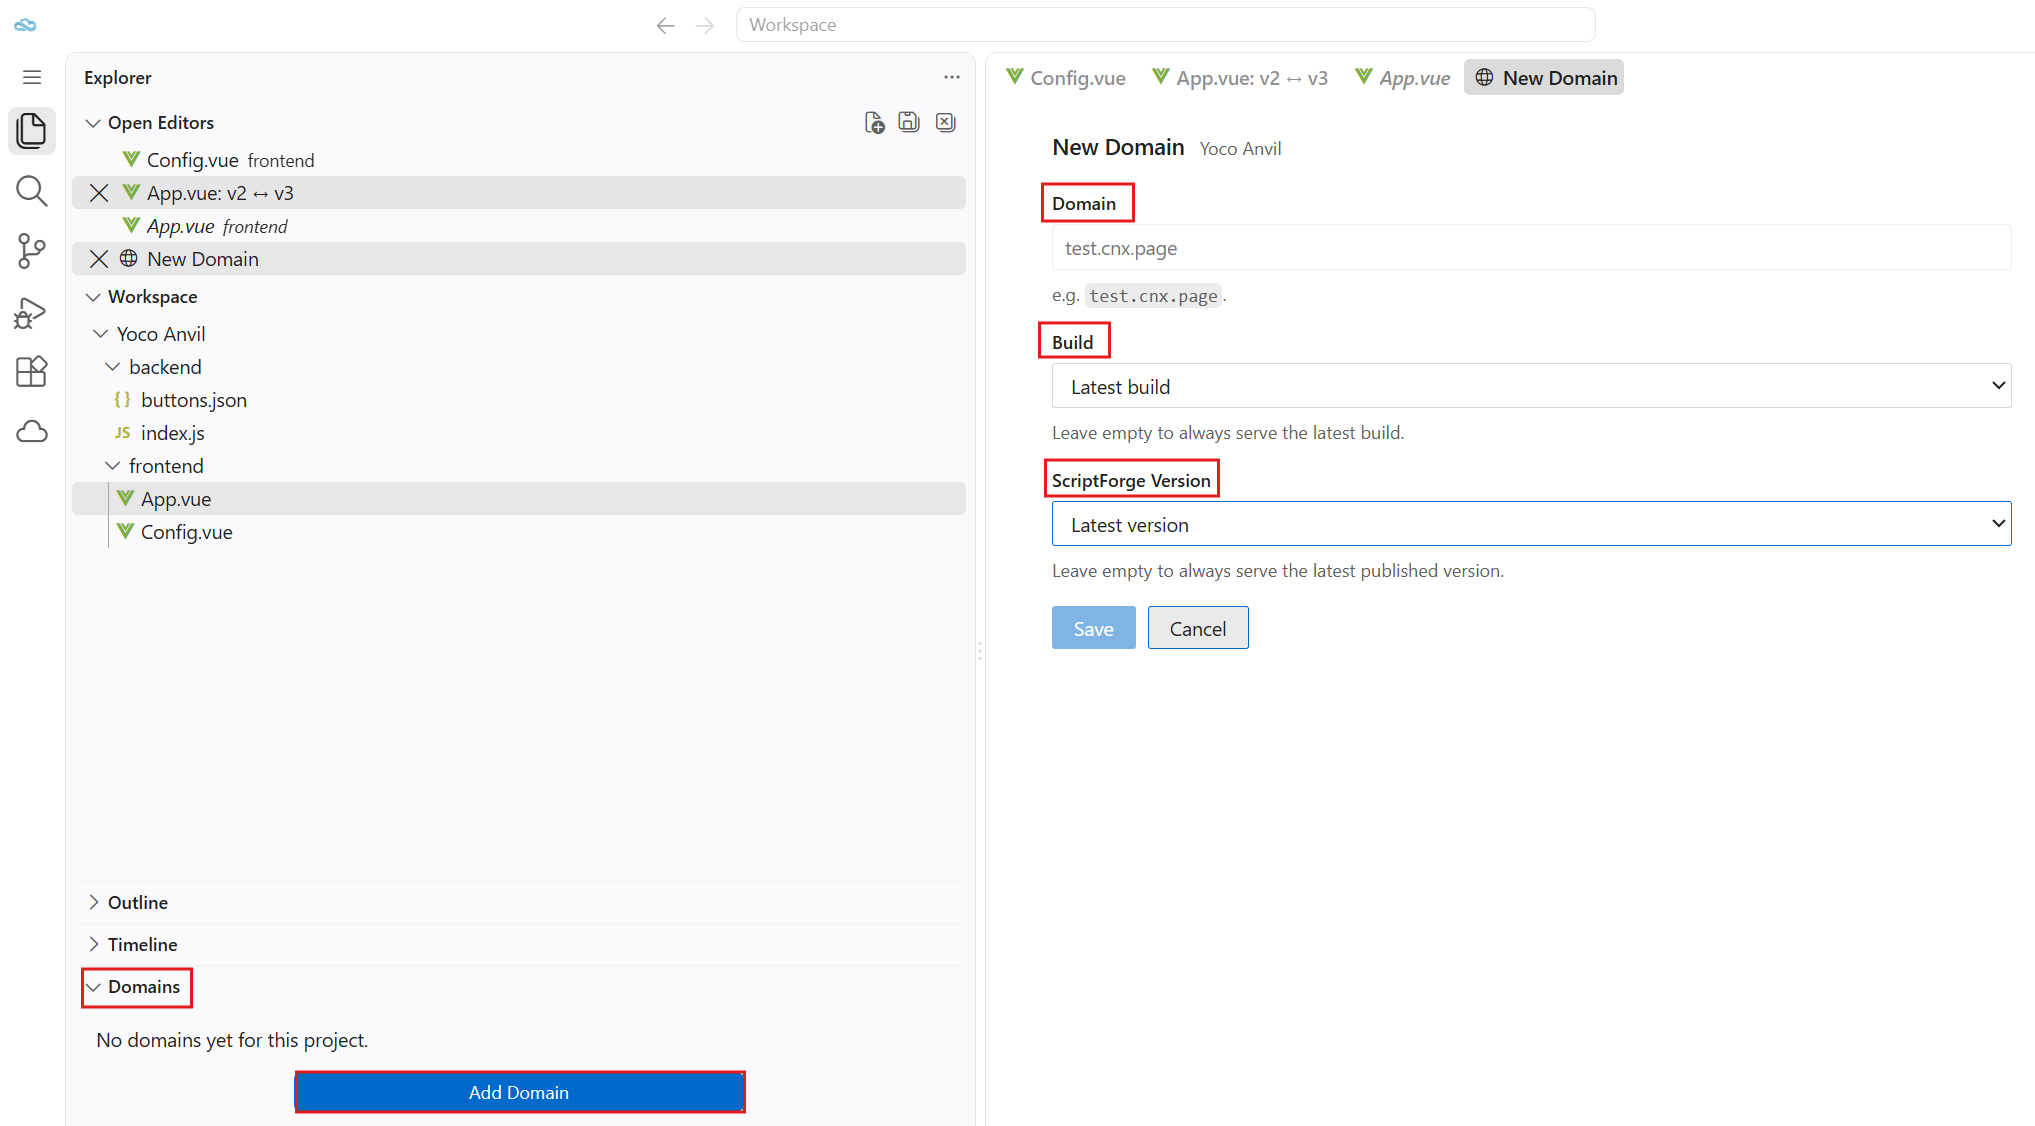
Clicking Add Domain opens a New Domain tab in the main editor area, alongside any other open files. The tab contains the following fields:
| Field | Default | Description |
|---|---|---|
| Domain | — | The hostname to attach to the project, e.g. test.cnx.page. A format example is shown below the field. |
| Build | Latest build | Which project build the domain serves. Left empty, the domain always serves the most recently created build rather than a fixed one. |
| ScriptForge Version | Latest version | Which ScriptForge runtime version the domain runs against. Left empty, the domain always runs the most recently published version rather than a fixed one. |
Tip: Leaving Build or ScriptForge Version empty is the recommended default for actively developed domains, since the domain then automatically tracks whatever is newest. Pin a specific build or version only when a domain needs to stay fixed — for example, a production domain that should not change until a deliberate release.
Saving or Discarding
- Fill in the Domain field, and optionally choose a specific Build and ScriptForge Version.
- Click Save to create the domain and bind it to the project.
- Click Cancel to close the tab without creating a domain.
Once saved, the new domain appears in the Domains list in the sidebar and can be selected again later to review or change its build and version bindings.
CX Terminal
The CX Terminal panel (at the bottom of the screen) is an interactive terminal connected to the ConnexCS cx-cli command-line tool. Use it to run ConnexCS CLI commands directly from the IDE.
To open it, click the CX TERMINAL tab in the bottom panel.
Type help to see available commands. The terminal supports standard cx-cli commands for managing your project environment, environment variables, and more.

KV Store
The KV (Key-Value) Store provides a simple way to store and retrieve small pieces of persistent data directly from the CX Terminal.
It is useful for saving configuration values, application state, tokens, timestamps, feature flags, and other information that your ScriptForge scripts or applications may need between executions.
Each value is stored as a key-value pair, where:
- Key uniquely identifies the stored item.
- Value is the data associated with that key.
The KV Store is ideal for lightweight configuration and runtime data, eliminating the need to create a database table for simple storage requirements.
Common Use Cases
You can use the KV Store to:
- Store API credentials or access tokens.
- Save application configuration values.
- Keep feature flags or environment settings.
- Record timestamps of the last successful execution.
- Cache small pieces of frequently accessed data.
- Store temporary application state between script executions.
Note: The KV Store is intended for lightweight data. It is not designed to replace a relational database or store large datasets.
Accessing the KV Store
The KV Store is managed through the CX Terminal, located in the bottom panel of the Anvil IDE.
To open the terminal:
- Click the CX TERMINAL tab in the bottom panel.
- Wait for the terminal to initialize.
- After connecting, you'll see a welcome screen similar to the following:

- Type
helpto get started. - An example of using KV:

Creating or Updating a Value
Use kv set to create a new key or update an existing one.
kv set <key> "<value>"
Example:
kv set test-key "test value"
Output:
OK
If the key already exists, its value is overwritten.
Retrieving a Value
Use kv get to read the value associated with a key.
kv get <key>
Example:
kv get test-key
Output:
test value
ConnexCS Assistant
The ConnexCS Assistant is an AI-powered chat interface built into the IDE.
Opening the Assistant
- Click the Open Assistant button in the ConnexCS sidebar.
- Or use the assistant icon in the secondary sidebar (right side panel).
Using the Assistant
Type questions or requests in the chat input. The assistant is aware of your open files and active project, so you can ask it things like: - "Explain what this script does" - "Help me write a ScriptForge function that sends an SMS" - "What parameters does the cxSend function accept?"
Editor Tab Mode
Click Open in Editor Tab to open the assistant as a full-width editor tab if you prefer more space.
SQL Auto-Complete
When editing .sql files (Query Builder scripts), the editor provides intelligent auto-completion including:
- SQL keywords
- Table names from your ConnexCS database schema
- Column names relevant to the current table
Auto-complete suggestions appear as you type, or press Ctrl+Space / Cmd+Space to trigger them manually.
External Edit Review
Overview
The External Edit Review feature detects when a file open in the editor is changed by something other than the current editing session — another developer saving from their own IDE, an API call, a script, or a snapshot restore from the History panel.
Rather than silently overwriting the buffer, the extension highlights the differences inline in the editor and lets the developer decide, region by region, whether to keep or undo each change.
Availability: This feature works identically inside the ConnexCS web IDE (code.connexcs.com) and in any VS Code-compatible editor where the ConnexCS extension is installed.
How It Looks
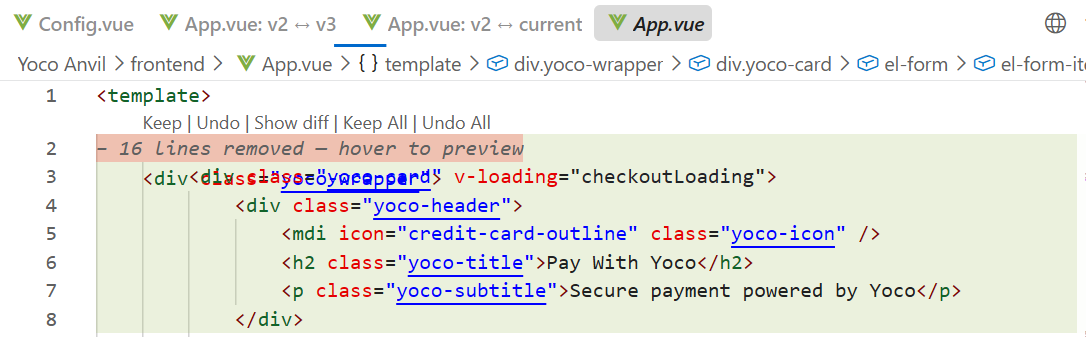
As soon as an external change lands on a file that is open, the affected lines are highlighted using two visual cues:
| Visual cue | Meaning |
|---|---|
| Green background | Lines that were added or replaced by the external edit. |
| Pink banner | Lines were removed by the edit. Shows a count (e.g. − 3 lines removed — hover to preview) and reveals the deleted content on hover |
Above the first changed region, a row of action buttons appears:
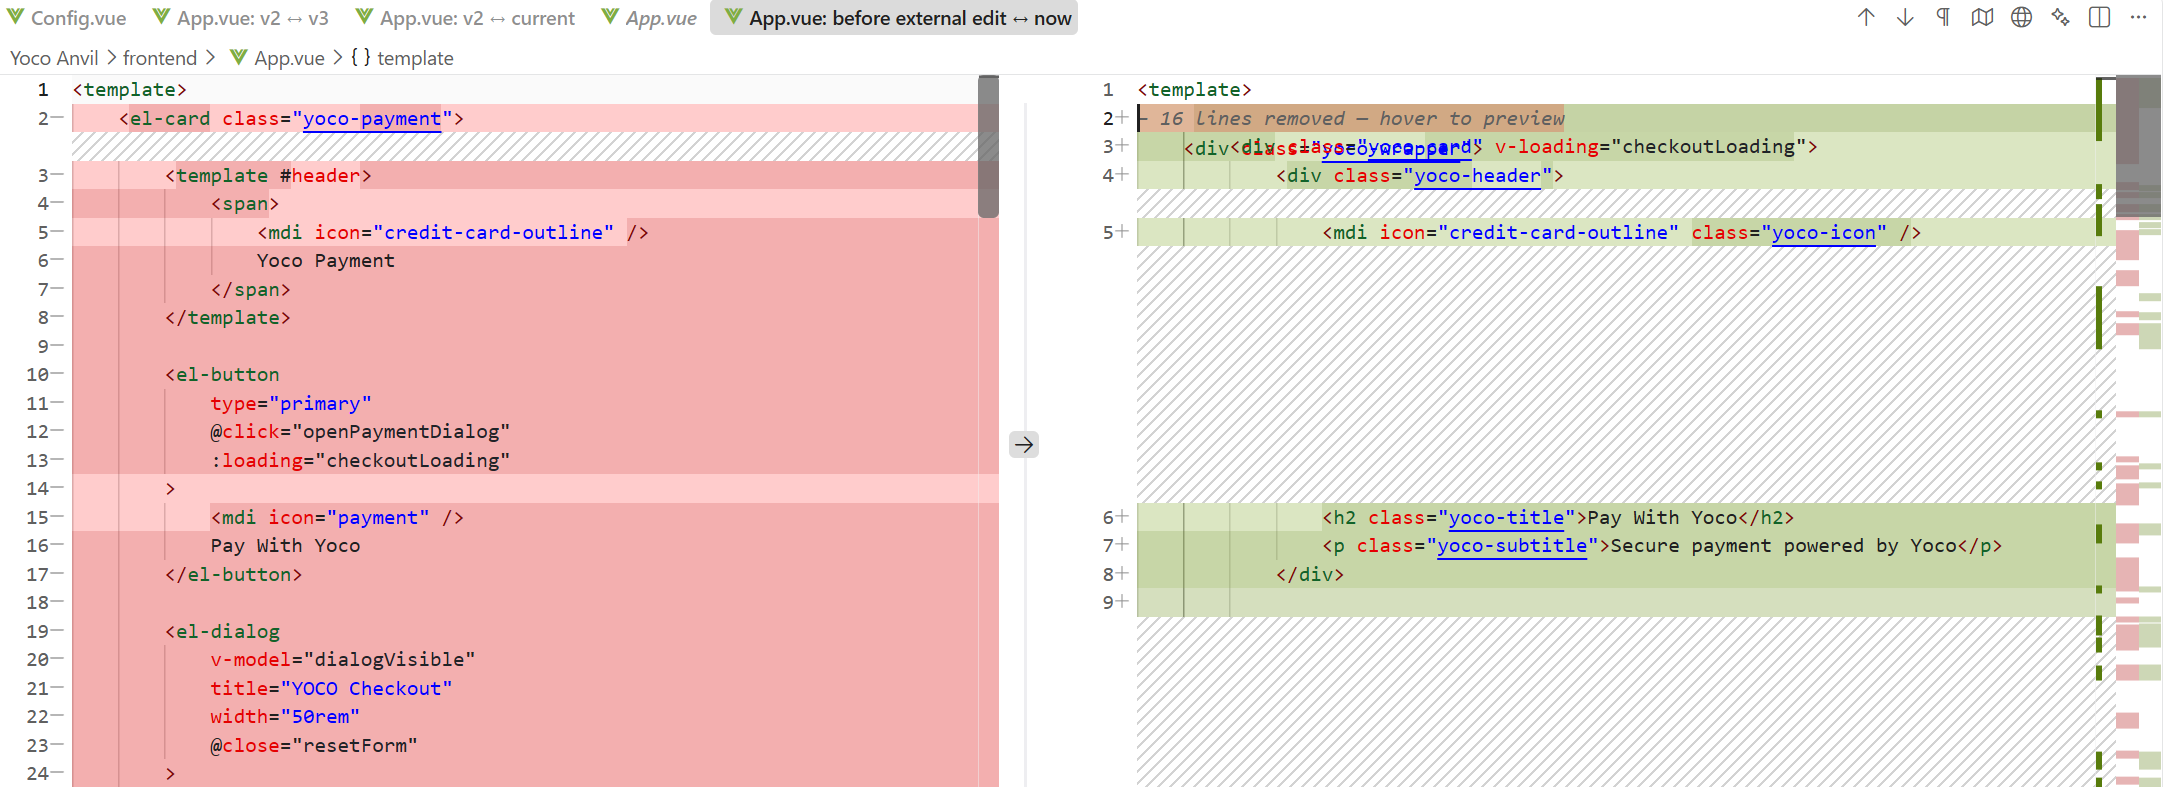
Keep | Undo | Show diff | Keep All | Undo All
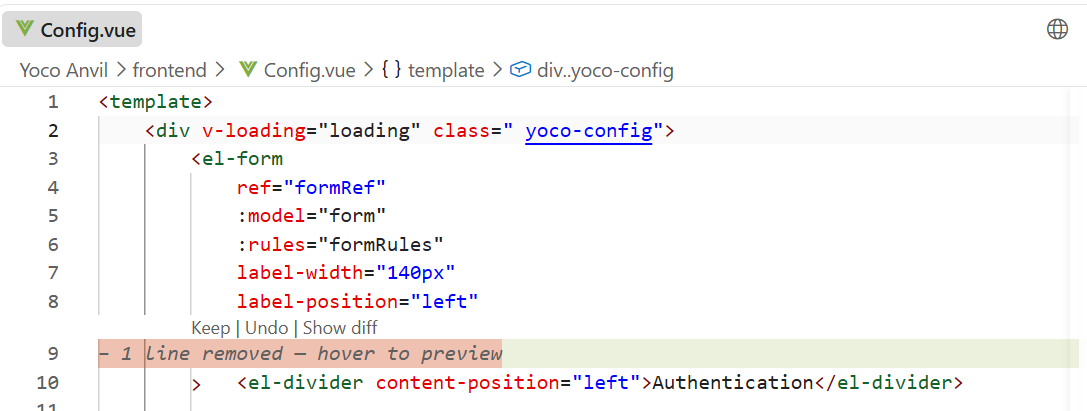
Note: Keep All and Undo All only appear when a file has two or more separate changed regions.
The Action Buttons
Each button operates at a defined scope — either a single changed region, or the whole file:
| Button | What it does | Scope |
|---|---|---|
| Keep | Accepts the external change for that specific region. The highlight clears for that region only; other regions remain highlighted until acted on individually. | Single region |
| Undo | Reverts that specific region back to its state before the external edit. The file content changes immediately, and the highlight clears for that region. | Single region |
| Show diff | Opens a side-by-side comparison tab — left side shows the file as it was when the external change arrived, right side shows the current live version. The tab stays open alongside the original file tab; closing it doesn't affect the file. Inline Keep/Undo buttons remain available while it's open. | Whole file |
| Keep All | Accepts all remaining external changes in the file in one click — equivalent to clicking Keep on every highlighted region in sequence. | Whole file |
| Undo All | Reverts all remaining external changes in the file in one click — equivalent to clicking Undo on every highlighted region in sequence. | Whole file |
How Highlights Clear
Highlights are not time-based — they persist until explicitly resolved. A region clears when any of the following occurs:
- The user clicks Keep or Undo for that region.
- The user clicks Keep All or Undo All to resolve everything at once.
- The user edits the file directly within that region — the extension re-diffs against the original and updates the highlight accordingly. Once the file matches the pre-edit state exactly, all highlights for that region clear.
Hovering Over a Deleted-Lines Banner
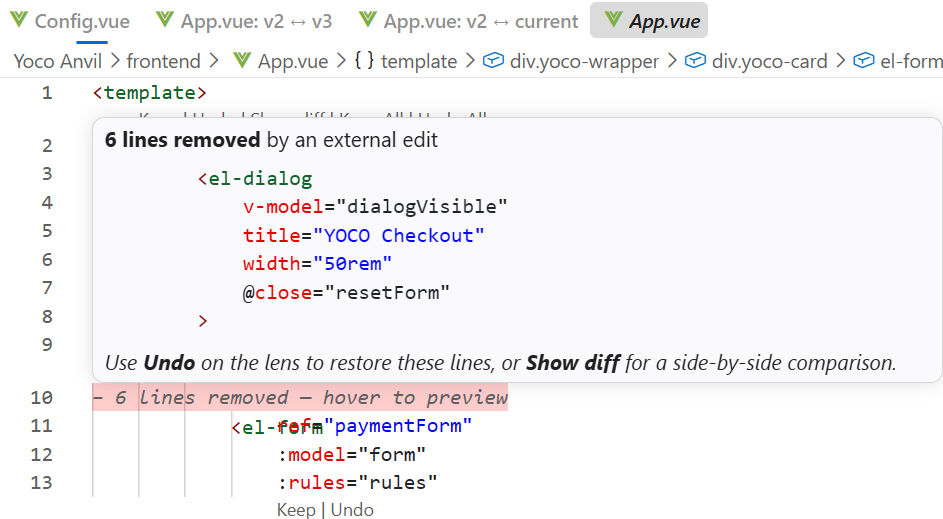
Hovering over the pink "− N lines removed — hover to preview" banner reveals a tooltip containing:
- A bold header stating N lines removed by an external edit.
- A syntax-highlighted code block showing the exact lines that were deleted.
- A reminder that Undo restores the deleted lines, or Show diff opens a side-by-side comparison.
History Panel — Restoring a Previous Version
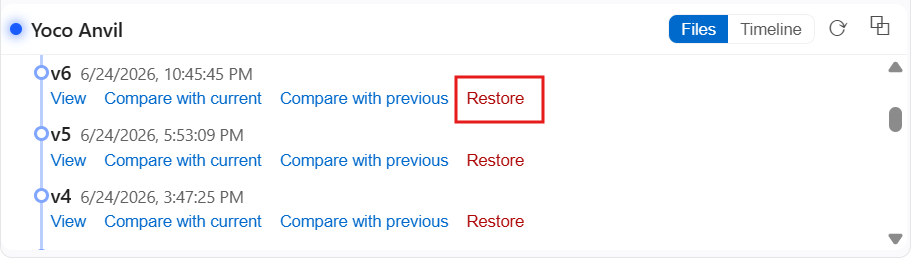
Restoring a file to a previous version through the History panel in the sidebar also triggers External Edit Review:
- Click the desired version in the History panel and choose Restore.
- The file immediately updates to that version.
- External Edit Review highlights appear automatically — the diff shown is between the version that was open at the time of the restore and the version restored to.
- Use Keep, Undo, Keep All, or Undo All as with any other external change.
Why this matters: This gives developers a safety net — they can restore a previous version and then selectively undo parts of the restore if it went further than intended.
Conflict Resolution (Dirty File)
If the file has unsaved edits at the moment an external change arrives, the extension cannot safely overwrite that work. Instead, it opens a separate resolution dialog so the user can compare their version against the incoming server version and decide which to keep.
Important distinction: This dirty-file conflict flow is separate from the External Edit Review feature described in this document — it only applies when there are unsaved local changes.
Extension Settings (for extension users)
These settings are available when using the ConnexCS Connect extension in your own IDE. Open Settings (Ctrl+, / Cmd+,) and search for ConnexCS.
| Setting | What it does |
|---|---|
connexcs.apiHost |
Override the ConnexCS API base URL. Leave blank for the default. |
connexcs.assistant.enabled |
Turn the ConnexCS Assistant on or off. |
connexcs.cli.url |
Override the full WebSocket URL for the CX Terminal. |
connexcs.cli.path |
Override just the path portion of the CX Terminal WebSocket URL. |
connexcs.watch.enabled |
Enable/disable real-time file sync from the server. |
Keyboard Shortcuts
The IDE inherits all standard VS Code keyboard shortcuts. The most relevant ones:
| Action | Shortcut |
|---|---|
| Save file | Ctrl+S / Cmd+S |
| Open command palette | Ctrl+Shift+P / Cmd+Shift+P |
| Quick file open | Ctrl+P / Cmd+P |
| Toggle sidebar | Ctrl+B / Cmd+B |
| Toggle terminal panel | Ctrl+` |
| Trigger auto-complete | Ctrl+Space / Cmd+Space |
| Search in file | Ctrl+F / Cmd+F |
Tips
- Stay signed in: The IDE remembers your session. If you see a 401 error, your session may have expired — the IDE will automatically attempt to renew it. If it cannot, a sign-in prompt will appear.
- One right column: All side panels (ScriptForge preview, Run with Vars dialog, Anvil preview) open as tabs in the same right-side column so they never clutter your screen.
- Right-click for context actions: Right-clicking files and folders in the Explorer shows available actions for that file type (Run, Preview, Show History, etc.).
- Project switching does not require a reload: You can switch projects from the status bar at any time without restarting the IDE.
Signing Out
To sign out, open the ConnexCS sidebar and click Sign Out from the quick-actions list. This clears your session from the IDE.