WebPhone App
Document Metadata
Category: Setup & Configuration → Integrations → WebPhone
Audience: Administrators, Engineers, Support Team
Difficulty: Intermediate
Time Required: 20–30 minutes
Prerequisites: ConnexCS account with WebRTC-capable server setup (TLS, WebSocket, DNS)
Related Topics: API & SDK Integrations (for embedding WebPhone), Certificates & Domain Setup
Next Steps: WebPhone App Platform
Warning
We advise users to switch to this new App Platform (WebPhone App) as the previous WebPhone development has been put on hold.
Introduction
The ConnexCS WebPhone Application is fully customizable. It replaces the old legacy Web Phone Application.
Our new Apps Platform lets you build your ideal and robust WebPhone. You can configure the WebPhone that resonates with your preferences.
Customers can make calls over the internet with the ConnexCS WebPhone App (softphone). It operates straight from a browser, without the need to install any software.
This cross-platform application is ideal for call centers and similar deployments. It works with Windows, Mac, Android, iOS, and other operating systems.
The ConnexCS WebPhone is fully compatible with smartphones, ensuring seamless usability across mobile devices.
Key Components
-
WebRTC: A technology that enables voice and video communication via a web browser.
-
WebPhone: A browser-based SIP client that serves as the user interface for making and receiving calls.
-
SIP Server: The backend component responsible for handling call signaling and connections.
-
DNS Records: Required to configure domain names for WebPhone and WebRTC services.
-
Certificates: Used for secure communications.
Benefits and Features
-
Seamless Browser-Based Communication:
- Eliminates the need for standalone SIP clients.
- Works directly within modern web browsers.
-
Automatic Certificate Deployment: Ensures secure connections without manual intervention.
-
Flexible DNS Configuration:
- CNAME records allow quick switching between servers in case of failures.
- Users can update DNS settings via ConnexCS without downtime.
-
Multi-Server Support:
- Customers can distribute traffic across multiple WebRTC servers.
- Ensures redundancy and failover support.
Technical Details
Application
ConnexCS WebPhone is a PWA-based WebRTC application.
WebRTC (Real-Time Communications) is a browser protocol that runs on top of an HTTPS connection.
ConnexCS WebPhone uses WebRTC (HTTPS port 443) for SIP Signaling and WebSockets (random UDP ports) for the Media.
BitDefender and WebSockets
BitDefender blocks WebSockets unless the phone and WebRTC domains get whitelisted.
A PWA (Progressive Web Application) is an application written inside the web browser, and it uses a modern API.
State-level firewalls
WebRTC is effective for bypassing state-level firewalls by:
- Running Signaling over a widely unblocked port (443).
- Sending all Data (Signaling and Media) over an encrypted connection.
Security and Encryption
ConnexCS WebPhone encrypts all information (Signaling & Media) between the browser and the ConnexCS platform.
You can achieve this by leveraging TLS (Transport Layer Security) protocol support on the underlying browsers. Presently, all modern browsers support TLS 1.0, 1.1, 1.2 & 1.3.
MITM (Man-in-the-Middle) attacks actively intercept traffic between endpoints, while still operating within a TLS framework. This kind of attack counteracts with PKI (Public Key Infrastructure), a native HTTPS feature.
PKI ensures end-point integrity, so you can be confident that the endpoint you connect with is the one you expect, without any intermediaries.
Debugging SIP Messages
If you need to debug Web Phone and see the SIP messages, you can enter *#0*# into the dial pad, this will switch on debugging mode in the browser console.
Configure WebPhone
Tip
Before you proceed with installing and using the WebPhone Application, make sure you meet the necessary prerequisites.
-
A working ConnexCS account.
-
Servers are deployed.
-
WebRTC is configured. (Before proceeding, ensure that WebRTC is properly configured. If you haven’t set it up yet, click on the link to get started.)
Step 1: Installing
- Login to your account.
- Navigate to Setup App Store.
- Click on Install.

- Click Install again.

- The WebPhone app is now installed. Click the installed app to continue with its configuration.

Step 2: Configuration
- Click
Webphone Config. Here you set up SIP server connections, WebSocket settings, general WebPhone behaviour, the custom design and custom domains.
-
Webphone Config: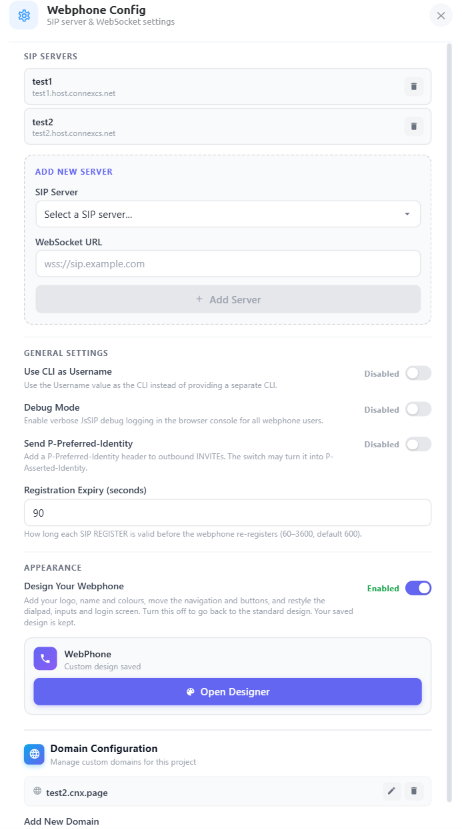
-
SIP Servers: Lists the SIP servers configured for the project. Each entry shows the server alias (for exampletest1) and its host (for exampletest1.host.connexcs.net). Click the 🗑 icon next to a server to remove it. If no servers have been added, the messageNo servers configured yetis displayed. -
Add New Server: Configure and add a SIP server.SIP Server: Select one of your active ConnexCS servers from the drop-down list, or selectCustom.Custom SIP Server: Appears only whenCustomis selected. Enter the hostname or address of the custom SIP server, such assip.example.com.WebSocket URL: Enter the secure WebSocket URL the WebPhone uses to connect to the SIP server, such aswss://sip.example.com.Add Server: Adds the SIP server to the list. The button stays disabled until a SIP server and a WebSocket URL are provided.
-
General Settings: Configure the general behaviour of the WebPhone. Each switch showsEnabledorDisabled.Use CLI as Username: When enabled, uses the Username as the Calling Line Identification (CLI), so users don't need to enter a separate CLI.Debug Mode: When enabled, writes verbose JsSIP debug logs to the browser console for all WebPhone users. Users also need this enabled to open theCall Metricspage.Send P-Preferred-Identity: When enabled, adds aP-Preferred-Identityheader to outbound INVITEs. The switch may turn it intoP-Asserted-Identity.Registration Expiry (seconds): How long each SIP REGISTER stays valid before the WebPhone re-registers. Enter a value from60to3600seconds. The default is600; the screenshot shows90.
-
Appearance: Controls whether users see your custom design.Design Your Webphone: When enabled, users see the design you built in the designer (logo, name, colours, navigation, dialpad, inputs and login screen). When disabled, users see the standard design, but your saved design is kept so you can turn it back on.Design status card: Shows the app name (for exampleWebPhone) and whether a custom design has been saved (Custom design saved).Open Designer: Opens the Design Your Webphone Studio, where you customise and save the design. See Design Your Webphone for details.
-
Domain Configuration: Manage the custom domains for the project.Configured Domains: Lists the custom domains already added, such astest2.cnx.page. Click ✏ to edit a domain or 🗑 to delete it. If no domains have been added, the messageNo domains configured yetis displayed.Add New Domain: Enter the domain name to add, such asexample.com.Add: Adds the domain to the project. You can also press Enter. The button stays disabled until a domain is entered.
You can change these settings later, for example if you want to deploy the WebPhone on your own domain.
Step 3: Create Certificates
There are 2 ways to create a certificate:
-
Use ConnexCS's domain, for example
yourservername.host.connexcs.net. -
Use your own domain.
-
SIP Switch (Domain B): Create the WebRTC domain and it's CNAME should point towards the DNS you create.
-
Navigate to Setup Settings DNS to create your DNS.
-
Enter the domain (ex: test1), then select the checkbox for the A record for the IP of the server you want to use.
- Setup a DNS (Domain Name System) record within ConnexCS, then point a
CNAMEon your domain to the ConnexCS setup domain.
-
-
After you configure the domains, verify the certificates in Setup Information Certificates.
-
Step 4: Add WebRTC to server
To setup WebRTC on a server:
- Ensure Domain (B) (signaling domain from above) points ONLY to the server where you enable WebRTC.
- Navigate to Setup Settings Servers select the server, then Edit.
- Update the FQDN (Fully Qualified Domain Name) to the server.
- Ensure that you enable both TLS and WebRTC.
- Run
Install Serverif any settings gets changed.
AnyEdge and WebRTC
If you are using AnyEdge, you can enable WebRTC automatically by adding a domain name to your AnyEdge Domain.
Custom Domain Setup
Step 1: Set up the CNAME record
-
Access your domain account at your domain host.
-
Locate the page for updating your domain's DNS (Domain Name System) records.
-
Locate the
CNAMErecords for your domain. -
Add a new domain record such as
app.mycustomdomain.com. -
Point it toward
cnx.page.
Step 2: Add a Domain to App
Click here to check the steps for adding the Domain to your App.
Step 5: Login
- Now let's have a look at the deployed domain.
- Enter in the domain name in the URL e.g.,
test4.cnx.page. - A login window will appear withe th following fields:
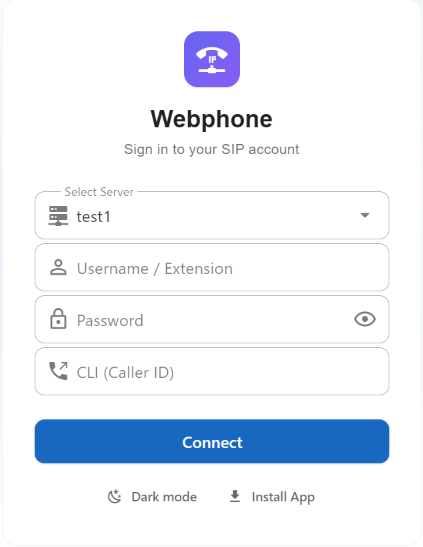
- Select a Server from the dropdown if
multiple serversare available. If onlyone serverhas been added, it is selected automatically. Ifno servershave been added, you will need to enter the server details manually. - Enter the SIP Username.
- Enter the Password.
- Enter the CLI only if the
Use CLI as Usernamesetting is enabled. - After logging in you can dial from your WebPhone.
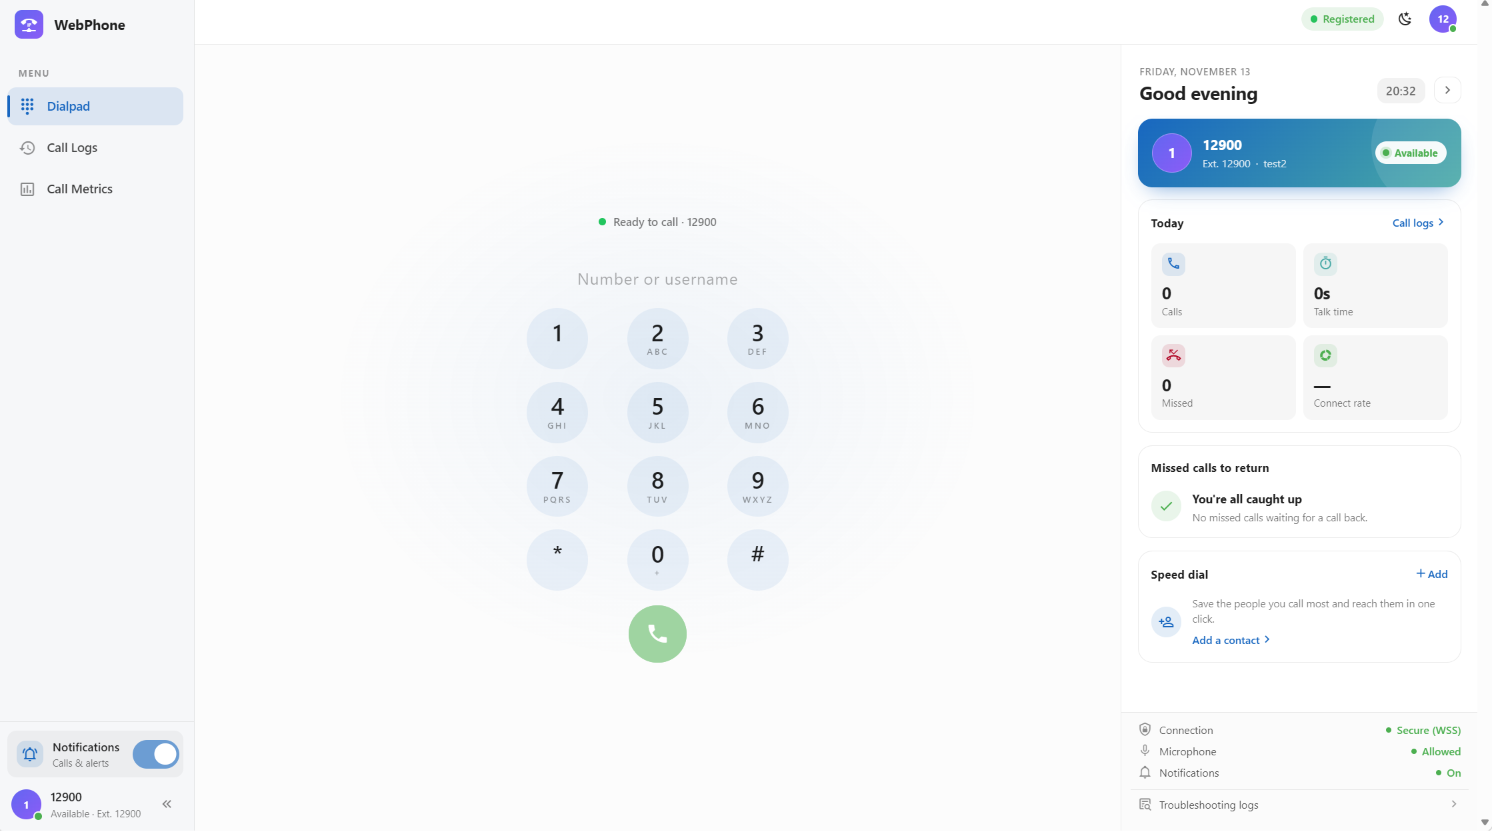
Navigation
Note: When Debug Mode is enabled, the Console option becomes available, displaying call-related information that you can use to troubleshoot and debug calls.
This is a browser-based softphone (a SIP phone that runs in the browser). Here's what each part of the screen means.
Top bar
- Registered (green): Your extension has successfully signed in to the phone server (SIP registration). If it turns red or says "Unregistered," you can't make or receive calls.
- Moon icon: Switches between light and dark mode.
- Avatar: Your profile/account menu (initials from your extension).
Left sidebar
- Dialpad: The calling screen you're on now.
- Call Logs: History of incoming, outgoing and missed calls.
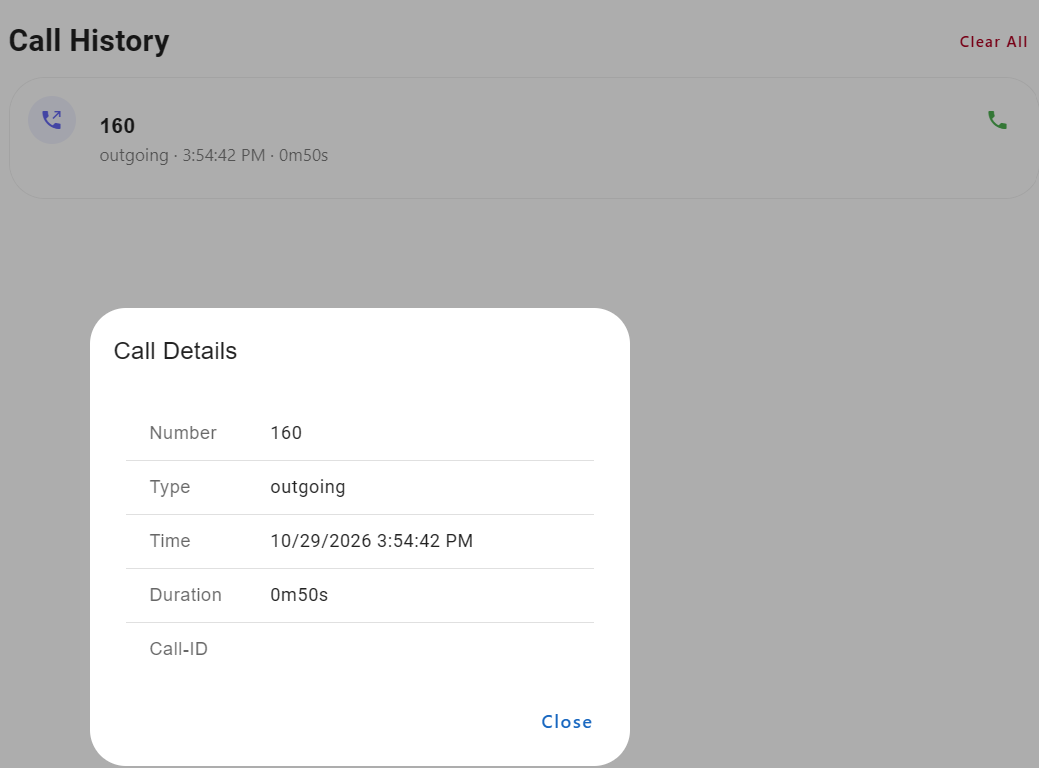
- Call Metrics: Stats and reports about your calling activity.
- Notifications toggle: Turns browser alerts on or off for incoming calls and other alerts.
- 12900 · Available · Ext. 12900: Your extension number and current presence status. The
«button collapses the sidebar.
Center (dialpad)
- Ready to call · 12900: The phone is idle and ready, using extension 12900.
- Number or username: Type a phone number, extension, or SIP username to call.
- Keypad: Standard phone keys. The letters (ABC, DEF…) are for vanity numbers.
*and#are used for feature codes and phone menus. Holding0usually enters+for international numbers. - Green call button: Starts the call. It looks faded because no number has been entered yet.
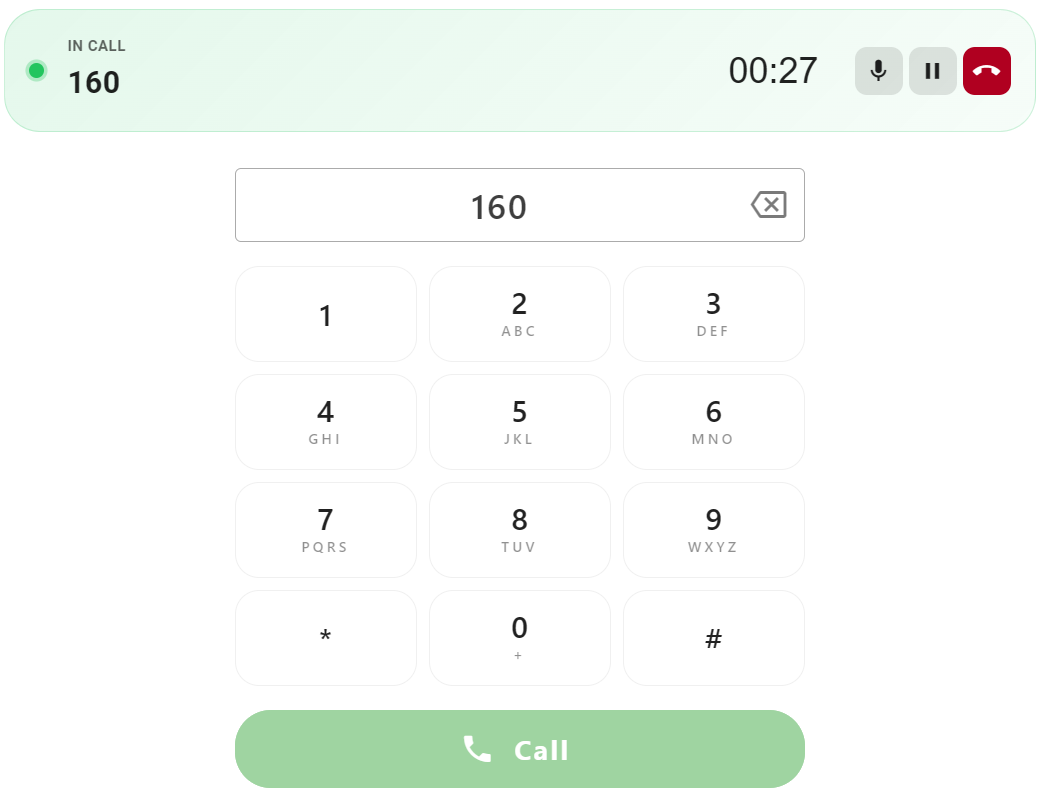
- Hangup: Disconnect the call.
- Call Hold: Hold the call.
- Clipboard: When you copy something on your computer, it's stored on the clipboard. You can then paste it on the Webphone.
- Current Call Time: Displays the duration of the ongoing call.
Right panel
- Date, greeting and clock (20:32): Current day and time. The
>arrow likely collapses this panel. - Profile card: Shows your extension (12900), and "test2" is probably the display name or account/tenant label. Available means you're accepting calls; clicking it usually lets you change to Busy, Away or Do Not Disturb.
- Today:
- Calls: Total calls made or received today.
- Talk time: Total time spent on connected calls.
- Missed: Incoming calls you didn't answer.
- Connect rate: The share of calls that actually connected. It shows "—" because there are no calls yet to calculate from.
- Missed calls to return: A callback list. "You're all caught up" means nothing is pending.
- Speed dial: Save frequent contacts for one-click calling (+ Add / Add a contact).
- Log Out (top-right): Click on this button to sign out of the Webphone.
Bottom status checks
- Connection: Secure (WSS): The phone talks to the server over an encrypted WebSocket, which is good.
- Microphone: Allowed: The browser has permission to use your mic, which calls need.
- Notifications: On: The browser can show alerts for incoming calls.
- Troubleshooting logs: Technical logs (SIP messages, errors) that are useful if calls fail or audio has problems.
Troubleshooting Logs
Troubleshooting Logs in ConnexCS WebPhone provide diagnostic information about calls made or received during the current session.
Users can review call status, termination details, call timing, and a chronological timeline of call events to understand how a call progressed and identify potential issues.
The logs remain in memory for the current session only. Users can inspect individual call records, copy the diagnostic information, or download a call log for further analysis.
Key Features
- Call history: Displays calls captured during the current WebPhone session.
- Call status: Identifies the call outcome, such as a normal termination.
- Call details: Displays information such as call direction, number, start time, answer time, talk time, and termination cause.
- Event timeline: Shows call events in chronological order with timestamps.
- Copy logs: Copies the available call log information for further investigation.
- Download call log: Downloads the diagnostic information for offline review.
- Session-based storage: Keeps troubleshooting logs in memory for the current session only.
How to Use?
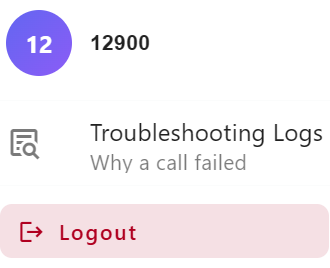
Step 1 — Open Troubleshooting Logs
- Open ConnexCS WebPhone.
- Open the navigation menu.
- Select Troubleshooting Logs, labelled Why a call failed.
Step 2 — Review the call list
The Troubleshooting Logs panel displays the calls captured during the current session.
Each call entry includes the following information:
| Field | Description |
|---|---|
| Number | Displays the phone number or destination associated with the call. |
| Call summary | Provides a brief description of the call outcome, such as Hung up from this webphone. |
| Date and time | Displays when the call event occurred. |
| Status label | Indicates the call classification, such as Normal. |
| Arrow (>) | Opens the detailed troubleshooting information for the selected call. |
The panel also includes a close (X) button to close the troubleshooting view.
Screenshot explanation:
The example shows call 160, with the summary Hung up from this webphone, recorded on October 29, 2026, at 6:47:34 PM. The Normal status indicates that the call ended normally rather than being identified as a failure. 
Step 3 — Inspect the call details
- In the Troubleshooting Logs panel, select the call you want to investigate.
- The call details view opens.
- Review the call status, call information, and event timeline.
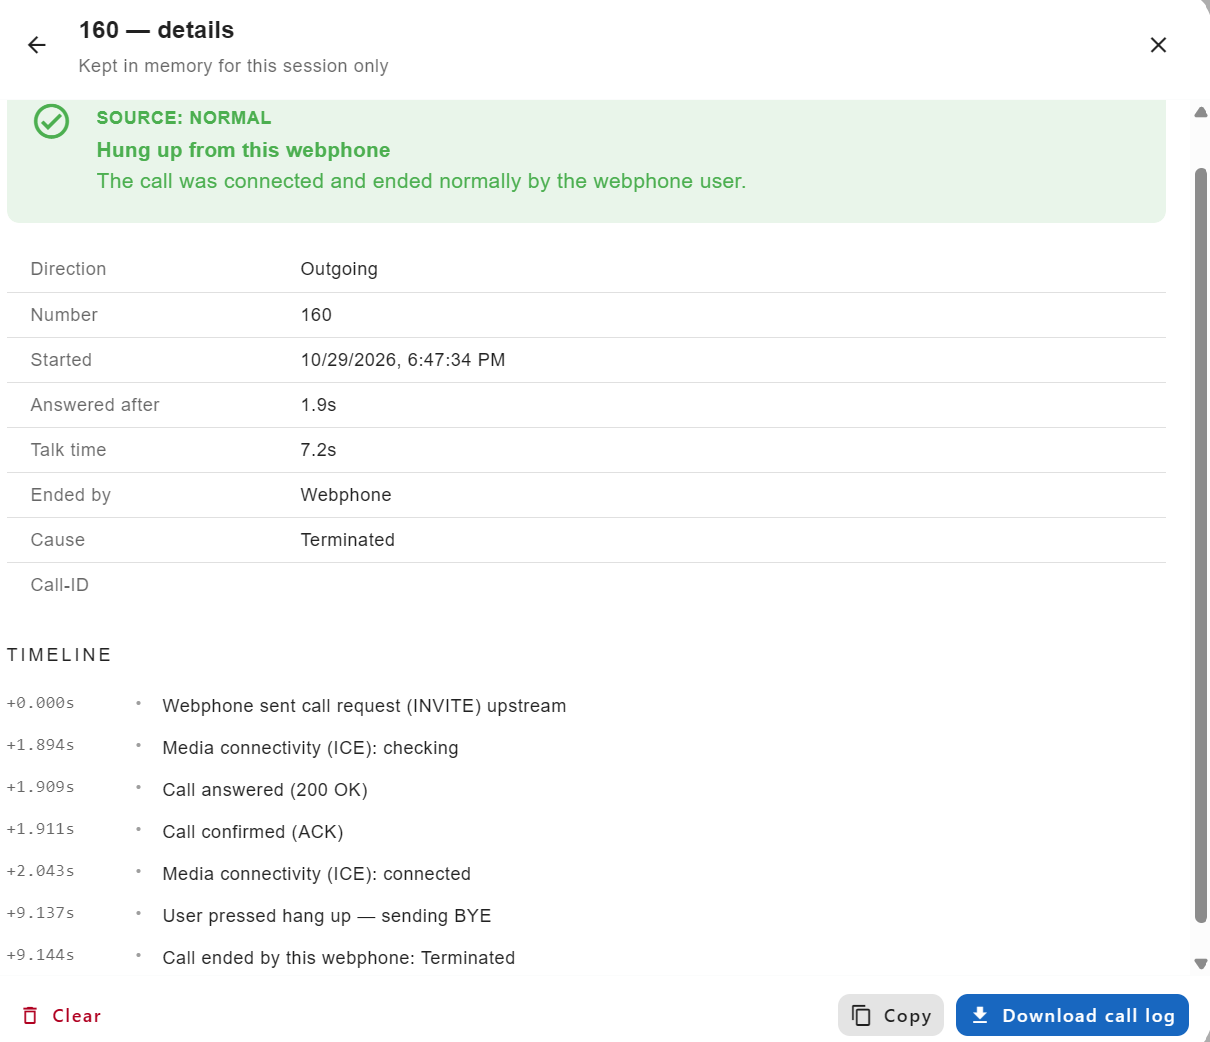
Call status summary
The top section displays a status message explaining the call outcome.
In the example screenshot:
- Source: Normal: Identifies the classification assigned to the call.
- Hung up from this webphone: Indicates that the WebPhone user ended the call.
- Status description: Explains that the call connected and ended normally through the WebPhone.
The status summary helps determine whether the call completed as expected before examining the detailed events.
Call details fields
| Field | Description |
|---|---|
| Direction | Indicates whether the call was outgoing or incoming. |
| Number | Displays the number associated with the call. |
| Started | Displays the date and time when the call started. |
| Answered after | Displays the elapsed time between call initiation and answer. |
| Talk time | Displays the duration of the connected conversation. |
| Ended by | Identifies the endpoint or party recorded as ending the call, such as WebPhone. |
| Cause | Displays the recorded call termination cause, such as Terminated. |
| Call-ID | Displays the call identifier when available. This can help correlate the call with other diagnostic records. |
Screenshot explanation:
The example shows an outgoing call to 160. The call was answered after approximately 1.9 seconds, remained connected for 7.2 seconds, and was ended by the WebPhone. The recorded cause is Terminated.
These fields provide a summary of the call lifecycle and help distinguish between call setup issues, answer delays, and call termination events.
Step 4 — Review the event timeline
The Timeline section displays call events in chronological order. Each entry includes a relative timestamp and a description of the event.
The example screenshot shows the following sequence:
| Timestamp | Event | Explanation |
|---|---|---|
+0.000s |
WebPhone sent call request (INVITE) upstream | The WebPhone initiated the call by sending a SIP INVITE request. |
+1.894s |
Media connectivity (ICE): checking | The WebPhone began checking possible network paths for media connectivity. |
+1.909s |
Call answered (200 OK) | A successful SIP response indicated that the call was answered. |
+1.911s |
Call confirmed (ACK) | The WebPhone sent an acknowledgement confirming the successful call setup. |
+2.043s |
Media connectivity (ICE): connected | The media connectivity check completed successfully. |
+9.137s |
User pressed hang up — sending BYE | The WebPhone user initiated call termination. |
+9.144s |
Call ended by this webphone: Terminated | The call ended, and the WebPhone recorded the termination event. |
The timestamps are relative to the start of the call. They help establish the order of events and identify delays between call setup, answer, media connectivity, and termination.
Note: The example represents a call that connected and ended normally. If a call fails, examine the timeline for unsuccessful responses, missing expected events, media connectivity issues, or unexpected termination messages. The precise events displayed depend on the call and the diagnostic information available.
Step 5 — Copy or download the call log
The call details view provides the following actions at the bottom of the panel:
- Clear: Clears the troubleshooting logs from the current session.
- Copy: Copies the available call log information so it can be shared or reviewed elsewhere.
- Download call log: Downloads the call log for further investigation or to share with the support team.
To investigate a call:
- Open the relevant call record.
- Review the status summary, call details, and timeline.
- Click Copy to copy the log or Download call log to save it.
- Review the diagnostic information or provide it to the technical support team when assistance is required.
Important: Use Clear carefully, as it removes the available troubleshooting logs from the current session. The logs are session-based and should be copied or downloaded before the session ends if they're needed later.
Troubleshooting Guidelines
| Observation | What to check |
|---|---|
| The call wasn't answered. | Review the call timeline for SIP responses and check whether an answer event appears. |
| The call connected but had no audio. | Inspect the ICE connectivity events and investigate possible network or media connectivity issues. |
| The call ended unexpectedly. | Check the Ended by field, termination cause, and final timeline events. |
| The call took too long to connect. | Compare the call initiation, answer, and media connectivity timestamps. |
| Further investigation is required. | Copy or download the call log and correlate the available details with other diagnostic records. |
WebPhone Console (Debug Mode)
The WebPhone Console displays diagnostic messages that help troubleshoot SIP registration, authentication, signalling, and call connectivity issues. When Debug Mode is enabled, users can access the browser's Developer Tools to inspect these messages.
How to Access the Console
- Enable Debug Mode in WebPhone.
- Press F12 on your keyboard to open the browser's Developer Tools.
- Select the Console tab to view the diagnostic messages generated by WebPhone.
Console Fields and Messages
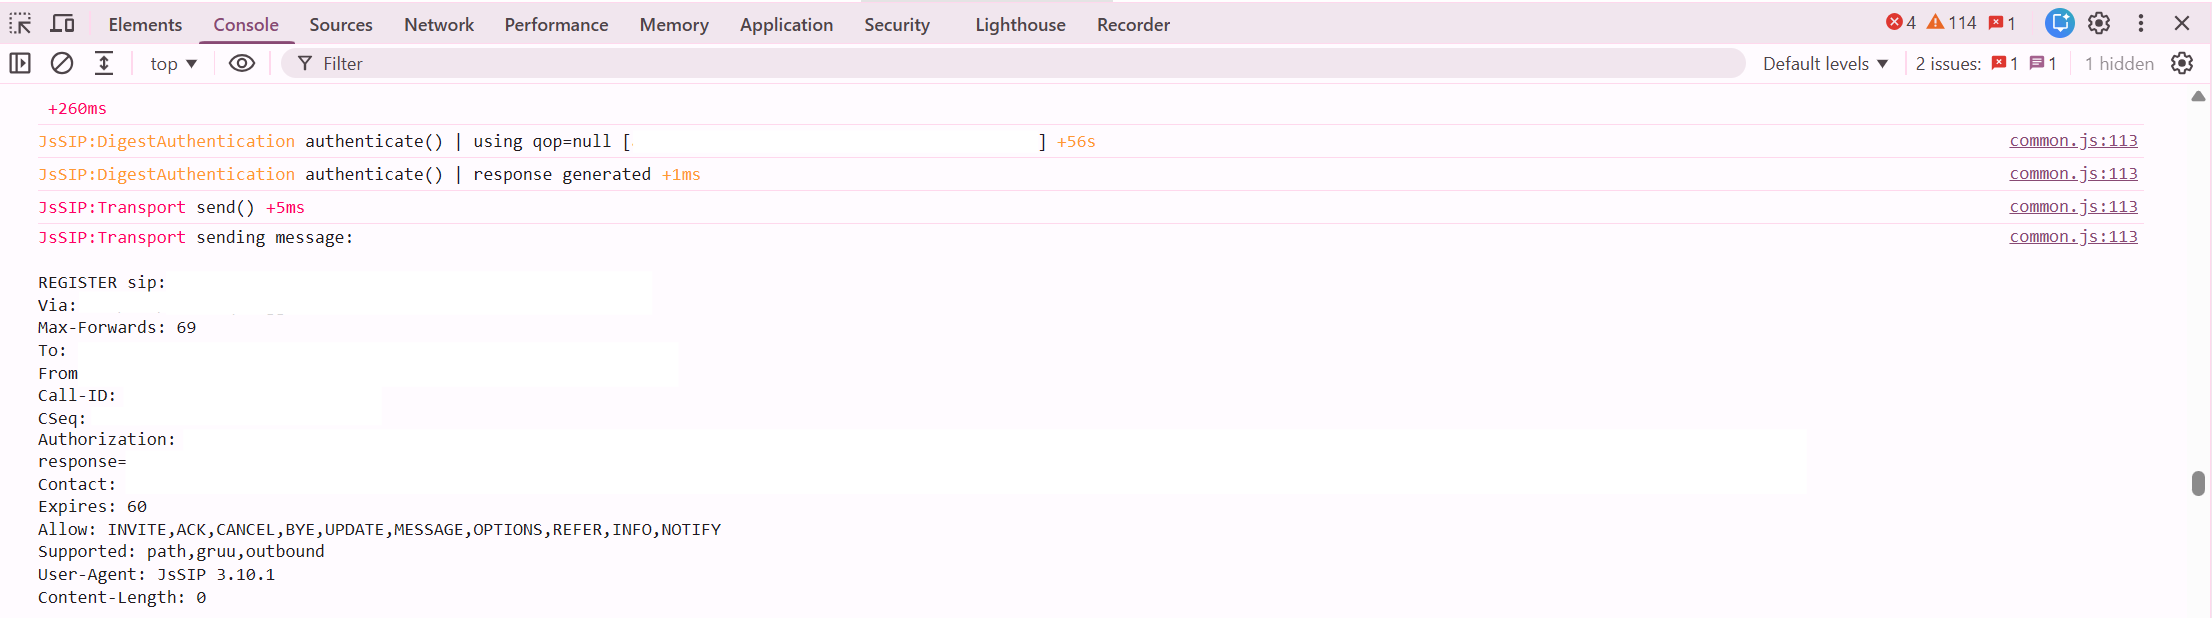
The Console displays various diagnostic messages and SIP protocol details.
JsSIP:DigestAuthentication: Displays SIP digest authentication activity, including the generation of authentication responses.JsSIP:Transport: Displays transport activity, such as sending SIP messages.REGISTER sip: Indicates that WebPhone is sending a SIP registration request to register its endpoint.Via: Contains routing and transport information for the SIP request.ToandFrom: Identify the intended recipient and the originator of the SIP request.Call-ID: Provides a unique identifier used to correlate SIP messages belonging to a call or signalling transaction.CSeq: Identifies the sequence number and method of a SIP request.Authorization: Contains authentication information used to authorize the SIP request.Contact: Specifies the contact address associated with the SIP endpoint.Expires: Indicates the requested registration expiry interval. In the screenshot, the value is60seconds.Allow: Lists the SIP methods supported by the endpoint, such asINVITE,ACK,CANCEL, andBYE.Supported: Lists additional SIP protocol extensions supported by the endpoint.User-Agent: Identifies the SIP library and version used by WebPhone. The screenshot showsJsSIP 3.10.1.Content-Length: Indicates the length of the SIP message body in bytes. A value of0means the message has no body.
Troubleshooting
Use the Console to investigate issues such as failed registration, authentication errors, or unsuccessful call setup. Review the sequence of messages and any error responses to identify where the process fails.
Note: Console output may contain sensitive information. Avoid sharing logs publicly, particularly when they include authentication headers or account details. Redact sensitive information before sharing logs with the ConnexCS support team.